A popular server-side technology that makes it possible to create dynamic, platform-independent web applications is Java Server Pages (JSP). Because it enables developers to embed Java code directly within HTML pages, it makes creating Java-based online apps easier.
Let's understand what JSP in Java is and its features, benefits, architecture, and applications.
What is JSP in Java?
JSP (Java Server Pages) is a technology developed by Sun Microsystems (now Oracle) that allows developers to create dynamic web content using Java. It is an extension of Servlets, offering a more flexible and readable way to embed Java logic within HTML.
Unlike Servlets, which require Java code for everything, JSP allows developers to use special JSP tags to integrate Java logic within an HTML page. This makes JSP a preferred choice for web applications requiring dynamic content generation.
Learn Java the right way! Our course teaches you essential programming skills, from coding basics to complex projects, setting you up for success in the tech industry.
Get started with this Free Introduction to Servlets and JSP course and learn to build dynamic web applications.
Key Features of JSP
- Separation of Business Logic and Presentation: Unlike Servlets, JSP enables better separation between UI (HTML) and backend logic (Java code).
- Reusability: JSP supports reusable components like JavaBeans, custom tags, and Expression Language (EL).
- Simplified Code Management: HTML and Java code can coexist in a single file, making development more intuitive.
- Platform Independence: Runs on any platform that supports a Java Virtual Machine (JVM), ensuring broad compatibility.
- Built-in Session Management: JSP provides built-in session tracking, making state management easier.
Suggested: Why is Java Platform Independent?
JSP Architecture: How Does JSP Work?
JSP follows a request-response cycle similar to Servlets but with an additional step for compilation. Here's how JSP works:
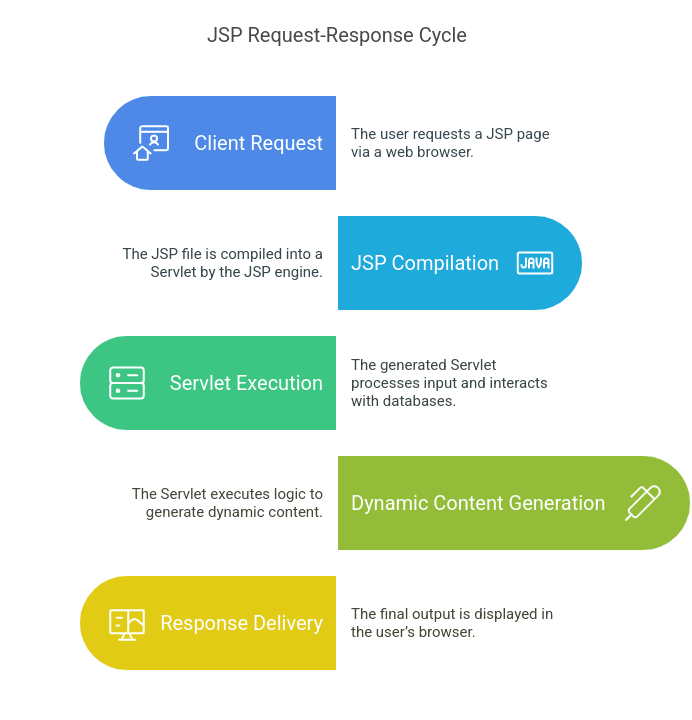
- Client Request: The user requests a JSP page via a web browser.
- JSP Compilation: The JSP file is compiled into a Servlet by the JSP engine.
- Servlet Execution: The generated Servlet processes user input, interacts with databases, and generates the necessary HTML response.
- Dynamic Content Generation: The compiled Servlet executes the logic and sends an HTML response to the client.
- Response Delivery: The final output is displayed in the user's browser.
Since JSP pages are converted into Servlets, they offer the same performance and scalability benefits as Java Servlets.
JSP vs. Servlets: Understanding the Differences
| Feature | JSP | Servlets |
| Syntax | HTML with embedded Java | Pure Java code |
| Readability | Easier for designers | More complex for non-developers |
| Maintenance | Easier due to separation of concerns | Harder to maintain |
| Performance | Slightly slower due to compilation overhead | Faster execution |
JSP is ideal for UI-focused web applications, while Servlets are better suited for backend logic handling.
Learn the fundamentals of Java Servlets and how they enhance web application development.
Core Components of JSP
1. JSP Directives
JSP directives provide instructions to the JSP container about how to process the page. Common directives include:
- page directive: Defines page attributes like language, error handling, and buffer size.
- include directive: Includes content from another file.
- taglib directive: Declares custom tag libraries.
Example:
<%@ page language="Java" contentType="text/html; charset=UTF-8" %>
2. JSP Scriptlets
Scriptlets allow embedding Java code within HTML.
Example:
<%
String message = "Hello, JSP!";
%>
<p><%= message %></p>
Here, <%= message %> dynamically outputs the Java variable value.
3. JSP Expressions
Expressions are used to output values directly within an HTML response.
Example:
<p>Current time: <%= new java.util.Date() %></p>
This dynamically displays the current server time.
4. JSP Declarations
Declarations define class-level variables and methods.
Example:
<%! int count = 0; %>
By doing this, an integer variable that holds its value throughout requests is declared.
Advantages of JSP in Java
- Simplified Web Development: By embedding Java code into HTML, JSP makes web development faster and more intuitive.
- Enhanced Maintainability: With JSP, business logic can be separated from presentation using JavaBeans and MVC architecture.
- Session Management: JSP provides built-in session tracking to maintain user states.
- Integration with Java Technologies: Works seamlessly with Java Servlets, JDBC, and JavaBeans.
- Scalability: JSP is highly scalable and can handle large enterprise applications efficiently.
Common Use Cases for JSP
JSP is used by many industries to build interactive web applications. Here are some common use cases:
1. E-commerce Websites
JSP is used in e-commerce platforms for:
- Displaying dynamic product listings.
- Handling user authentication and session management.
- Processing shopping cart functionality.
2. Content Management Systems (CMS)
JSP is used in CMS solutions to:
- Storing and updating digital content.
- Provide user authentication for restricted content.
3. Online Forms & Surveys
JSP is effective in creating online forms that:
- Collect and process user input.
- Store data in a backend database(db).
4. Enterprise Applications
JSP is used in enterprise software solutions, such as HR and finance applications, due to its scalability and security features.
Challenges and Considerations
While JSP offers several benefits, developers must be aware of the following challenges:
- Performance Overhead: The compilation of JSP pages may introduce a slight delay in execution.
- Security Risks: If not implemented properly, JSP applications can be vulnerable to SQL injection, cross-site scripting (XSS), and session hijacking.
- Complexity in Large-Scale Projects: For extensive applications, adopting Java frameworks like Spring MVC is often a better choice.
To mitigate these challenges, developers should follow best coding practices, implement security mechanisms, and optimize application performance.
Future of JSP: Is JSP Still Relevant?
With the rise of JavaScript frameworks like React, Angular, and Vue.js, as well as microservices-based architectures, the use of JSP in Java has declined for front-end development.
However, JSP is still widely used in enterprise applications, particularly in backend development, and continues to be relevant in Java EE applications. It is often combined with Spring, Hibernate, and Struts frameworks to build robust enterprise solutions.
For new projects, developers often prefer modern Java frameworks like Spring Boot with Thymeleaf, but JSP remains a crucial technology for maintaining legacy Java applications.
Suggested: How to Become a Java Developer?
Conclusion
JSP is a powerful and flexible technology that simplifies Java-based web development. It allows developers to easily create dynamic, scalable, and maintainable web applications.
While modern web development trends have shifted towards JavaScript frameworks, JSP still holds its place in enterprise software development.
Frequently Asked Questions(FAQ's)
1. Can JSP be used without Servlets?
No, JSP is internally converted into Servlets by the application server. It cannot function independently without Servlet support. Servlets handle backend logic while JSP manages UI rendering.
2. How does JSP handle form data submission?
JSP retrieves form input using request.getParameter(). It processes user data and can store it in databases or display it dynamically. Example:
<%= request.getParameter("name") %>
3. Is JSP still used in modern web development?
JSP is less common for new projects but is still used in enterprise applications. Many legacy Java systems rely on JSP for server-side rendering. Modern alternatives include Spring Boot and Thymeleaf.
4. What are JSP implicit objects?
JSP provides built-in objects like request, response, session, and application. These simplify web development by allowing direct access to HTTP data. No explicit declaration is needed.
5. Can JSP be used with JavaScript?
Yes, JSP can generate JavaScript dynamically using embedded Java code. JavaScript runs on the client side, while JSP executes on the server before sending the response.