
This android interview question and answer can help fresh android aspirants
- What is Android?
Android is an open-source and Linux-based Operating System for mobile devices such as smartphones and tablet computers. Android developers create the programs using the free Android Software Development Kit (SDK) to develop android.
- What is Android Studio?
Android Studio is the official integrated development environment for Google's Android operating system, built on JetBrains' IntelliJ IDEA software and designed specifically for Android development.
- Who is the founder of Android?
Andy Rubin, Nick Sears and Rich Miner.
- Why Android Studio?
Android Studio provides a unified environment to build apps for Android phones, tablets, Android Wear, Android TV, and Android Auto. Structured code modules allow you to divide your project into units of functionality to build, test, and debug independently.
- What are the code names of Android?
- Aestro
- Blender
- Cupcake
- Donut
- Éclair
- Froyo
- Gingerbread
- Honeycomb
- Ice Cream
- Sandwich
- Jelly Bean
- KitKat
- Lollipop
- Marshmallow
- How to install android studio?
To install android studio, one should follow the below link:
- How to change the app icon in android studio?
To change the app icon in android studio, one should follow these steps:
Step 1: Open your application in Android Studio.
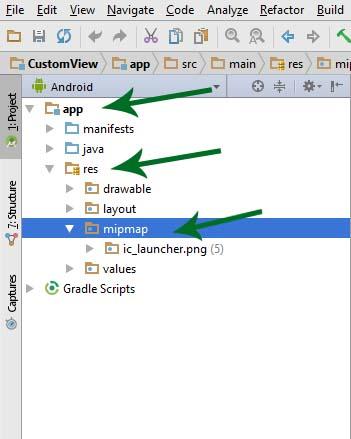
Step 2: Further follow the path to reach the desired folder to add an icon (app -> res-> mipmap).
Step 3: Here, add your app icon. You can just simply copy and paste the image into the mipmap folder.
Step 4: After placing the image in the mipmap folder. You need to rename the default icon name to your icon image name.
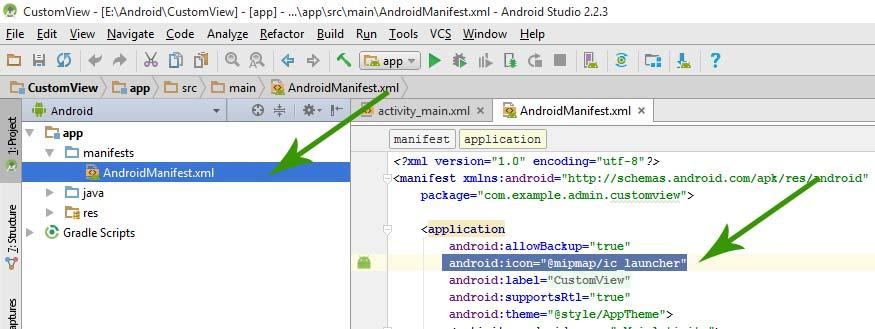
Step 5: Go to (app -> manifests) open the AndroidManifest.xml file. Here find the following code.
android:icon=”@mipmap/ic_launcher”
Here ic_launcher is the default image name; rename it.
- How to change project name in android studio?
There are five methods to change the project name in android studio.
Method 1
Step 1: Click on the Setting Icon and Uncheck Compact Middle Packages

Step 2: Click on your Project Name and Go to Refractor > Rename

Step 3: Click on Rename Packages

Step 4: Change the package name and click on Refractor

Step 5: Click on Do Refractor, and then you will fill in, finding that the project name is changed

Method 2: Open app/build.gradle and change this line

Method 3: Update app/src/main/res/values/strings.xml

Method 4: Open settings.gradle and change this line

Method 5: Open app/src/main/AndroidManifest.xml and change the following line

- How to use the android studio?
Step 1: Download android studio by using this - https://developer.android.com/studio and install it.
Step 2: Open a New Project.


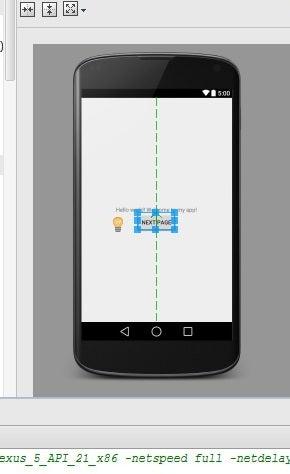
Step 3: Edit the Welcome Message in Main Activity and activity_main.xml

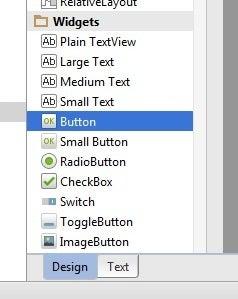
Step 4: Add a Button to the Main Activity in activity_main.xml
Step 5: Create a Second Activity


Step 6: Write the Button's "onClick" Method in Mainactivity.


Step 7: Test the Application


Step 8: Application is ready


- How to create a login page in android studio?
To create a login page in android studio, we can follow this java coding.

- How to update android studio?
To update the latest version of android studio, you should follow the below steps:
Step 1: Start Android Studio
Step 2: To check for the latest update available for download, you can use any of these methods
- On the Android Studio landing page, select Configure > Check for Update.

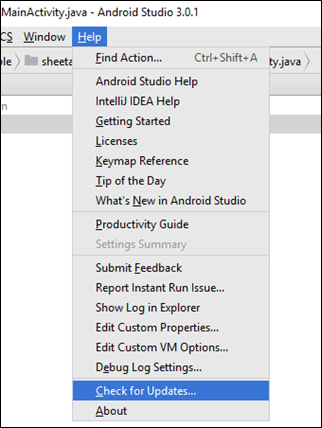
- From your Android Studio application toolbar, select Help > Check for Updates.
- How to install an android studio in windows 10?
Step 1: Download the latest version of android studio.
Step 2: Right-click on the downloaded .exe file and run as administrator.
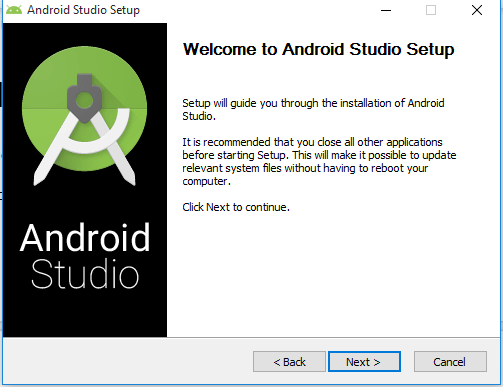
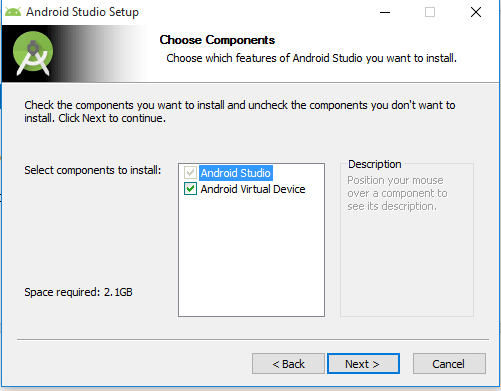
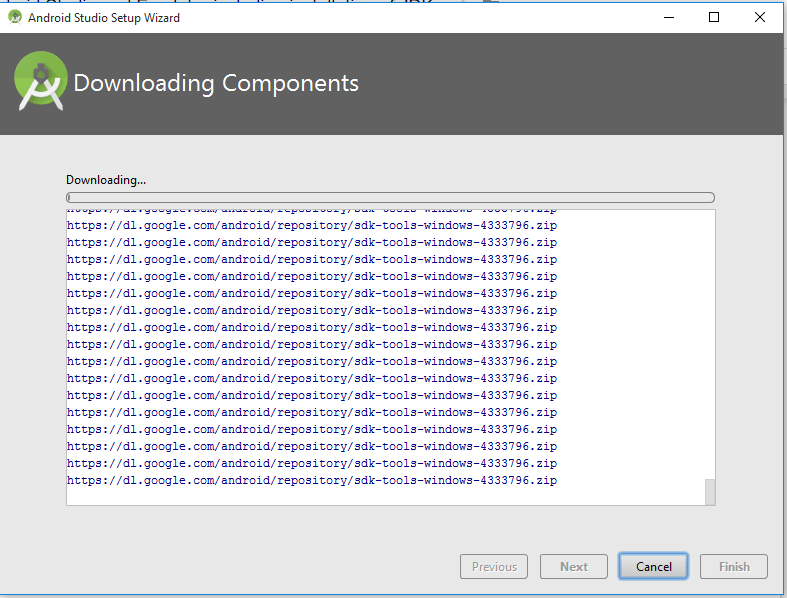
Step 3: You will see the below Android Studio setup wizard, here you should click next.
Step 4: Select Android Virtual Device and click on Next.
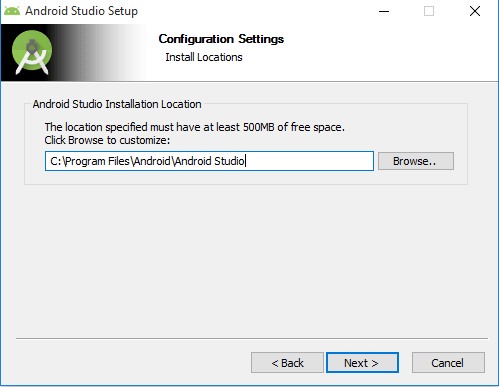
Step 5: It will show the installation path, default it could be in C:\Program Files\Android\; if you want to change the installation directory, you can freely use the Browse button and give the location and click on Next.
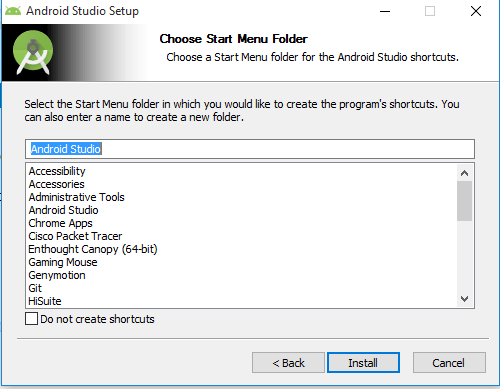
Step 6: Click on Install.
Step 7: Actual installation in progress. After completing the installation process click on Next.

Step 8: Tick on Start Android Studio and Click on Finish.

Step 9: Here is the Android Studio, Welcome Screen, and you Click on Next.

Step 10: It will ask for the Android Studio installation type. We can mostly go with a standard setup; if you have any specific configuration setup, you can select the Custom option for manual setup. Now I am choosing Standard Setup. Then click on next.

Step 11: It will ask for the UI Theme; by default,, it would be IntelliJ, then directly you can click on Next.

Step 12: It will ask for confirmation for the installation setting wizard. Then click on Next.
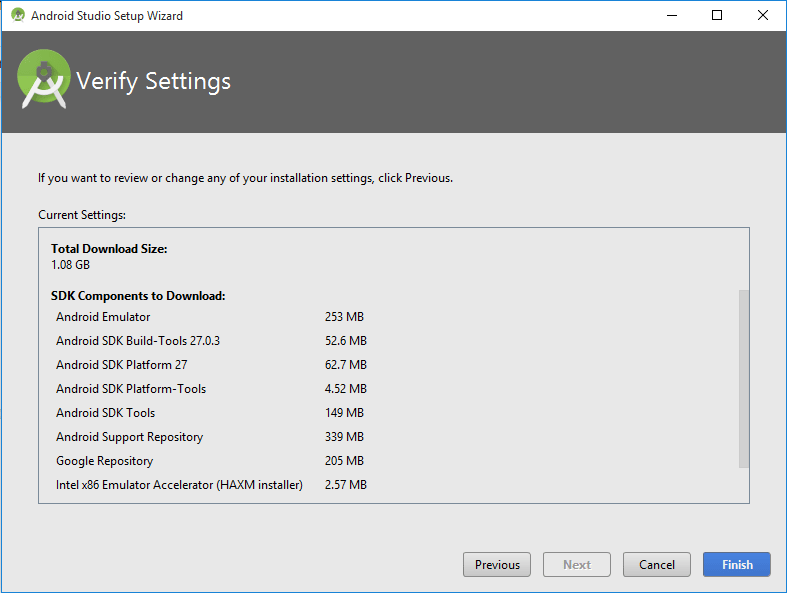
Step 13: It will download all necessary components to launch the Android Studio and setting up the environment. After download and installation, click on Finish.
We have successfully installed the Android Studio. Now it is ready for building the projects.
- How to set background image in android studio?
Here is the code for setting background image in android studio.
You just need to fetch data from the gallery. Your code should be like this:
String [] projection = new String[]{
    MediaStore.Images. Media.DATA,
};

Uri images = MediaStore.Images.Media.EXTERNAL_CONTENT_URI;
Cursor cursor = managedQuery(images,
                projection,
                "",
                null,
                ""
);
Manifest.xml
<?xml version="1.0" encoding="utf-8"?>
<manifest xmlns:android="http://schemas.android.com/apk/res/android"
    package="com.legendblogs.showbackground">

    <application
        android:allowBackup="true"
        android:icon="@mipmap/ic_launcher"
        android:label="@string/app_name"
        android:supportsRtl="true"
        android:theme="@style/AppTheme">
        <activity android:name=".MainActivity">
            <intent-filter>
                <action android:name="android.intent.action.MAIN" />

                <category android:name="android.intent.category.LAUNCHER" />
            </intent-filter>
        </activity>
    </application>

</manifest>
MainActivity.java
package com.legendblogs.showbackground;

import android.content.Context;
import android.support.v7.app.AppCompatActivity;
import android.os.Bundle;
import android.view.View;
import android.widget.Button;
import android.widget.EditText;

import android.graphics.BitmapFactory;
import android.graphics.Color;
import android.graphics.drawable.BitmapDrawable;
import android.graphics.drawable.ColorDrawable;
import android.graphics.drawable.Drawable;

public class MainActivity extends AppCompatActivity {

    Context context;
    private RelativeLayout main_layout;

    @Override
    protected void onCreate(Bundle savedInstanceState) {
        super.onCreate(savedInstanceState);
        setContentView(R.layout.activity_main);
        this.context = this;

        main_layout = (RelativeLayout) findViewById(R.id.main_layout);

        String[] projection = new String[]{
                MediaStore.Images.Media.DATA,
        };

        Uri images = MediaStore.Images.Media.EXTERNAL_CONTENT_URI;
        Cursor cursor = managedQuery(images,
                projection,
                "",
                null,
                ""
        );

        final ArrayList<String> imagesPath = new ArrayList<String>();
        if (cursor.moveToFirst()) {
            int dataColumn = cursor.getColumnIndex(
                    MediaStore.Images.Media.DATA);
            do {
                imagesPath.add(cursor.getString(dataColumn));
                if(imagesPath.size() > 100) break;
            } while (cursor.moveToNext());
        }

        cursor.close();
        final Random random = new Random();
        final int count = imagesPath.size();

        handler.post(new Runnable() {
            @Override
            public void run() {
                int number = random.nextInt(count);
                String path = imagesPath.get(number);
                if (currentBitmap != null)
                    currentBitmap.recycle();
                currentBitmap = BitmapFactory.decodeFile(path);

                final int sdk = android.os.Build.VERSION.SDK_INT;
                if(sdk < android.os.Build.VERSION_CODES.JELLY_BEAN) {
                    BitmapDrawable ob = new BitmapDrawable(getResources(), currentBitmap);
                    main_layout.setBackgroundDrawable(ob);
                } else {
                    Drawable drawable = new BitmapDrawable(getResources(), currentBitmap);
                    main_layout.setBackground(drawable);
                }
                handler.postDelayed(this, 1000);
            }
        });

    }
}
Activity_main.xml
<?xml version="1.0" encoding="utf-8"?>
<RelativeLayout xmlns:android="http://schemas.android.com/apk/res/android"
    xmlns:tools="http://schemas.android.com/tools"
    android:layout_width="match_parent"
    android:layout_height="match_parent"
    android:id="@+id/main_layout"
    android:paddingBottom="@dimen/activity_vertical_margin"
    android:paddingLeft="@dimen/activity_horizontal_margin"
    android:paddingRight="@dimen/activity_horizontal_margin"
    android:paddingTop="@dimen/activity_vertical_margin"
    tools:context="com.legendblogs.asynctask.MainActivity">

    <TextView
        android:layout_width="wrap_content"
        android:layout_height="wrap_content"
        android:text="Welcome to Legend Blogs Exmpale"
        android:layout_alignParentTop="true"
        android:layout_centerHorizontal="true"
        android:textStyle="bold"
        android:textSize="20dp" />


</RelativeLayout>
- How to set app icon in android studio?
These are the steps to set the app icon in android studio.
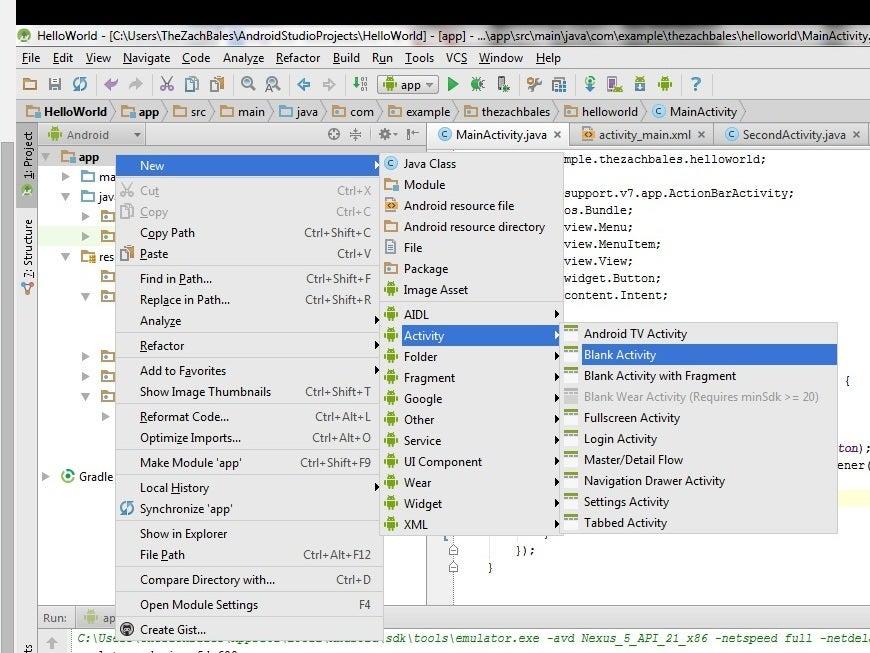
Step 1: Create a new project in Android Studio, go to File ⇒ New Project and fill in all required details to create a new project.
Step 2: Further follow the path to reach the desired folder to add an icon (app → res → mipmap).
Step 3: Add your app icon. You can just simply copy and paste the image into the mipmap folder.
Step 4: After placing the image in the mipmap folder. You need to rename the default icon name to your icon image name.
Step 5: Add the following code to activity_main.xml.
<?xml version="1.0" encoding="utf-8"?>
<android.support.constraint.ConstraintLayout
   xmlns:android="http://schemas.android.com/apk/res/android"
   xmlns:app="http://schemas.android.com/apk/res-auto"
   xmlns:tools="http://schemas.android.com/tools"
   android:layout_width="match_parent"
   android:layout_height="match_parent"
   tools:context=".MainActivity">
   <TextView
      android:layout_width="wrap_content"
      android:layout_height="wrap_content"
      android:text="Hello World!"
      app:layout_constraintBottom_toBottomOf="parent"
      app:layout_constraintLeft_toLeftOf="parent"
      app:layout_constraintRight_toRightOf="parent"
      app:layout_constraintTop_toTopOf="parent" />
</android.support.constraint.ConstraintLayout>
Step 6: Add the following code to MainActivity.java
package com.example.sample;
import android.support.v7.app.AppCompatActivity;
import android.os.Bundle;
public class MainActivity extends AppCompatActivity {
   @Override
   protected void onCreate(Bundle savedInstanceState) {
      super.onCreate(savedInstanceState);
      setContentView(R.layout.activity_main);
   }
}
Step 7: Add the following code to AndroidManifest.xml
<?xml version="1.0" encoding="utf-8"?>
<manifest xmlns:android="http://schemas.android.com/apk/res/android"
   package="com.example.sample">
   <application
      android:allowBackup="true"
      android:icon="@mipmap/ic_launcher"
      android:label="@string/app_name"
      android:roundIcon="@mipmap/icon1" //rename the icon
      android:supportsRtl="true"
      android:theme="@style/AppTheme">
      <activity android:name=".MainActivity">
         <intent-filter>
            <action android:name="android.intent.action.MAIN" />
            <category android:name="android.intent.category.LAUNCHER" />
         </intent-filter>
      </activity>
      <activity android:name=".MainActivity"></activity>
   </application>
</manifest>
- How to get current location in android studio?
Steps to get the location in Android
- Provide permissions in manifest file for receiving location update.
To access current location information through location providers, we need to set permissions with the android manifest file.
<manifest ... >
<uses-permission android:name="android.permission.ACCESS_FINE_LOCATION" />
<uses-permission android:name="android.permission. ACCESS_COARSE_LOCATION" />
<uses-permission android:name="android.permission.INTERNET" />
</manifest>
- Create LocationManager instance as a reference to the location service.
For any background Android Service, we need to get a reference for using it. Similarly, location service reference will be created using the getSystemService() method. This reference will be added with the newly created LocationManager instance as follows.
locationManager = (LocationManager) getSystemService(Context.LOCATION _SERVICE);
- Request location from LocationManager.
After creating the location service reference, location updates are requested using requestLocationUpdates() method of LocationManager.
locationManager.requestLocationUpdates(LocationManager.GPS_PROVIDER, 0, 0, this)
- Receive location update from LocationListener on change of location.
LocationListener will be notified based on the distance interval specified or the number of seconds.
Here is the complete code for getting the current location using android studio.

- How to change API level in android studio?
There are two ways to change the API level in android studio.
- Change SDK API Level in Android Studio:
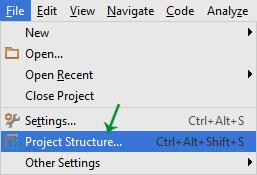
Step 1: Open your Android Studio, and go to Menu. File >Project Structure.
Step 2: In the project Structure window, select the app module in the list given on the left side.
Step 3: Select the Flavors tab, and under this, you will have an option for setting “Min SDK Version” and setting “Target SDK Version”.
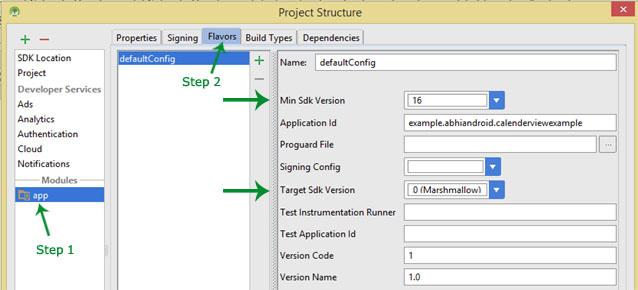
Step 4: Select both the versions and Click OK.
- Change API (Android Version) in Android Studio:
Step 1: If your project is opened the Androidroid option, select open Gradle Scripts > build.gradle(Module: app)
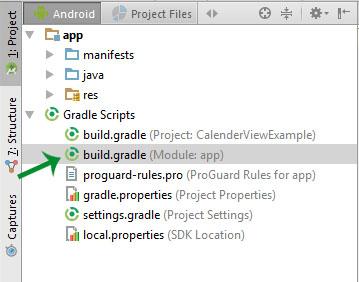
Step 2: You have to change the minimum and Maximum SDK level as per your requirement. check the below-given code.
defaultConfig {
applicationId "com.AbhiAndroid.Android.myProject"
minSdkVersion 14
targetSdkVersion 23
versionCode 1
versionName "1.0"
}
Step 3: Click on Sync Now, and You are ready to go.

- How to change e theme in android studio?
To change the theme in android studio, you should follow the below steps:
Step 1: Go to File ->Settings.
Step 2: Under IDE settings, click on appearance.
Step 3: Select the theme of your choice from the dropdown, i.e., File > Import Settings, select the file of your choice and select ok. A pop up to restart the studio will open up; here, click yes.
Step 4: Android Studio will restart, and your theme will be applied.
- How to create a chat application in android using android studio?
Step 1: Get your free chat starter kit
I prefer Applozic free chat kit to build the chat app.
Applozic chat kit includes
Ready-made Chat SDK
Chat API
Ready-made UX/UI
To get this free chat kit, Sign up here and sign up Applozic generates a unique APP_ID, which we will be using in our configuration step. You can get APP_ID in the installation section.
Step 2: Install Applozic chat SDK in your android app
Once you create applozic a/c, then you need to integrate Applozic chat SDK in your app.
Here you will be using the Gradle toolkit to integrate the chat app.
Copy the below and add it in your android Gradle dependency
implementation 'com.applozic.communication.uiwidget:mobicomkitui:5.45'
Once gradle builds, you need to exclude a package option to avoid duplicate files or errors.
To exclude the package, Just copy the below and add it to your grade android target.
packagingOptions {

           exclude 'META-INF/DEPENDENCIES'
           exclude 'META-INF/NOTICE'
           exclude 'META-INF/LICENSE'
           exclude 'META-INF/LICENSE.txt'
            exclude 'META-INF/NOTICE.txt'
            exclude 'META-INF/ECLIPSE_.SF'
            exclude 'META-INF/ECLIPSE_.RSA'
}
build.gradle file will look like this:

Now you’re done with the installation of Chat SDK into the android app.
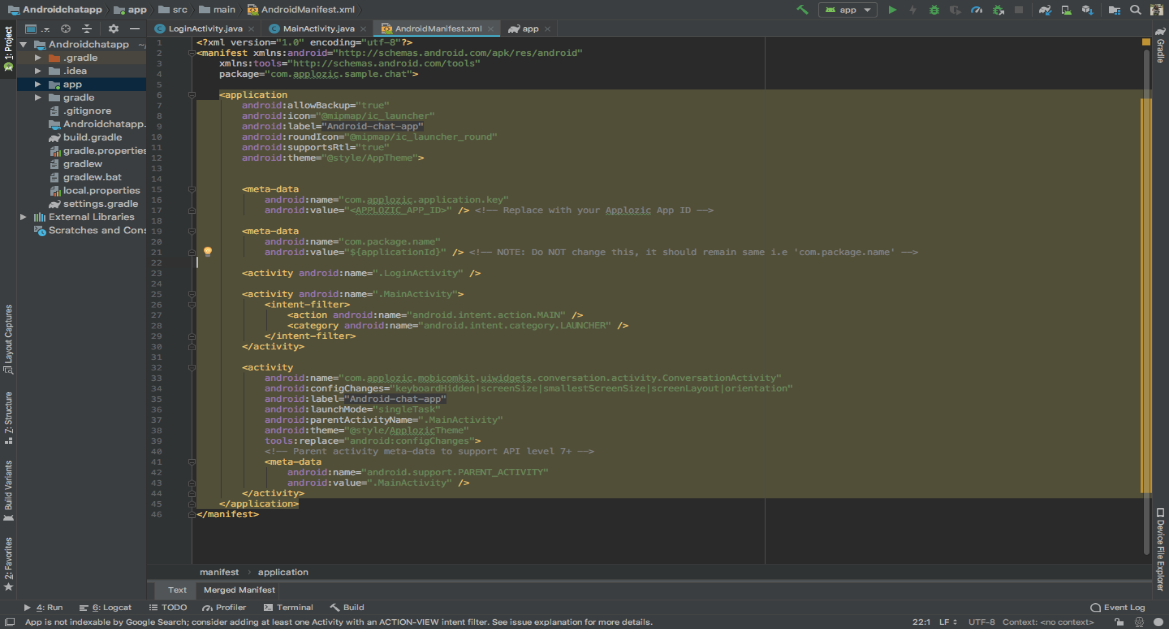
Step 3: Configuration
In this step, you need to CONFIGURE the activity and metadata in your AndroidManifest.xml and put your APP_ID, app icon and attachment folder name. This step is necessary because there are some components used by Applozic SDK which needs to be registered in your App-level AndroidManifest.xml file just that you can change their properties. For e.g.E.g., you need to add the ConversationActivity.java entry in the AndroidManifest.xml file to add a parent activity(Which belongs to your app).
Add below coding within your android App application tag.
<activity android:name="com.applozic.mobicomkit.uiwidgets.conversation.activity.ConversationActivity"

           android:configChanges="keyboardHidden|screenSize|smallestScreenSize|screenLayout|orientation"

           android:label="@string/app_name"

           android:parentActivityName=".MainActivity"

           android:theme="@style/ApplozicTheme"

           android:launchMode="singleTask"

           tools:node="replace">

      <!-- Parent activity meta-data to support API level 7+ -->

<meta-data

           android:name="android.support.PARENT_ACTIVITY"

           android:value=".MainActivity" />

 </activity>

<meta-data android:name="com.applozic.application.key"

           android:value="<APPLOZIC_APP_ID>" /> <!-- Replace with your Applozic APP_ID -->

 <meta-data android:name="com.package.name"

           android:value="${applicationId}" /> <!--
NOTE: Do NOT change this, it should remain same i.e ‘com.package.name’ →
You AndroidManifest.xml file will look something like this:
Step 4: Authentication
(You need to make sure that you have already created the a/c in applozic)
Login into Applozic Chat – user registration code – anywhere from your app – pass the required details.
Before accessing any APIs or Screens in Applozic SDK, you need to authenticate a user. You can directly authenticate a user using a userId (The only mandatory field of Applozic User); if the user exists, the SDK will log in to the user; if not, the SDK will create the user log in Do the following operations in LoginActivity.
Create a User object as below:
Mandatory: User ID

User user = new User();

user.setUserId(userId); //userId it can be any unique user identifier NOTE : +,*,? are not allowed chars in userId.

user.setDisplayName(displayName); //displayName is the name of the user which will be shown in chat messages

user.setPassword(password); //If the password is set, you need to pass it always when authenticating this user.

user.setImageLink("");//optional, set your image link if you have
Pass this user object to the authentication method in Applozic:
Applozic.connectUser(this, user, new AlLoginHandler() {

   @Override

   public void onSuccess(RegistrationResponse registrationResponse, Context context) {

       // After successful registration with the Applozic server, the callback will come here

       Intent mainIntent = new Intent(context, MainActivity.class);

       context.startActivity(mainIntent);

       LoginActivity.this.finish();

   }

   @Override

   public void onFailure(RegistrationResponse registrationResponse, Exception exception) {

       // If any failure in registration, the callback  will come here

       Toast.makeText(LoginActivity.this, "Error : " + registrationResponse, Toast.LENGTH_SHORT).show();

   }

});
This is how the Login Activity will look:

Step 5: Check if the user is already logged in.
In your launcher activity(In this sample, MainActivity), you can check if the user is already logged into applozic. If the user is already logged in, launch the chat directly with a userId “test2” (You can use any userId). Else we will navigate the user to the login activity.
In your launcher activity’s onCreate() method, add the below code:
if (Applozic.isConnected(this)) {

// This is the code to launch chat with a particular userId

   Intent intent = new Intent(MainActivity.this, ConversationActivity.class);

   intent.putExtra("userId", "test2"); //change the userId here for other users

   intent.putExtra(ConversationUIService.DISPLAY_NAME, "Test User 2"); //This name will be displayed on the toolbar of the chat screen

   startActivity(intent);

   finish();

} else {

   Intent intent = new Intent(MainActivity.this, LoginA,,a the ,ctivity.class);

   startActivity(intent);

   finish();

}
This is how the launcher activity will look like:

Here’s How the chat window will look like:
Now your chat app is ready.
- How to create a GPS tracking application in android studio?
Below is the complete java code for creating GPS tracking app using android studio.

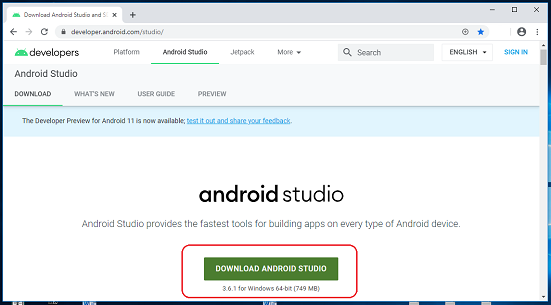
- How to download android studio?
Step 1: To download the Android Studio, visit https://developer.android.com/studio website in your web browser.
Step 2: Here, you must click on the "Download Android Studio" option.
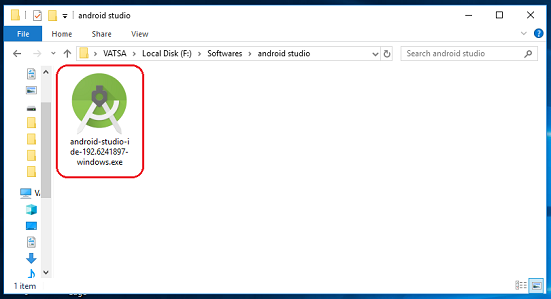
Step 3: Double click on the downloaded "Android Studio-ide.exe" file.
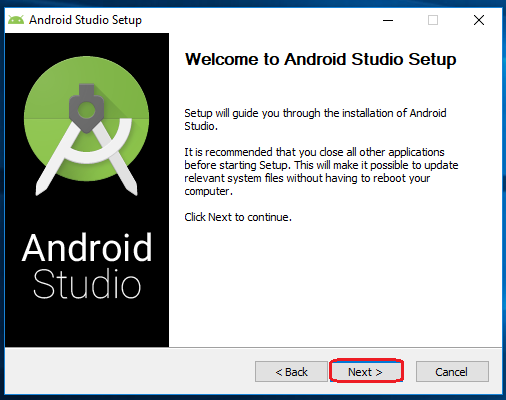
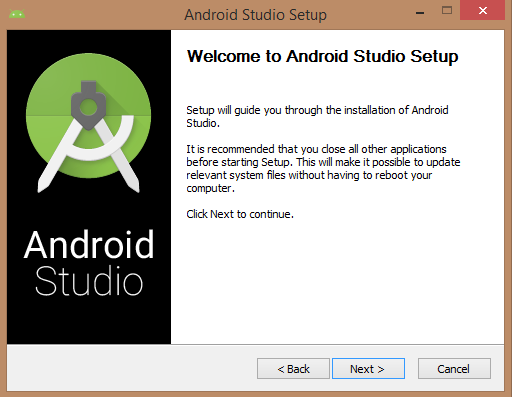
Step 4: "Android Studio Setup" will appear on the screen and click "Next" to proceed.
Step 5: Select the components that you want to install and click on the "Next" button.
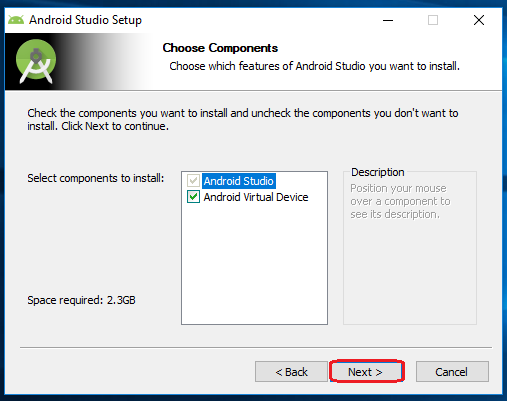
From this stage installing the android studio will be started.
- How to build apk in android studio?
To build apk in android studio, you must follow these below steps:
- In the Android menu, go to Build > Build Bundle(s) / APK (s) > Build APK(s).
- Android Studio will start building the APK for you. Once done, a pop-up on the bottom right will notify you of its completion. Click the ‘locate’ button in this dialog.
- The ‘locate’ button should open File Explorer with the debug folder open containing a file called “app-debug.apk”.
- That’s it. Your apk is ready. If you want, you can rename it.
- How to create a menu in android studio?
These are the steps to create a menu in the android studio:
Step 1: Open an Activity Class
Select your application package and choose “File”, “New”, then “Class” and enter a name of your choice. Remember to make your class extend the Activity class and add it to the application Manifest.
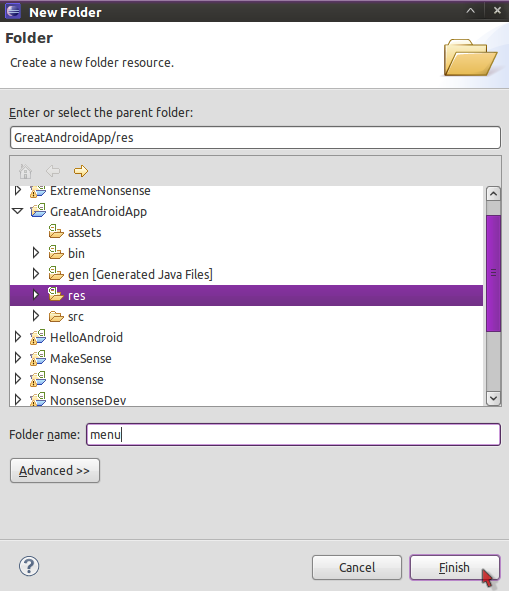
Step 2: Create a Resources Folder
The “res” folder holds all of your application resources. To create a menu, you need a menu folder, so create one inside the “res” folder by selecting it and choosing “File”, “New”, then “Folder” and entering “menu” as the name.
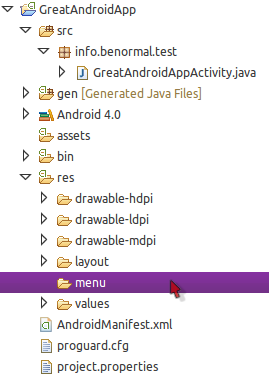
Your new folder will appear within the “res” directory:
Step 3: Create a Menu XML File
Choose the folder and create a new file by selecting “File”, “New”, then “File”, and entering a name. You can choose any filename you like, for example, “my_options_menu.xml”.
<menu xmlns:android=”http://schemas.android.com/apk/res/android">
</menu>
Step 4: Add Items to Your Menu
You can add one or more items to your options menu, depending on the needs of your project. Add an item for each menu option using the following syntax:
<item android:id=”@+id/about”
android:title=”About” />
<item android:id=”@+id/help”
android:title=”Help” />
Step 5: Create Icons for Your Menu Items
Once you have your icons in their folders, you can alter your menu item XML to include them as follows:
<item android:id=”@+id/about”
android:icon=”@drawable/about”
android:title=”About” />
<item android:id=”@+id/help”
android:icon=”@drawable/help”
android:title=”Help” />
Step 6: Inflate Your Menu Resource
Add the following method to your Java code, inside the class declaration and after the “onCreate” method:
public boolean onCreateOptionsMenu(Menu menu) {
MenuInflater inflater = getMenuInflater();
inflater.inflate(R.menu.my_options_menu, menu);
return true;
}
Step 7: Menu is ready in your application

- How to run apk file in android studio?
To run apk in android studio, you must follow these three steps:
Step 1: In the toolbar, select your app from the run configurations drop-down menu.
Step 2: From the target device drop-down menu, select the device you want to run your app on.

If you don't have any configured devices, you need to either connect a device via USB or create an AVD to use the Android Emulator.
Step 3: Click Run ![]() .
.
- How to increase font size in android studio?
To increase the font size in Android Studio: Open Android Studio, then Go to Settings > Editor > Colors & Fonts > Font. Then click "Save As..." and choose a new scheme name. Then change the font size and say OK. This will be the default size every time you open Android Studio now.
- How to reset android studio?
Go to your User Folder: C:\Users\Your User\. In this folder, there should be a folder called ”.AndroidStudioBeta” or ”.AndroidStudio” (notice the period at the start - so on some OSes, it would be hidden).
For Update
Now, Android Studio settings are at:
C:\Users\<Your User>\AppData\Roaming\Google\.AndroidStudio4.X
Delete this folder (or better yet, move it to a backup location - so you can return it if something goes wrong).
This should reset your Android Studio settings to default.
- How to create a virtual device in android studio?
Step 1: To create a virtual device in android studio, you have to click Tools-> AVD Manager.

Step 2: Click Create Virtual Device at the bottom of the AVD Manager dialog.
The Select Hardware page appears.
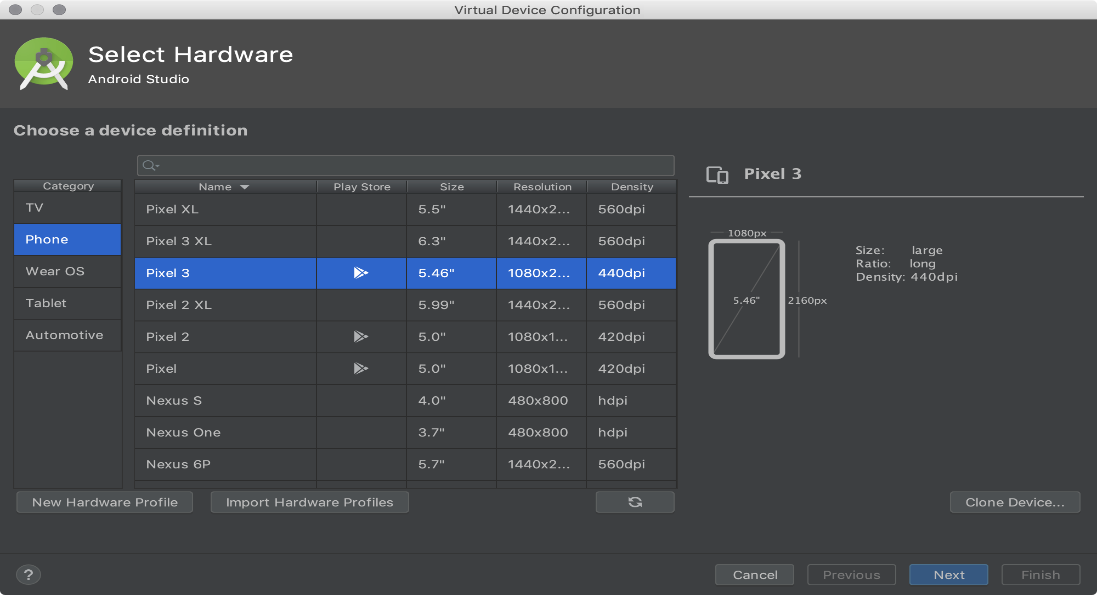
Notice that only some hardware profiles are indicated to include Play Store. This indicates that these profiles are fully CTS compliant and may use system images that include the Play Store app.
Step 3: Select a hardware profile, and then click Next.
If you don't see the hardware profile you want, you can create or import a hardware profile.
The System Image page appears.

Step 4: Select the system image for a particular API level, and then click Next.
The Recommended tab lists recommended system images. The other tabs include a complete list.
The right pane describes the selected system image, and x86 images run the fastest in the emulator.
If you see Download next to the system image, you need to click it to download the system image. You must be connected to the internet to download it.
The Verify Configuration page appears.
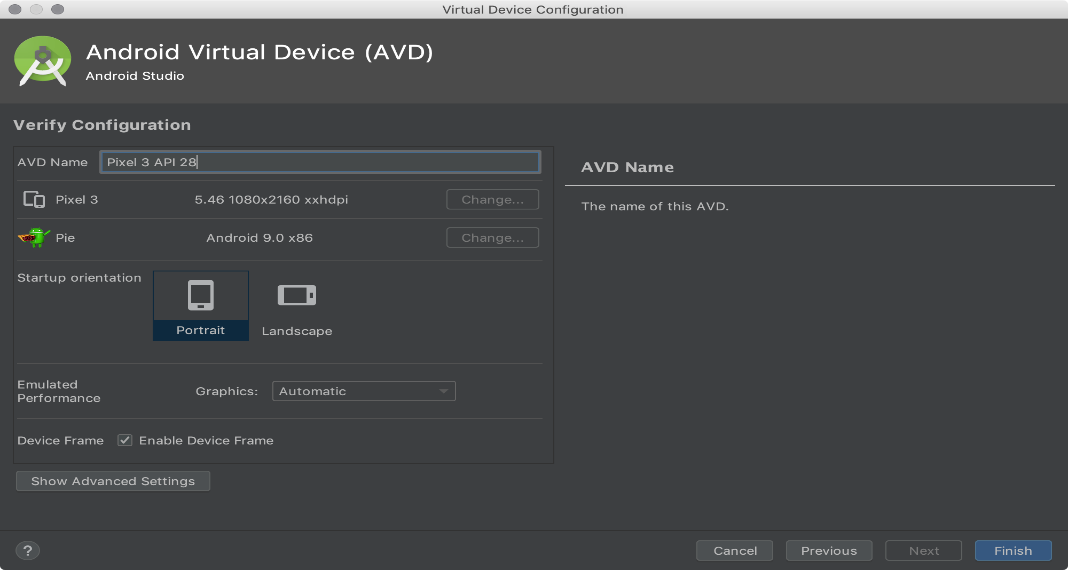
Step 5: Change AVD properties as needed, and then click Finish. Your virtual device is ready now.
- How to update Gradle in android studio?
Step 1: Use the default Gradle wrapper.
In android studio, click File->Settings->Build, Execution, Deployment->Build Tools->Gradle->Use Default Gradle Wrapper (Recommended).

Step 2: Select desired Gradle version.
File->Project Structure->Project.

Now your Gradle version has updated.
- How to install an emulator in android studio?
Step 1 - Download the Android SDK
Download the Android SDK, and unzip it somewhere. I placed the android-SDK-mac_86 folder in my /Applications/ folder, but you can put it wherever you want.
Step 2 - Optional Add to System Path
Since we are using the command line, you might find it helpful to add the android-sdk-platform/tools folder to your system path so you can run the android commands from any folder.
Step 3 - Install Android Platforms
At this point, I tried running the emulator command, but the SDK doesn't contain any Android Platforms, the Android platform is essentially Android OS. You need to install at least one version (e.g. 1.6, 2.1, 2.2, etc.) to run the emulator.
To install platforms run the android command located in the tools folder of the SDK (use Terminal.app on a Mac, or the Command Prompt on Windows, Linux folks, you know what to do :). This will pop up a window. Select Available Packages, pick some platform versions and install.
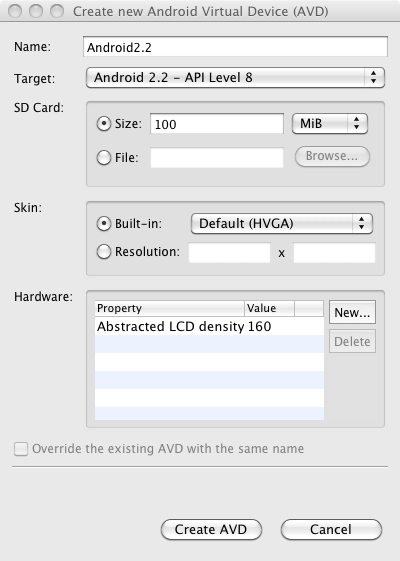
Step 4 - Create a Virtual Device
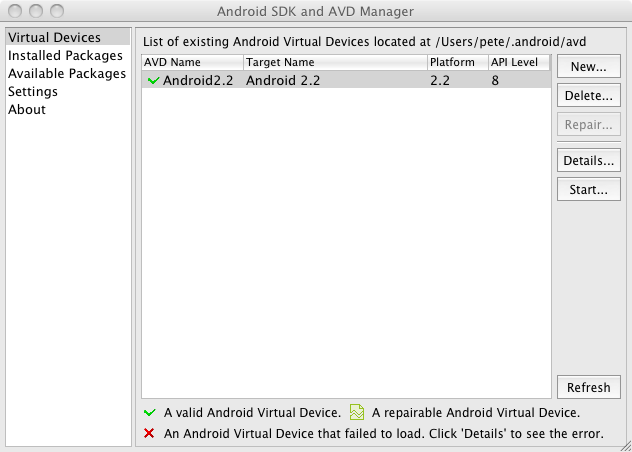
Still, click on Virtual Devices on the left in the android tool and then click New. Here's an example of the settings for the new device:
Once you create the avd file, it should show up in the listing of Android Virtual Devices:
Step 5 - Run the emulator
Now select the virtual device you just created and click Start on the right, and the emulator should start running:

- How to get the current location latitude and longitude in android studio?
Code for getting current location latitude and longitude in android studio

- How to reduce apk size in android studio?
- Select File > Settings (or on Mac, Android Studio > Preferences.)
- Select the Plugins section in the left panel.
- Click the Marketplace tab.
- Search for the “Android Size Analyzer” plugin.
- Click the Install button for the analyser plugin.
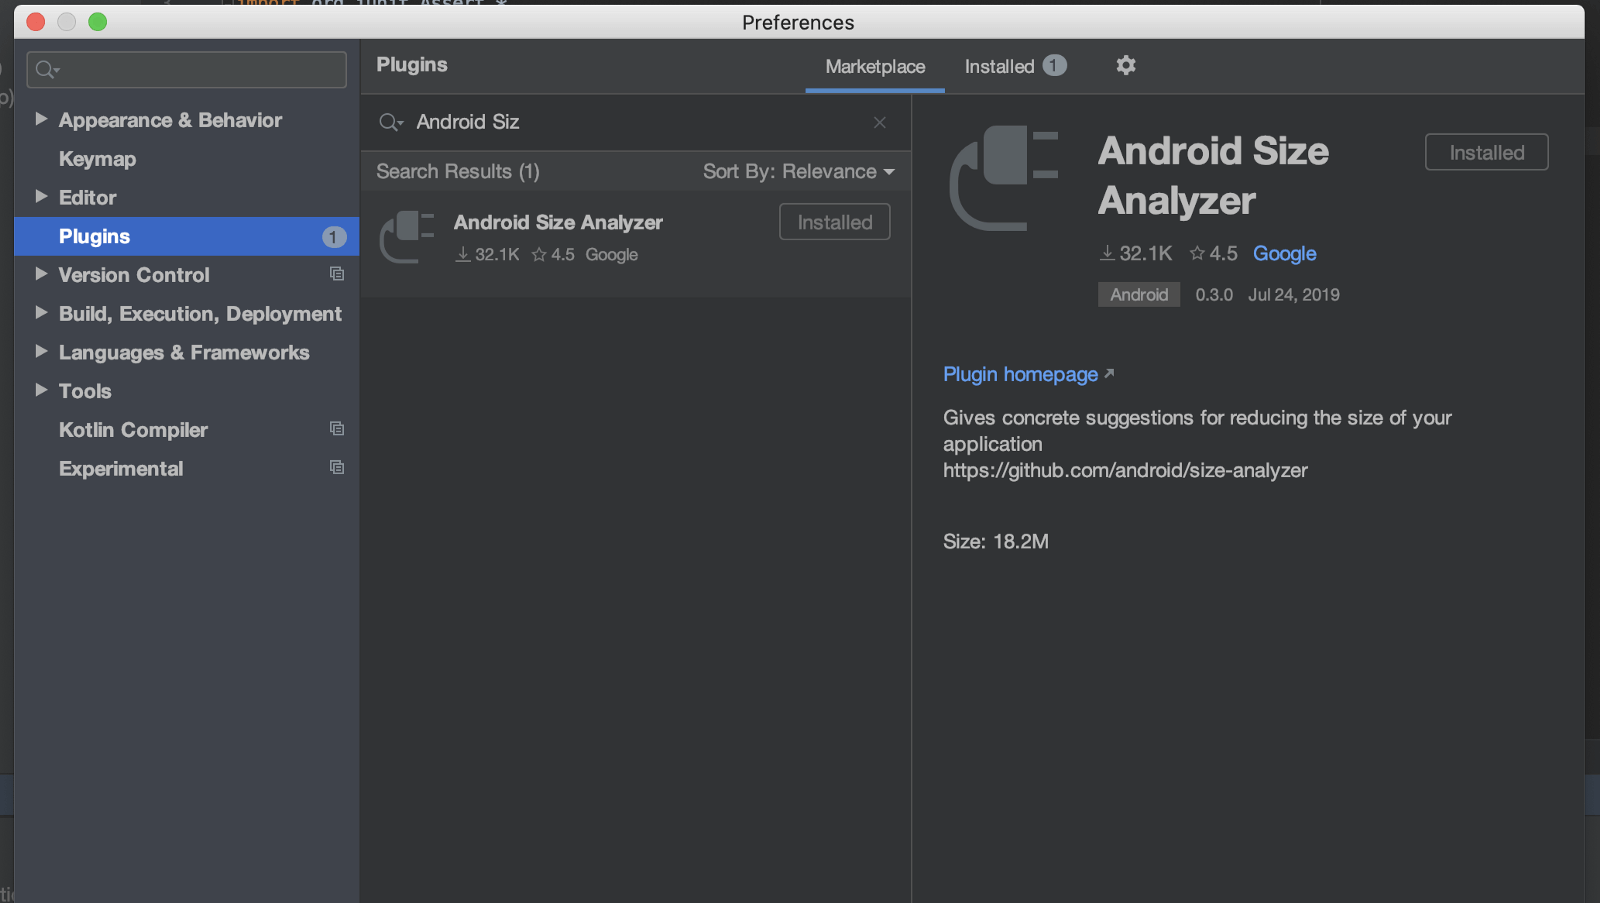
Restart the IDE after installing the plugin. Now, to analyse the application, go to Analyze > Analyze App Size from the menu bar. We will get a window something similar to this:

This can help us in reducing the app size in a much better way.
- How to connect mobile to the android studio?
- On the mobile device, open the Settings app, select Developer Options, and then enable USB debugging (if applicable).
- Set up your system to detect your device. Install a USB driver for ADB (if applicable). For an installation guide and links to OEM drivers, see the Install OEM USB drivers document.
- You can connect your device by using either of these methods.
- Connect to your device using a USB
When you are set up and plugged in over USB, you can click Run ![]() in Android Studio to build and run your app on the device.
in Android Studio to build and run your app on the device.
You can also use ADB to issue commands, as follows:
Verify that your device is connected by running the adb devices command from your android_sdk/platform-tools/ directory. If connected, you'll see the device listed.
Issue any adb command with the -d flag to target your device.
- Connect to your device using Wi-Fi
-> On your workstation, update to the latest version of the SDK Platform-Tools.
-> Enable the Wireless debugging option under Developer options.
-> On the dialog that asks Allow wireless debugging on this network?, click Allow.
-> Select Pair device with pairing code. Take note of the pairing code, IP address, and port number displayed on the device (see image).
-> On your workstation, open a terminal and navigate to android_sdk/platform-tools.
-> Run adb pair ipaddr:port. Use the IP address and port number from step.
32) How to set up an android studio?
- After downloading android studio, double click on the downloaded application, it will open the android setup window.
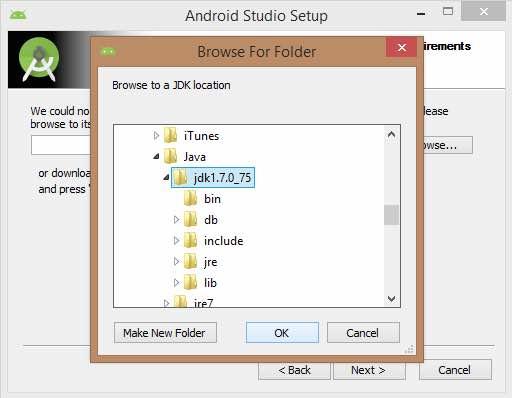
- Once you launched Android Studio, it’s time to mention the JDK7 path or later version in the android studio installer.

- Below the image initiating JDK to Android SDK.
- Need to check the components, which are required to create applications, below the image has selected Android Studio, Android SDK, Android Virtual Machine and performance(Intel chip).

- Need to specify the location of local machine path for Android studio and Android SDK, below the image has taken default location of windows 8.1 x64 bit architecture.

- We need to specify the ram space for the Android emulator. By default, it would take 512MB of local machine RAM.

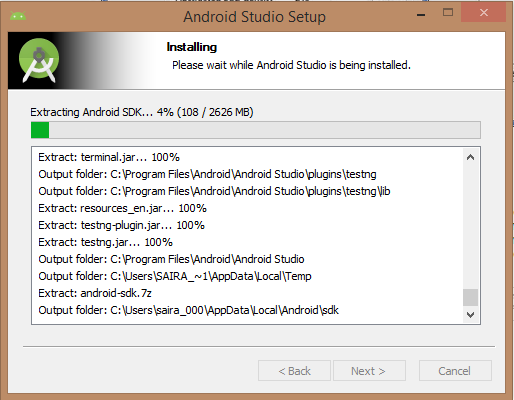
- At the final stage, it would extract SDK packages into our local machine; it would take a while time to finish the task and would take 2626MB of Hard disk space.
- After done all the above steps perfectly, you must get the finish button and it going to be open the android studio project with the Welcome to android studio message as shown below.

- What is an android manifest file?
Every application must have an AndroidManifest.xml file (with precisely that name) in its root directory. The manifest file describes essential information about your app to the Android build tools, the Android operating system, and Google Play. Various Windows technologies use it for configuring and deploying software, including ClickOnce and the Common Language Runtime (CLR).
- What is the difference between File, Class, and Activity in android?
File: It is a block of arbitrary information or resource for storing information. It can be of any type.
Activity: An activity provides the window in which the app draws its UI. This window typically fills the screen but may be smaller than the screen and float on top of other windows. Generally, one activity represents a single screen in an app. It is very similar to windows in a desktop application.
Class: A class is a combination of methods, variables and data types. Every Java or Android project must have at least one class.
- What is ADB in android?
ADB stands for Android Debug Bridge. Android Debug Bridge (adb) is a versatile command-line tool that lets you communicate with an emulator instance or connected Android-powered device.