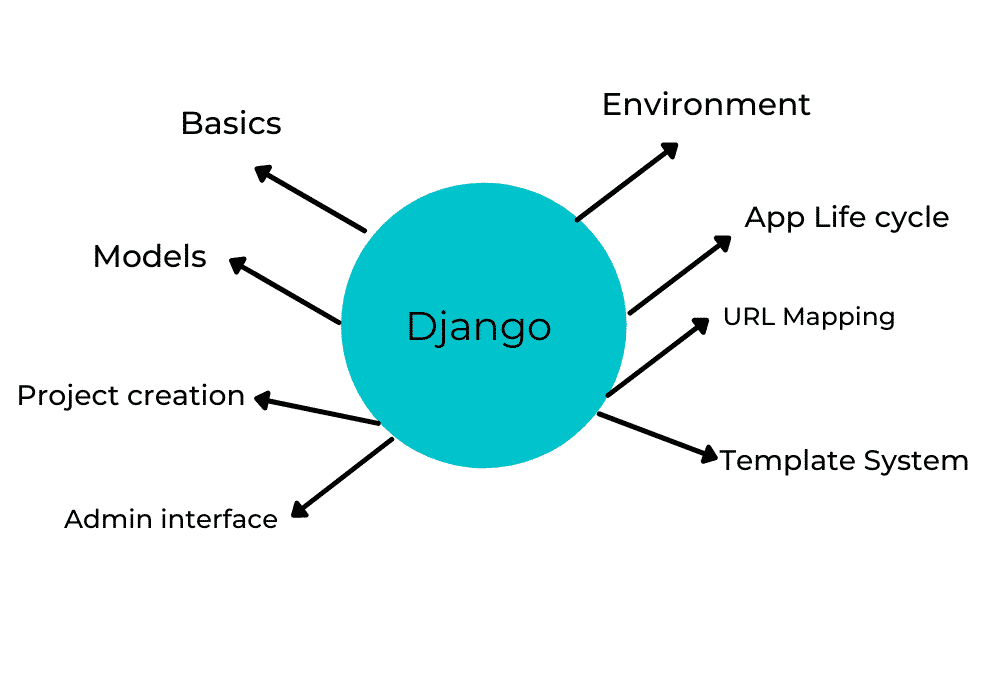
- Django - Basics
- What is Django?
- Application Types
- What are the advantages and disadvantages of Django framework
- Django - Overview
- Django - Environment
- How to Install Django Framework?
- Django - Creating a Project
- Creating Django Project:
- Setting Up Your Django Project:
- Django - Apps Life Cycle
- How to Create a Django Application?
- How to connect new apps with Django projects:
- Django - Admin Interface
- Django - Models
- Django – Page Redirection
- Django - Sending E-mails
- Django - Generic Views
- Django - Form Processing
- Django - File Uploading
- Django - Cookies Handling
- Django - Sessions
- Django – Caching
- Django RSS
- What is Django?
- What are the Application Types?
- What are the Advantages and Disadvantages of Django Framework?
- Django – Environment
- How to Install Django Framework?
- How to create a project using Django Python Framework?
- How to set up a Django Project?
- Django – Apps Life Cycle
- How to Create a Django Application?
- How to connect new apps with Django projects
- Django – Template System
- Django – Admin Interface
- Django – Creating Views
- Django – URL Mapping
- Django – Models
- Django – Page Redirection
- Django Template Language
- Django – Sending E-mails
- Django – Generic Views
- Django – Form Processing
- Django – File Uploading
Django – Basics
What is Django?
Django is a popular python server-side web framework. It’s ideal for data-driven websites with commonly needed utilities prebuilt into the platform. It offers flexibility and a collection of community-built extensions.
Django’s framework is ideally a library of reusable modules. The integrated Python libraries make it easy for rapid development. For instance, for a web framework like Django, we have modules to work with HTTP requests, URLs, sessions, cookies, etc.
All these functionalities are already provided in Django, there’s no need to code from scratch, that is why we use a framework like Django. This web framework is suitable for both front-end and back-end web development. It provides consistency among various Django projects.
Application Types
Django provides everything you need for faster deployment of your projects. As a result, it is considered a framework of choice by many developers. By using Django, you can develop complex and database-driven web applications that include:
- Machine learning
- E-commerce platforms·
- Data analysis
- Content management
What are the advantages and disadvantages of Django framework
Advantages of Django Framework
- Implemented in Python: Python is one of those programming languages that has seen exponential growth in its demand and popularity over the last 5-6 years. As a programming language, Python has been known for its simple syntax, code readability, and English-like commands that make it a beginner-friendly language.
- Batteries included Framework: Django is a battery-included framework, which means it provides a lot of built-in functionalities. Instead of writing your own code (power code), you just need to import the packages or modules that you want to use.
Django batteries provide a wide range of contents that include:
- Authentication users with auth package
- Admin Control with admin package
- Sessions management with Sessions package
- Show or manage Messages with Messages package
- Generate Google sitemap with Sitemaps package
- Postgres features with Postgres package
- Hooking with content types framework
- Fast Processing: Django uses the MVT architecture which makes the whole process of transmitting over the Internet easier and faster.
- Supported by a vast and active Community: Django provides a huge community who are actively working on making the framework more beginner-friendly and stabilizing the framework by adding new features. Django documentation is quite easy to go through and is useful as a standalone tutorial, it will help you wrap your head around various features so you can use it as a primary source of information.
- Django is Immensely Scalable: One of the greatest advantages of Django is that it can handle traffic and mobile app API usage of more than 400 million+ users. It is designed in such a way that it can handle any kind of hardware additions.
Disadvantages of Django Framework
- It cannot handle multiple requests at the same time.
- Impacts performance of small web applications.
- Knowledge of the entire system is needed to work with Django.
- Relieves heavily on the ORM system.
- The URL specification with Regex is not easy.
Django – Overview
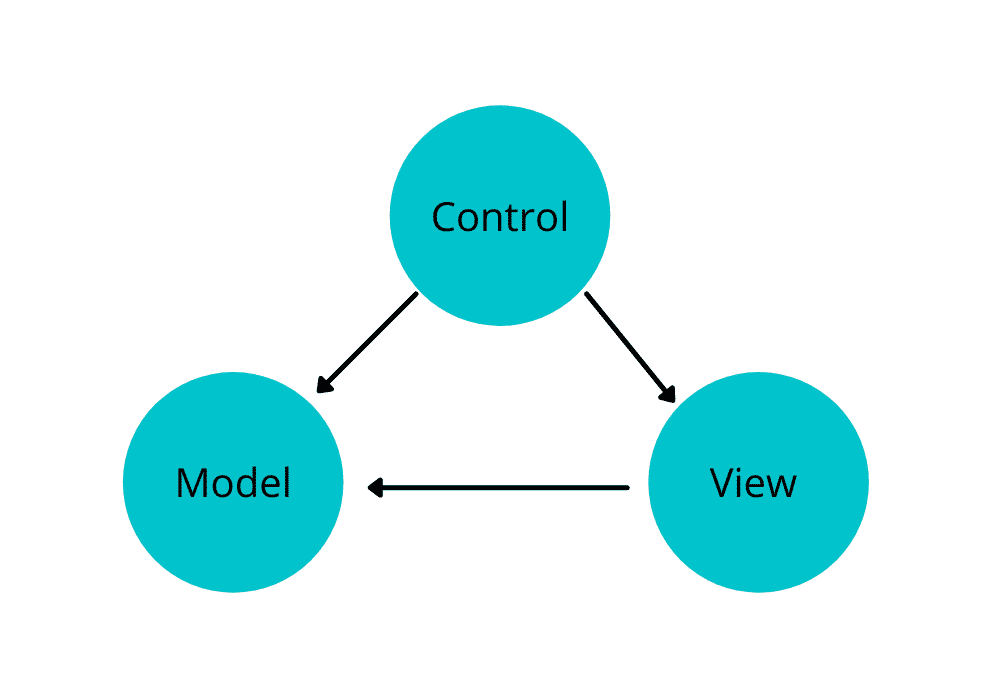
Django is an MVT web framework that is used to build web apps. It defines itself as a “batteries included” web framework, with stability and simplicity to help developers to write clean, efficient, and powerful code. It is one of the most famous web frameworks used by web developers and it is also one of the most used frameworks as well. It is used by Instagram, Youtube, Spotify, Google, and even NASA for their website.
Django works on MVT architecture which stands for Models Views Templates. MVT is a Django framework which is a variation of the famous MVC structure which stands for Model View Control.
Django – Environment
How to Install Django Framework?
Step 1 – Installing Latest Python Version:
- Download Python Link: https://www.python.org/downloads/
- If you want to check the python version or if it’s previously installed in your system, just open the terminal/command prompt and just type python or python3.
Syntax: python
Code:
linux@root: ~$ python3
Python 3.8.5 (default, Jan 27 2021, 15:41:15)
[GCC 9.3.0] on linux
>>> |
Step 2 – Creating Virtual Environment (venv):
A virtualenv is a tool for creating an insulated virtual python environment for python projects. To develop a virtual environment we need to install and then we need to activate the virtual environment.
To install: “ pip install virtualenv ”
To create and activate virtualenv:
Syntax: virtualenv <virtualenv_name>
Code:
linux@root:~/django_project/CellShop$ virtualenv venv
linux@root:~/django_project/CellShop$ . venv/bin/activate
(venv) linux@root:~/django_project/CellShop$
Step 3 – Installing Django:
For easy installation of Django, we use the pip installer package. pip is a Python package installer which is used to manage and install python software packages. We can install several python modules easily using pip.
Syntax: pip install <module_name>
Code:
(venv) linux@root:~/django_project/CellShop$ pip install Django==3.2
Django Latest Version Download Link: https://www.djangoproject.com/download/
Step 4 – Django Database:
By default, Django supports SQLite3 database. But Django also supports various other database engines like MySQL, Oracle, PostgreSQL, etc and you can easily set up any of them based on your requirements.
- Mysql: https://www.mysql.com/
- Oracle: https://www.oracle.com/database/
- SQLite: https://www.sqlite.org/
Step 5 – Django WebServer:
Django contains a lightweight web server for creating and testing web applications. This webserver is pre-configured to work on the Django framework, and it restarts the web server whenever you modify the app code.
Django also creates wsgi.py files while creating Django projects. WSGI stands for web server gateway interface. The purpose of this module is to provide a standard interface between applications built with Django and web servers.
Django supports Apache web server and also other popular web servers. On our local system, by default, mostly Django runs on 8000 ports, i.e., 127.0.0.1:8000 or localhost:8000 and http://127.0.0.1:8000/.
Django – Creating a Project
How to create a project using Django Python Framework?
Now that we have successfully installed Django, let’s start creating a website using the Django Python framework. In Django, all the web apps you create are known as a project and a project is an addition of applications. An application is a set of program files that are implemented based on the Model-View-Templates (MVT) pattern.
For example, let’s say we want to create an e-commerce website – the website is our Django project and the products, accounts, carts engine are applications. So for that, this structure makes it simpler to move an app between Django projects hence every application acts as an independent.
Creating Django Project:
To create a Django project, we need to execute this command on the terminal or cmd prompt.
Syntax: django-admin startproject <project_name> .
Code:
(venv) linux@root:~/django_project/CellShop$ django-admin startproject CellShop
When we install Django, it brings a command line called Django admin. We can execute this program using cmd prompt or terminal. Django-admin includes various arguments. With the help of these arguments we will then be able to create a project called Cell Shop in the current folder.
A folder will then be created named “CellShop” with the following structure −
CellShop/
  CellShop/
      __init__.py
      settings.py
      urls.py
      wsgi.py
   manage.py
- init.py: It means the CellShop folder is a package, so we can import various modules from this package into other modules
- setting.py: It is a module we define various settings for our applications
- urls.py: From this module, we define what should the users see when they see /index. /about, /contact, etc.
- WSGI: It acts as a web server gateway interface.
- manage.py: As the name implies we use this module to manage the Django project. With this we can start our web server, we can work with our database, etc.
Setting Up Your Django Project:
You need to set up your project in the subfolder which is named CellShop/settings.py : Then set “ DEBUG = True ” to start your debugging system. Debug mode helps you get more clear information about your project error. Never set a DEBUG to True for a live project. However, this has to be set to True if you want the Django light webserver to serve static files. Always do it only in the development mode only.
The database can be set up through the ‘Database’ dictionary which is also located in settings.py. The default database Engine selected is the SQLite database. Django also supports MySQL, Oracle, PostgreSQL, MongoDB, NoSQL, etc. You can allocate a database engine as per your requirements. SQLite is not as secure and flexible as Mysql, Oracle database, etc.
SQLite: “DATABASE: {‘default’:{‘ENGINE’: ‘django.db.backends.sqlite3’, …. }}”
MySQL: “DATABASE: {‘default’ {‘ENGINE’: ‘django.db.backends.postgresql_psycopg2’, }}”
Oracle: “DATABASE: {‘default’:{‘ENGINE’: ‘django.db.backends.oracle’, …. }}”
MongoDB: “DATABASE: {‘default’:{‘ENGINE’: ‘django_mongodb_engine’, …. }}”
Before setting up any new database engine, make sure you have the same related database driver installed in your system.
You also have to set other options like: TIME_ZONE, INSTALLED_APPS, LANGUAGE_CODE, TEMPLATE, etc.
Now your project is successfully created and well configured.
To view the working status of the project, we need to execute our project using the below command by typing in terminal or cmd prompt.
Syntax: python manage.py runserver
Code:
(venv) linux@root:~/django_project/CellShop$ python3 manage.py runserver
Once the above code is executed successfully, it will generate a developer server as given below −
(venv) linux@root:~/django_project/CellShop$ python3 manage.py run server
Watching for file changes with StatReloader
Performing system checks…
System check identified no issues (0 silenced).
You have 18 unapplied migration(s).
Run ‘python manage.py migrate’ to apply them.
April 08, 2021 – 18:01:29
Django version 3.2, using settings ‘CellShop.settings’
Starting development server at http://127.0.0.1:8000/
Quit the server with CONTROL-C.
Django – Apps Life Cycle
A project contains multiple apps. These apps don’t represent the entire application, they are small functional areas of the Django project. For example: Imagine you have to build a website or web app like Amazon. Amazon is a big eCommerce website. It has various functions.
Instead of implementing all these functions in a single Django project, we divide this project into small functional areas that focus on one functionality. Like, we can implement functional areas for product management, order management, customer management, etc.
The functions we have for managing the customers are different from the function for managing the products. So with this analogy, we divide the Django project into multiple Django apps. Each app focuses on one functional area. Each app is essentially a python package.
A project is a group of several applications. All applications have an objective or goal and can be reused in other projects. For instance, login/registration form on a website or web app can be an application and can be reused for other projects.
How to Create a Django Application?
Now for creating an app, type the below command in your command line terminal or cmd prompt.
Syntax: python manage.py startapp <app_name>
Code:
(venv) linux@root:~/django_project/CellShop$ python3 manage.py startapp products
You have successfully created an application in your Django project. Django created a “products” folder with the following application structure −
products/
    migrations/
     __init__.py
     admin.py
     apps.py
     models.py
     tests.py
     views.py
- __init__.py – Just to make sure python treats this folder as a package.
- admin.py – This file helps you to make changes to the application in the admin interface.
- Apps.py – It is used to store various configuration settings for these apps and it also contains AppConfig functions.
- models.py – This is where all system models are stored.
- tests.py – This is where your unit test is located.
- views.py – This is where your app views are.
How to connect new apps with Django projects:
We currently have “products” application, now we need to register it with our Django “CellShop” project. For this, update the INSTALLED_APPS which is located in your project settings.py file (add your application name) –
INSTALLED_APPS = (
   'django.contrib.admin',
   'django.contrib.auth',
   'django.contrib.contenttypes',
   'django.contrib.sessions',
   'django.contrib.messages',
   'django.contrib.staticfiles',
   'products.apps.ProductsConfig',
)
Django – Admin Interface
One of the most important aspect of Django is that, it contains default automated admin controller interface. Django administrator site reads metadata from your models to provide a quick, modular link where trusted users can manage content on your site. On the Django administrator site, the use of the controller is limited to the organization’s internal management tool. It is not intended to build your entire frontend work.
Administrator is enabled on the default project template used by startproject. Admin interface is based on the Django contrib module. To proceed further, you need to make sure that other modules are imported into INSTALLED_APPS and MIDDLEWARE_CLASSES tuples of the CellShop/ settings.py file.
For INSTALLED_APPS make sure you have –
INSTALLED_APPS = (
   'django.contrib.admin',
   'django.contrib.auth',
   'django.contrib.contenttypes',
   'django.contrib.sessions',
   'django.contrib.messages',
   'django.contrib.staticfiles',
   'products.apps.ProductsConfig',
MIDDLEWARE_CLASSES –
MIDDLEWARE_CLASSES = (
   'django.contrib.sessions.middleware.SessionMiddleware',
   'django.middleware.common.CommonMiddleware',
   'django.middleware.csrf.CsrfViewMiddleware',
   'django.contrib.auth.middleware.ConfirmationMiddleware',
   'django.contrib.messages.middleware.MessageMiddleware',
   'django.middleware.clickjacking.XFrameOptionsMiddleware',
)
Before launching your server, to access your Admin Interface, you need to start the database
1. You need to make migrations after creating the models in products/models.py
Syntax: $ python manage.py makemigrations
Code:
(venv) linux@root:~/django_project/CellShop$ python3 manage.py makemigrations
2. You need to simply write below code to do migrations:
Syntax: $ python manage.py migrate
Code:
(venv) linux@root:~/django_project/CellShop$ python3 manage.py migrate
Syncdb is a django shell command to create tables for the first time for applications added to INSTALLED_APPS for settings.py. Syncdb will create the required tables or groups depending on your database type, which is required for the administrator interface to work. Even if you don’t have a superuser, you will be notified that you have created it.
If you need to create a user to sign in with, use the create super user command.
By default, login to administrator requires that the user has the is_staff attribute set to True.
Finally, decide which models of your application should be configured in the controller interface. For each of these types, register with the administrator as described in ModelAdmin.
If you already have a superuser or have missed it, you can always build using the following code –
Syntax: $ python manage.py create superuser
Code:
(venv) linux@root:~/django_project/CellShop$ python3 manage.py createuperuser
After executing the above code on the terminal it will ask for username, email, and password. So according to your requirement, complete this process and it will create a superuser Django for you.
Now to start Admin Interface, we need to make sure we have prepared the URL of the administrator interface. Open CellShop / urls.py and you should have something in common.
urlpatterns = [
path('admin/', admin.site.urls),
path('', include('products.urls')),
path('accounts/', include('accounts.urls')),
]
Now just execute the project on webserver.
Code: $ python manage.py runserver
And your administrator interface is available at: http: // 127.0.0.1: 8000 / admin /
Once connected to your superuser account, you will see the default admin panel screen which consists of Users and Groups.
This interface will allow you to control Django groups and users, with all the models registered in your app. The interface gives you the ability to use some “CRUD”operations (Create, read, update, delete) to your models.
Django – Creating Views
Django View is a layer of business logic. It is responsible for processing the user request and sending back a valid response. It downloads data from the model, gives each template access to the specific data to be displayed, and can perform further data processing. Nowadays, Django views can be a process of requesting and retrieving feedback.
The view function, or “view” for short, is simply a Python function that takes a web request and returns the answer to the web. This response could be HTML content on a Web page or redirect, or a 404 error, or an XML document, or an image, etc.
Example: When using views to create web pages, note that you need to link a view to an appropriate URL to see it as a web page.
In Django, views should be created in the views.py app file.
Simple view
We will create a simple view on the products app to say “Hello to my app!”
Write below code in your products/view.py –
from django.http import HttpResponse
def new(request):
return HttpResponse(‘Hello to my app!’)
In this view, we use HttpResponse to provide HTML (as you may have noticed that we have HTML with a strong code in view). To view this as a page we just need to put it in a URL (this will be discussed in the next subtopics).
We used HttpResponse to provide HTML in preview. This is not the best way to provide pages. Django supports MVT pattern to create a preview, Django – MVT likes, we will need –
Template: products / templates / hello.html
To modify your project, i.e., CellShop / settings.py, go to TEMPLATE -> directories (DIRS) and add a BASE_DIR and template. This will merge the base directory and templates.
Before Changes DIRS:
TEMPLATES = [
{
'BACKEND': 'django.template.backends.django.DjangoTemplates',
'DIRS': [],
'APP_DIRS': True,
'OPTIONS': {
'context_processors': [
'django.template.context_processors.debug',
'django.template.context_processors.request',
'django.contrib.auth.context_processors.auth',
'django.contrib.messages.context_processors.messages',
],
},
},
]
After Changes DIRS:
TEMPLATES = [
{
'BACKEND': 'django.template.backends.django.DjangoTemplates',
'DIRS': [BASE_DIR, 'templates'],
'APP_DIRS': True,
'OPTIONS': {
'context_processors': [
'django.template.context_processors.debug',
'django.template.context_processors.request',
'django.contrib.auth.context_processors.auth',
'django.contrib.messages.context_processors.messages',
],
},
},
]
Now we can write in our view like –
from django.shortcuts import render
from django.http import HttpResponse

def hello(request, id):
           return render(request, 'hello.html')

Views can also receive parameters -

from django.shortcuts import render
from django.http import HttpResponse

def hello(request, id):
	text = "<h1> welcome to my app id % s! </h1>"% id
           return HttpResponse(text')
Views can also receive parameters –
from django.shortcuts import render
from django.http import HttpResponse

def hello(request, id):
	text = "<h1> welcome to my app id % s! </h1>"% id
           return HttpResponse(text')
Views can also return objects in form of dictionary-
from django.shortcuts import render
from django.http import HttpResponse
from .models import Product
def product(request):
	products = Product.objects.all()
	return render(request, 'index.html', {'products': products})
When linked to a URL, the page will display the forwarded number as a parameter. Note that the parameters will be passed by URL.
Django – URL Mapping
The Django URL router is much more complex than other frameworks like Laravel, etc. It uses common expressions. However, creating the URL path itself is not difficult at all, it is just a syntax that you may not feel comfortable with at first.
Now we have a practical idea as explained in the previous topics. We want to access the project using the URL. Django has its own way to map URLs and this is done by editing the urls.py project of your file (CellShop / urls.py). The URLS.py file looks like –
"""Pyshop URL Configuration
     ....
"""
from django.contrib import admin
from django.urls import path, include

urlpatterns = [
path('admin/', admin.site.urls),
path('', include('products.urls')),
path('accounts/', include('accounts.urls')),
]
When a user makes a page request to your web app, the Django controller replaces the corresponding view with the url.py file, and retrieves the HTML response or 404 error that is requested File not found, if a file is not available. In urls.py, the most important thing is listings for “urlpatterns”. This is where you define the map between URLs and views. Mapping is the motto of similar URL patterns –
from django.urls import path
from . import views

urlpatterns = [
path('', views.front, name='front'),
path('product', views.index, name='index'),
path('hello/', views.new),
]
In urls.py, the most important thing is listings for “urlpatterns”. This is where you define the mapping between URLs and views. Mapping is the motto of similar URL patterns –
The tagline lists the URL “hello/” to the hello view created in the myapp products / view.py file. As you can see above the map is made up different elements are as follows-
- Python mode of view – Same as when importing modules.
- The route dispute must be a thread or gettext_lazy() containing the URL pattern.
- Dispute view is a view function or an as_view() class-based viewing result. It can also be written as django.urls.include().
- Name – In order to perform URL reversal, you will need to use the URL patterns named after them as in the examples above. When you’re done, just start the server to access your view via: http: //127.0.0.1/hello
- Normally, the location of the application name should be specified by the installed module. If the application namespace is set, the namespace dispute can be used to set a different example location.
- include() also acceptance as a dispute can be a retrieval of URL or 2-Tuple patterns that contain probability as well as system name names.
How to Edit URLs?
Till now we were creating URLs in the “Cell Shop / urls.py” file, however as mentioned earlier about Django and app building, the benefit is that it can be reused in various projects. You can easily see the errors if you save all your URLs to the “projecturl.py” file. The best practice is to create a “urls.py” for each application and install it in the main urls.py file.
We need to create a urls.py file on myapp using the following code –
from django.urls import path
from . import views

urlpatterns = [
path('', views.front, name='front'),
path('product', views.index, name='index'),
path('hello/', views.new),
]

Thereafter CellShop / urls.py will switch to the following -

from django.contrib import admin
from django.urls import path, include

urlpatterns = [
path('admin/', admin.site.urls),
path('', include('products.urls')),
path('accounts/', include('accounts.urls')),
]
Thereafter CellShop / urls.py will switch to the following –
from django.contrib import admin
from django.urls import path, include

urlpatterns = [
path('admin/', admin.site.urls),
path('', include('products.urls')),
path('accounts/', include('accounts.urls')),
]
We’ve included all URLs from the myapp app. Home.html achieved with “/ hello” is now “/ myapp / hello” which is the best and most understandable web application.
Now let’s assume we have another idea for myapp “morning” and we want to put it in my app / urls.py, then we will change our myapp / urls.py into –
from django.urls import path
from . import views

urlpatterns = [
path('', views.front, name='front'),
path('product', views.index, name='index'),
path('hello/', views.new),
path('morning/', views.new, name=”morning”),
]
As you can see, we are now using the first item of our urlpatterns Tuple. This can be used when you want to change the name of your application.
Sending Parameters to Views
Now that we know how to map URL, how to edit them, now let’s see about errors handlers.
django.conf.urls jobs for use at URLconfs
static ()
from django.conf import settings
from django.conf.urls.static import static

urlpatterns = [
    # ... all your URLconf goes here ...
] + static (settings.MEDIA_URL, document_root = settings.MEDIA_ROOT)

url ()
This function is alias in django.urls.re_path ().
url ()
This function is alias in django.urls.re_path ().
Error Handler:
1. 400:
A drive, or cable representing a full Python input line in view that should be called when an HTTP client has sent a request that created an error and a response with 400 status code.
By default, this is Django.views.defaults.bad_request (). If you are using a custom view, make sure it accepts different requests and arguments and returns HttpResponseBadRequest.
2. 403:
An expensive string, or a string representing a full Python import line in the view to be called if the user does not have the necessary permissions to access the app.
By default, this is Django.views.defaults.permission_denied (). If you are using a custom view, make sure it accepts the application with different arguments and returns HttpResponseForbidden.
3. 404:
A dial, or a string representing a full Python import line in the view that should be called if there are no matching URL patterns.
By default, this is Django.views.defaults.page_not_found (). If you are using a custom view, and if it has errors that it will return HttpResponseNotFound.
4. 500:
A drive, or cable representing a full Python input line in the view should be called in case of server errors. Server errors occur when you have time-lapse errors in the view code.
By default, this is Django.views.defaults.server_error (). If you are using a custom view, make sure it accepts the request dispute and retrieves HttpResponseServerError.
Django – Template System
The Django template system is used to separate data, the way it is presented and viewed by the user. The template layer is the same as the MVC view layer. There are already template formats besides HTML, if you want to generate XML documents or JSON files, etc.
DRY is one of the main building codes of Django and is a design pattern that stands for “Do Not Repeat Yourself”. It is all about keeping the code simple and non repeating. For example, the template should be divided into useful items such as a sidebar, main navigation bar, page title, page footer and so on. This reduces duplication and is designed to write code that is efficient.
Django makes it possible to distinguish between python and HTML, python goes to view and HTML enters templates. Linking the two, Django relies on dedicated performance and the language of the Django template.
Django Template (DTL) Language:
Django template engine provides a small language to define the user-facing layer of the program.
Flexible Display:
The variation looks like this: {{variable}}. The template replaces the dynamic variable sent by the view to the third parameter of the rendering function. Let’s change our hello.html to show today –
hello.html

<html>
   <body>
      Hello World !!! <p> Today is {{today}} </p>
   </body>
</html>
After that our view will change to –
def hello (request):
   today = datetime.datetime.now(). date ()
   roll back (request, "hello.html", {"today": today})
We will now get the next result after getting the URL / myapp / hello –
Hello World!!!
Today is September 11, 2015
As you may have noticed, if the variable is not a thread, Django will use the __str__ method to indicate it; and with the same goal, you can achieve the quality of an object just as you do in Python.
For example: if we wanted to show the date year, my variable would be: {{today.year}}.
Filters:
They help you adjust the dynamics during the display. The filter structure looks like the following: {{var | filters}}.
Other examples –
{{string | truncatewords: 80}} – This filter will shorten the thread, so you’ll only see the first 80 words.
{{string | lower}} – Converts a unit of characters into lowercase letters.
{{string | escape | line
breaks}} – The content of the line runs, then converts the line split into tags.
Tags:
Tags allow you to perform the following tasks: if conditions, loop, template asset and many more.
As like Python you can use if, else and elif in your template –
<html>
   <body>

      Hello World !!! <p> Today is {{now}} </p>
      Singa
      {% if now.day == 1%}

      the first day of the month.
      {% elif now.day == 30%}

      last day of the month.
      {% more %}

      I do not know.
      {% endf %}
   </body>
</html>
In this new template, depending on the date, the template will give you a certain value.
Mark the tag for
Like ‘if’, we have the ‘for’ tag, which works in the same way as Python. Let’s change our mindset so we can move the list to our template –
def hello (request):
now = datetime.datetime.now (). date ()
week_days = [‘Sun’,’Mon’, ‘Tue’, ‘Wed’, ‘Thu’, ‘Fri’, ‘Sat’]
return (request, “hello.html”, {“now”: now, “days_of_week”: week_days})
Block and Expand Tags:
The template program cannot be completed without a template asset. Which means that when designing your own templates, you should have a large template with empty space for a child template to fill in according to their need, such as a page that may require a special css of the selected tab.
Syntax: {% block <block_name>%}{% endblock %}
Code:
”””
{% extends 'base.html' %} {% block content %}
<div
class="bg-image d-flex justify-content-center align-items-center"
style="
background-image: url('https://www.hdwallpapersfreedownload.com/uploads/large/fruits/fruits-background.jpg');
height: 100vh;
"
>
<h1 class="text-white">Fresh Fruits Shop</h1>
</div>
{% endblock %}
”””
Django – Models
Django model uses a powerful ORM layer that makes it easy to deal with databases and data which also speeds up the development process.
With the exception of Object-Relational-Mapping, developers need to create their own tables and define queries or procedures that sometimes translate into large SQL values that tend to be complex and difficult to track.
The ORM layer allows you to write all table descriptions with a simple python code, and takes care of translating that into appropriate query language of choice, and also helps with CRUD functionality.
In fact, the developer does not need to know the most complex SQL or what it translates, however, it is important to note that understanding SQL will allow you to write better and faster questions and make your website more secure.
Unlike other frameworks, the models are placed in a single file, usually, models.py, which can make it sound cramped for large projects.
Django supports multiple data systems. SQLite is ready for testing and development as it can be used out of the box without installing any other software. For production, you can go to MYSQL or PostgreSQL, and if you want a NoSQL database, you can use MongoDB in our Django projects.
Code:
from django.db import models

class Product(models.Model):
name = models.CharField(max_length=255)
price = models.FloatField()
stock = models.IntegerField()
image_url = models.CharField(max_length=2083)

class Offer(models.Model):
code = models.CharField(max_length=10)
description = models.CharField(max_length=255)
discount = models.FloatField()
Django – Page Redirection
In a web application, page redirection is required for a variety of reasons. You may wish to redirect a user to another page when a specified action is performed, or simply in the event of an error. When a user joins in to your website, he is frequently forwarded to either the main home page or his own dashboard. The ‘redirect’ method is used in Django to perform redirection.
The ‘redirect’ method takes two arguments: the URL to which you wish to be redirected as a string, and the name of the view.
def hello(request):
   today = datetime.datetime.now().date()
   daysOfWeek = ['Monday', 'Tuesday', 'Wednesday', 'Thursday', 'Friday', 'Saturday', 'Sunday']
   return render(request, "hello.html", {"today" : today, "days_of_week" : daysOfWeek})

def viewBlog(request, blogId):
""" A view that displays a specific article depending on its ID."""
   text = "Displaying Number of Blog : %s" %blogId
   return HttpResponse(text)

def viewBlogs(request, year, month):
   text = "Displaying Blogs of : %s/%s"%(year, month)
   return HttpResponse(text)
Let’s alter our hello view to redirect to djangoprojectsamples.com and our viewBlog to redirect to our internal ‘/myapp/blogs’. To accomplish this, myapp/view.py will be renamed to
from django.shortcuts import render, redirect
from django.http import HttpResponse
import datetime

# Create your views here.
def hello(request):
   today = datetime.datetime.now().date()
   daysOfWeek = ['Monday', 'Tuesday', 'Wednesday', 'Thursday', 'Friday', 'Saturday', 'Sunday']
   return redirect("https://www.djangoprojectsamples.com")

def viewBlog(request, blogId):
   """ A view that display an article based on his ID"""
   text = "Displaying Number of Blog: %s" %blogId
   return redirect(viewBlogs, year = "2021", month = "08")

def viewBlogs(request, year, month):
   text = "Displaying blogs of: %s/%s"%(year, month)
   return HttpResponse(text
In the preceding example, we imported redirect from django.shortcuts, and for redirection to the Django official website, we simply pass the full URL as a string to the ‘redirect’ method, whereas for the second example (the viewBlog view), the ‘redirect’ method takes the view name and its parameters as arguments. When you go to /myapp/hello, you will see the following screen.

And going to /myapp/blog/40 will bring you to the following screen.

By adding the permanent = True argument, you may also indicate whether the ‘redirect’ is temporary or permanent. The user will see no difference, yet these are the factors that search engines use when ranking your website.
Django – Sending E-mails
For sending e-mail, Django has a ready-to-use light engine. You only need to import smtplib, just like Python. Simply import django.core.mail into Django. Edit your project settings.py file and specify the following options to start sending e-mail. –
| EMAIL_HOST | smtp server |
| EMAIL_HOST_USER | smtp server login credential |
| EMAIL_HOST_PASSWORD | smtp server password credential |
| EMAIL_PORT | server port of smtp |
| EMAIL_USE_TLS or _SSL | if secure connection then it’s TRUE |
Sending a Simple E – Mail
Let’s create a “sendSimpleEmail” view to send a simple e-mail for the second example (the viewBlog view), the ‘redirect’ method takes the view name and its parameters as arguments.
from django.core.mail import send_mail
from django.http import HttpResponse
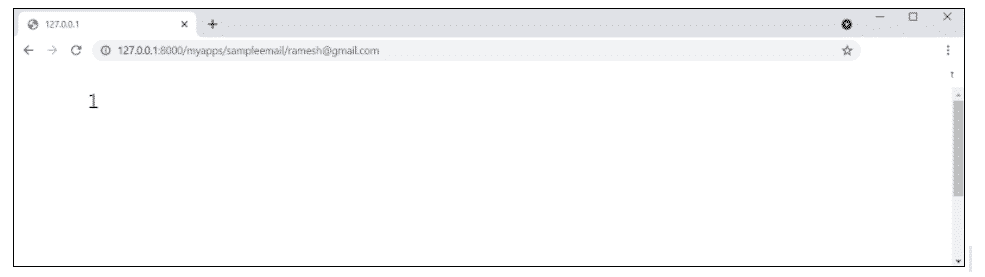
def sendSimpleEmail(request,emailto):
res = send_mail("hello ramesh", "How are you?", "ramesh@gmail.com", [emailto])
return HttpResponse('%s'%res)
List of parameter details to send an e mail:
| subject | Subject of the email |
| message | Body of the email |
| from_email | From email |
| recipient_list | Email receivers list |
| fail_silently | If false, send mail will throw an exception if there is a problem. |
| auth_user | User login |
| auth_password | User Password |
| connection | Backend of the email |
| html_message | Email will be multipart or alternative |
from django.conf.urls import patterns, url

urlpatterns = paterns('myapps.views',url(r'^sampleemail/(?P<emailto>
   [\w.%+-]+@[A-Za-z0-9.-]+\.[A-Za-z]{2,4})/',
   'sendSampleEmail',name = 'sendSampleEmail'),
So, if you go to /myapps/sampleemail/ramesh@gmail.com, you’ll see something like this:
Using send mass mail to send many emails
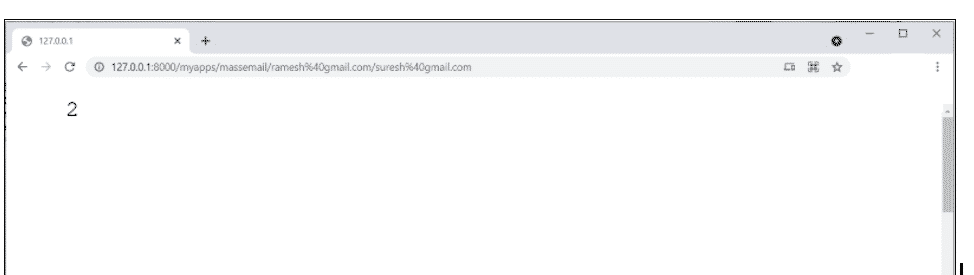
The method returns the number of messages sent successfully. This is similar to send mail but adds a datatuple parameter, thus our sendMassEmail view will be datatuple.
from django.core.mail import send_mass_mail
from django.http import HttpResponse

def sendMassEmail(request,emailto):
   msg1 = ('subject 1', 'message 1', 'ramesh@gmail.com', [emailto1])
   msg2 = ('subject 2', 'message 2', 'suresh@gmail.com', [emailto2])
   res = send_mass_mail((msg1, msg2), fail_silently = False)
   return HttpResponse('%s'%res)
Let’s create the URL to access the view:
from django.conf.urls import patterns, url

urlpatterns = paterns('myapps.views', url(r'^massEmail/(?P<emailto1>
   [\w.%+-]+@[A-Za-z0-9.-]+\.[A-Za-z]{2,4})/(?P<emailto2>
   [\w.%+-]+@[A-Za-z0-9.-]+\.[A-Za-z]{2,4})', 'sendMassEmail' , name = 'sendMassEmail'),)
When accessing /myapps/massemail/ramesh@gmail.com/suresh@gmail.com/, we get –
Send_Mass_Mail parameter details:
| datatuples | Each element of the tuple is (subject, message, from email, recipient list). |
| fail_silently | If false, send mail will throw an exception if there is a problem. |
| auth_user | User Login |
| auth_password | User Password |
| connection | Backend of e- mail |
Two messages were successfully sent, as shown in the image above.
$python -m smtpd -n -c DebuggingServer localhost:1025
This implies that all of your sent e-mails will be printed to stdout, and the dummy server will be accessible at localhost:1025.
Sending HTML E-Mail
It’s as simple as sending an HTML message in Django >= 1.7.
from django.core.mail import send_mail

from django.http import HttpResponse
   res = send_mail("hello ramesh", "How are you ?", "ramesh@gmail.com",
         ["ramesh@gmail.com"], html_message=")
This will result in a multipart/alternative e-mail being sent.
However, with Django 1.7, HTML messages are sent via the django.core.mail module. The EmailMessage class then calls the object’s’send’ method.
Let’s generate a “sendHTMLEmail” view to send an HTML e-mail.
from django.core.mail import EmailMessage
from django.http import HttpResponse

def sendHTMLEmail(request , emailto):
   html_content = "<strong>Comment tu vas?</strong>"
   email = EmailMessage("my subject", html_content, "ramesh@gmail.com", [emailto])
   email.content_subtype = "html
  res = email.send()
   return HttpResponse('%s'%res)
Information for the EmailMessage class construction parameters:
| Subject | E- mail subject |
| Message | Body in HTML |
| from_email | E- mail from whom |
| to | Receiver’s list |
| bcc | e- mail address for list of bcc receivers |
| connection | Backend email connection |
Let’s make a URL to get to our view:
from django.conf.urls import patterns, url

urlpatterns = paterns('myapps.views', url(r'^htmlemail/(?P<emailto>
   [\w.%+-]+@[A-Za-z0-9.-]+\.[A-Za-z]{2,4})/',
   'sendHTMLEmail' , name = 'sendHTMLEmail'),)
return HttpResponse('%s'%res)
viewBlog view), the ‘redirect’ method takes the view name and its parameters as arguments.
Django – Generic Views
As we’ve seen, writing views can be somewhat difficult in some circumstances. Assume you require a static or listing page. Generic views are a convenient method to put up those simple views in Django.
Generic views, unlike classic views, are classes rather than functions. In django.views.generic, Django provides a set of generic view classes, and every generic view is either one of those classes or a class that derives from one of them.
There are more than ten generic classes.
>>> import django.views.generic
>>> dir(django.views.generic)

['ArchiveIndexView', 'CreateView', 'DateDetailView', 'DayArchiveView', 'DeleteView', 'DetailView', 'FormView', 'GenericViewError', 'ListView', 'MonthArchiveView', 'RedirectView', 'TemplateView', 'TodayArchiveView', 'UpdateView', 'View', 'WeekArchiveView', 'YearArchiveView', '__builtins__', '__doc__', '__file__', '__name__', '__package__', '__path__', 'base', 'dates','detail', 'edit', 'list']
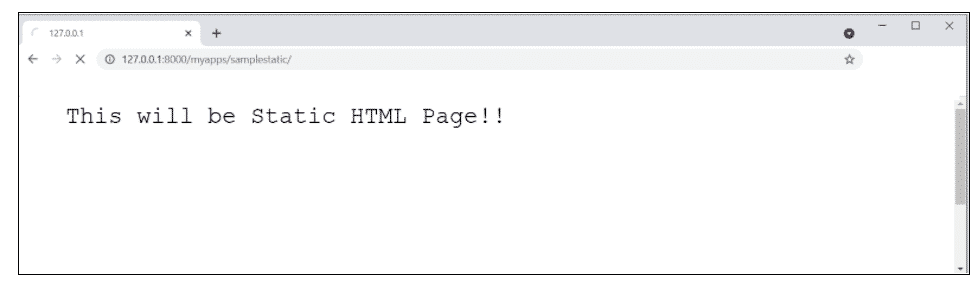
This is the view that you can use for your generic view. Let’s have a look at an illustration to see how it works.
Static Page of HTML: (samplestatic.html)
<html>
   <body>
      This will be Static HTML Page!!
   </body>
</html>
If we implemented it the way we learnt before, we’d have to rename as myapp/sviews.py
from django.shortcuts import render

def static(request):
   return render(request, 'samplestatic.html', {})
 return HttpResponse('%s'%res
from django.conf.urls import patterns, url
urlpatterns = patterns("myapps.views", url(r'^static/', 'static',
name = 'samplestatic'),
The good way is to use generic views. For that, our myapps/views.py will become –
from django.views.generic import TemplateView

class StaticView(TemplateView):
   template_name = "samplestatic.html"
our myapp/samplestatic
from myapp.views import StaticView
from django.conf.urls import patterns

urlpatterns = patterns("myapps.views", (r'^static/$', StaticView.as_view()),)
We can also do the following to achieve the same result:
There has been no change in the view.py
Change the name of the url.py file
from django.views.generic import TemplateView
from django.conf.urls import patterns, url

urlpatterns = patterns("myapps.views",
   url(r'^static/',TemplateView.as_view(template_name = 'samplestatic.html')),)
 return HttpResponse('%s'%res)
viewBlog view), the ‘redirect’ method takes the view name and its parameters as arguments.
Change the name of the url.py file
from django.views.generic import TemplateView
from django.conf.urls import patterns, url

urlpatterns = patterns("myapps.views",
   url(r'^static/',TemplateView.as_view(template_name = 'samplestatic.html')),)
In our Dreamreal model, we’ll make a list of all entries. Using the ListView generic view class makes this simple. Update the url.py file as follows:
from django.views.generic import ListView
from django.conf.urls import patterns, url

urlpatterns = patterns(
   "myapps.views", url(r'^dreamlist/', ListView.as_view(model = Dreamreal,
      template_name = "dream_list.html")),
)
It’s worth noting at this point that the generic view passes object list to the template as a variable. You’ll need to add a context object name argument to the as view method if you wish to name it yourself. The sampleurl.py file will then be renamed
from django.views.generic import ListView
from django.conf.urls import patterns, url

urlpatterns = patterns(
   "myapps.views", url(r'^dreamlist/', ListView.as_view(model = Dreamreal,
      template_name = "dream_list.html")),
It’s worth noting at this point that the generic view passes object list to the template as a variable. You’ll need to add a context object name argument to the as view method if you wish to name it yourself. The sampleurl.py file will then be renamed
from django.views.generic import ListView
from django.conf.urls import patterns, url

urlpatterns = patterns("myapp.views",
   url(r'^dreamreals/', ListView.as_view(
      template_name = "dream_list.html")),
      model = Dreamreal, context_object_name = ”dreamreals_objects” ,)
the template will be
viewBlog view), the ‘redirect’ method takes the view name and its parameters as arguments
{% extends "mainsample_template.html" %}
{% block content %}
Dreamreals:<p>
{% for dr in object_list %}
{{dr.name}}</p>
{% endfor %}
{% endblock %}

Django – Form Processing
In Django, generating forms is quite similar to establishing a model. Again, all we have to do is inherit from the Django class, and the form fields will be the class attributes. To store our app forms, create a forms.py file in the myapp subdirectory. We’ll make a login page.
myapps/sampleforms.py
#-*- coding: utf-8 -*-
from django import forms

class LoginForm(forms.Form):
   user = forms.CharField(max_length = 150)
   password = forms.CharField(widget = forms.PasswordInput())
The field type can take the “widget” parameter for html rendering, as seen above; in our case, we want the password concealed rather than displayed. Django also includes a number of other widgets, such as DateInput for dates, CheckboxInput for checkboxes, and so on.
Using Form in View:
GET and POST are the two types of HTTP queries. The type of the request is set in the “method” attribute of the request object supplied as a parameter to your view in Django, and all data passed
Loin view myapps/view.py
#-*- coding: utf-8 -*-
from myapps.forms import LoginForm

def login(request):
   username = "not logged in"

   if request.method == "POST":
      #Get the posted form
      MyLoginForm = LoginForm(request.POST)  #login form

      if MyLoginForm.is_valid():
         username = MyLoginForm.cleaned_data['username'] #validation
   else:
      MyLoginForm = Loginform()

   return render(request, 'loggedinsample.html', {"username" : username})
The outcome of the login form submitted via loggedinsample.html will be displayed in the view. We’ll need the login form template first to test it. We’ll call it loginsample.html for now.
<html>
   <body>

      <form name = "form" action = "{% url "myapps.views.samplelogin" %}"
         method = "POST" >{% csrf_token %}

         <div style = "max-width:470px;">
            <center>
               <input type = "text" style = "margin-left:20%;"
                  placeholder = "Identifiant" name = "username" />
            </center>
         </div>

         <br>

         <div style = "max-width:470px;">
            <center>
               <input type = "password" style = "margin-left:20%;"
                  placeholder = "password" name = "password" />
            </center>
         </div>

         <br>

         <div style = "max-width:470px;">
            <center>

               <button style = "border:0px; background-color:#4285F4; margin-top:8%;
                  height:35px; width:80%;margin-left:19%;" type = "submit"
                  value = "Login" >
                  <strong>Login</strong>
               </button>

            </center>
         </div>

      </form>

   </body>
</html>
The template will show a login form and then post the results to the login view we saw earlier. You’ve probably noticed the tag in the template, which is just there to protect your site from a Cross-site Request Forgery (CSRF) attack.
After we’ve created the login template, we’ll need to create the loggedinsample.html template, which will be rendered after the form has been processed.
<html>

   <body>
      The user who has logged in is : <strong>{{username}}</strong>
   </body>

</html>
To get started, we just need a pair of URLs: myapps/urls.py
from django.conf.urls import patterns, url
from django.views.generic import TemplateView

urlpatterns = patterns('myapps.views',
   url(r'^connection/',TemplateView.as_view(template_name = 'loginsample.html')),
   url(r'^login/', 'login', name = 'login'))

The form is valid when it is submitted. Make careful to fill out both fields in our situation, and you’ll obtain
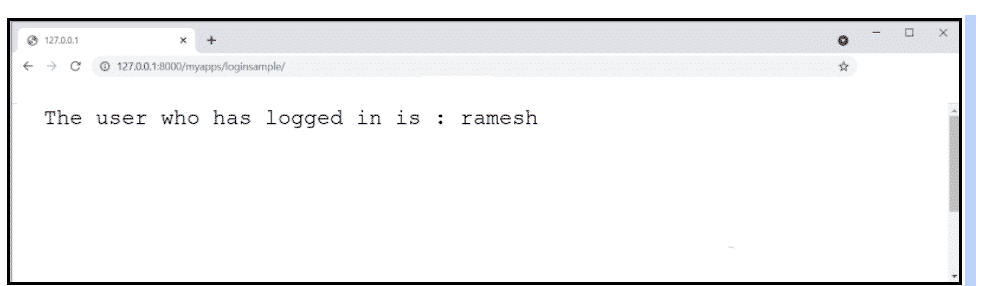
If your username is ramesh and you’ve forgotten your password, this is the place to go. The following notice will appear on your screen:

Django – File Uploading
Make sure you have the Python Image Library (PIL) installed before you start playing with images. Let’s make a profile form in myapps/formsample.py to demonstrate how to upload an image.
from django import forms

class ProfileForms(forms.Form):
   name = forms.CharField(max_length = 150)
   picture = forms.ImageFields()
The only change here, as you can see, is just the forms. ImageField. ImageField will verify that the file you’ve submitted is an image. The form validation will fail if this is not done.
Now we’ll make a “Profile” model to save our profile that we just submitted. In myapps/samplemodels.py, this is done. –
rom django.db import models

class Profile(models.Model):
   name = models.CharField(max_length = 70)
   picture = models.ImageField(upload_to = 'pictures')
   class Meta:
      db_table = "profile"
The ImageField takes a mandatory argument: upload to, as you can see for the model. This is the location where your images will be saved on your hard drive. Note that the parameter will be added to your settings.py file’s MEDIA ROOT option.
myapps/views.py
from myapp.forms import ProfileForm
from myapp.models import Profile
def SaveProfile(request):
   saved = False


   if request.method == "POST":
      #Get the posted form
      MyProfileForm = ProfileForm(request.POST, request.FILES)

      if MyProfileForm.is_valid():
         profile = Profile()
         profile.name = MyProfileForm.cleaned_data["name"]
         profile.picture = MyProfileForm.cleaned_data["picture"]
         profile.save()
         saved = True
   else:
      MyProfileForm = Profileform()

   return render(request, 'savedsample.html', locals())
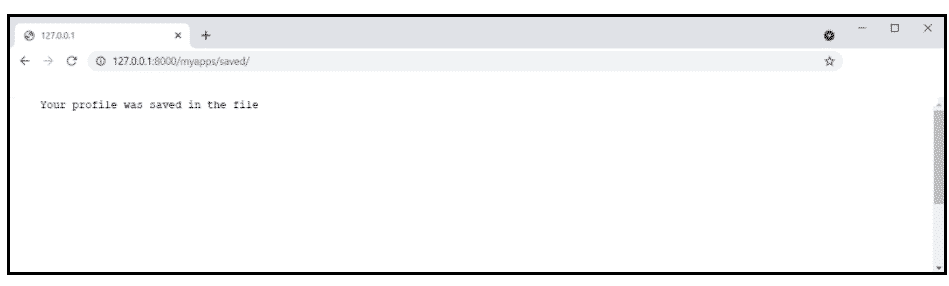
It’s important to note that when building a ProfileForm, we’ve included a new parameter: request.FILES. If the form validation fails, a message stating that the photo is empty will be displayed.
We only need the savedsample.html and profilesample.html templates now for the form and redirection page, respectively.
myapps/templates/savedsample.html
<html>
   <body>

      {% if saved %}
         <strong>Your profile was saved in the file</strong>
      {% endif %}

      {% if not saved %}
         <strong>Your profile was not saved in the file</strong>
      {% endif %}

   </body>
</html>
myapp/templates/profilesample.html
<html>
   <body>

      <form name = "form" enctype = "multipart/form-data"
         action = "{% url "myapps.views.SaveProfile" %}" method = "POST" >{% csrf_token %}

         <div style = "max-width:470px;">
            <center>
               <input type = "text" style = "margin-left:20%;"
               placeholder = "Name" name = "name" />
            </center>
         </div>

         <br>

         <div style = "max-width:470px;">
            <center>
               <input type = "file" style = "margin-left:20%;"
                  placeholder = "Picture" name = "picture" />
            </center>
         </div>

         <br>

         <div style = "max-width:470px;">
            <center>

               <button style = "border:0px;background-color:#4285F4; margin-top:8%;
                  height:35px; width:80%; margin-left:19%;" type = "submit" value = "Login" >
                  <strong>Login</strong>
               </button>

            </center>
         </div>

      </form>

   </body>
</html>
To get started, we’ll need our pair of URLs: myapps/urls.py
from django.conf.urls import patterns, url
from django.views.generic import TemplateView

urlpatterns = patterns(
   'myapp.views', url(r'^profile/',TemplateView.as_view(
      template_name = 'profilesample.html')), url(r'^saved/', 'SaveProfile', name = 'saved')
)
When accessing “/myapp/profilesample”, we will get the following profilesample.html template rendered −


And the saved template will be rendered when the form is submitted.
If you want to submit a different type of file than an image, simply replace the ImageField in both the Model and the Form with FileField.
Django – Apache Setup
The Django dev web server was utilised. However, this server is only for testing purposes and is not suitable for use in a production environment. You’ll need a real server like Apache, Nginx, or something similar once you’re in production. Let’s talk about Apache Setup.
Mod wsgi is used to serve Django apps via Apache. The first step is to ensure that Apache and mod wsgi are both installed. Remember how, when we were creating our project and looking at the structure, it looked like this
myprojectsample/
   manage.py
   myprojectsample/
      __init__.py
      settings.py
      urls.py
      wsgi.py
The wsgi.py file is the one taking care of the link between Django and Apache.
Let’s imagine we wish to share our project with Apache (myprojectsample). All we have to do now is tell Apache to access our folder. Assume we’ve placed our myprojectsample folder in the standard “/var/www/html” location. At this time, the project can be accessed at 127.0.0.1/myprojectsample. As you can see in the next screenshot, Apache will just list the folder.
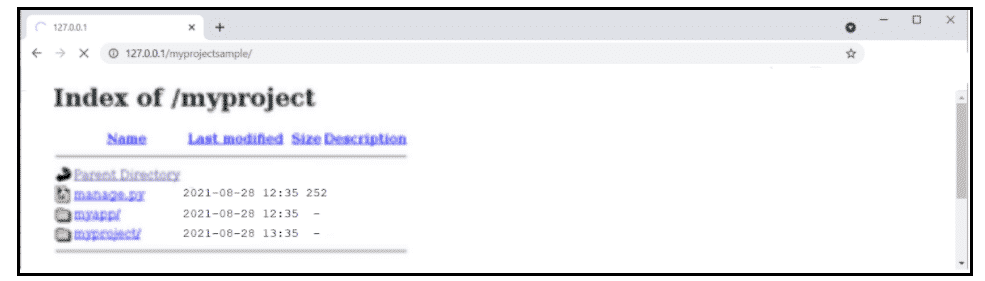
As can be observed, Apache is unable of dealing with Django-related issues. We’ll need to configure Apache in httpd.conf to take care of this. As a result, enter httpd.conf and add the following line
WSGIScriptAlias / /var/www/html/myprojectsample/myprojectsample/wsgi.py
WSGIPythonPath /var/www/html/myprojectsample/

<Directory /var/www/html/myprojectsample/>
   <Files wsgi.py>
      Order deny,allow
      Allow from all
   </Files>
</Directory>

Django – Cookies Handling
As part of your web application’s requirements, you may need to keep some data on a per-site-visitor basis. Always remember that cookies are saved on the client side, and that depending on the security level of your client browser, setting cookies may or may not function.
Let’s develop a system that uses the login system we created before to demonstrate cookie handling in Django. The system will keep you logged in for X minutes after which you will be kicked out of the app.
You’ll need to set up two cookies for this: last connection and username.
Let’s start by changing our login view such that our username and last connection cookies are saved.
from django.template import RequestContext

def login(request):
   username = "not logged in"

   if request.method == "POST":
      #Get the posted form
      MyLoginForm = LoginForm(request.POST)

   if MyLoginForm.is_valid():
      username = MyLoginForm.cleaned_data['username']
   else:
      MyLoginForm = LoginForm()

   response = render_to_response(request, 'loggedinsample.html', {"username" : username},
      context_instance = RequestContext(request))

   response.set_cookie('last_connection', datetime.datetime.now())
   response.set_cookie('username', datetime.datetime.now())

   return response
As can be seen in the example above, the set cookie method is called on the response rather than the request, and all cookie values are returned as strings.
Now let’s make a form View for the login form, where we won’t show the form until a cookie is set and it’s less than 10 seconds old.
def formView(request):
   if 'username' in request.COOKIES and 'last_connection' in request.COOKIES:
      username = request.COOKIES['username']

      last_connection = request.COOKIES['last_connection']
      last_connection_time = datetime.datetime.strptime(last_connection[:-7],
         "%Y-%m-%d %H:%M:%S")

      if (datetime.datetime.now() - last_connection_time).seconds < 10:
         return render(request, 'loggedinsample.html', {"username" : username})
      else:
         return render(request, 'loginsample.html', {})

   else:
      return render(request, 'loginsample.html', {})
The COOKIES attribute (dict) of the request is used to access the cookie you set, as shown in the formView above.
from django.conf.urls import patterns, url
from django.views.generic import TemplateView

urlpatterns = patterns('myapps.views',
   url(r'^connection/','formView', name = 'loginform'),
   url(r'^login/', 'login', name = 'login'))
When accessing /myapps/connection, you will get the following page –

After login you will be redirected to the page displayed below
If you try to access /myapps/connection again during the next 10 seconds, you will be taken straight to the second screen. If you go outside of this range and access /myapps/connection again, you’ll get the login form (screen 1).
Django – Sessions
As previously mentioned, client-side cookies can be used to store a lot of useful data for the web app. We’ve already seen how client-side cookies can be used to store various data for our web app. Depending on the relevance of the data you want to save, this can lead to a slew of security flaws.
Django offers a session framework for handling cookies for security reasons. Data is saved on the server side (as in a database), while the client-side cookie only provides a session ID for identification. Sessions can also help you avoid situations where the user’s browser is set to reject cookies.
How to setup sessions lets learn
Enabling sessions in Django is done in the project settings.py Add some lines to the MIDDLEWARE_CLASSES and INSTALLED APPS settings.py This should be done when creating the project, but it’s always good to be prepared, thus MIDDLEWARE_CLASSES should have MIDDLEWARE_CLASSES.
‘django.contrib.sessions.middleware.SessionMiddleware’
The app installed must contain
.contrib.sessions’
‘django
Django saves session data in the database by default (django session table or collection), but you can configure the engine to save data in other places, such as a file or a cache.
When session is enabled, a session (dict) attribute is added to every request (first argument of any Django view).
To demonstrate how to create and store sessions, let’s design a simple example. We’ve already constructed a simple login mechanism (see Django form processing chapter and Django Cookies Handling chapter). Allow us to save your username in a cookie so that you won’t see the login form if you aren’t logged out when you visit our login page. Basically, let’s make our Django Cookies handling login mechanism more safe by keeping cookies on the server.
Let’s start by changing our login view to save our username cookie on the server side.
def login(request):
   username = 'not logged in'

   if request.method == 'POST':
      MyLoginForm = LoginForm(request.POST)

      if MyLoginForm.is_valid():
         username = MyLoginForm.cleaned_data['username']
         request.session['username'] = username
      else:
         MyLoginForm = LoginForm()

   return render(request, 'loggedinsample.html', {"username" : username}
Then we’ll make a form View view for the login form, which will hide the form if a cookie is set.
def formView(request):
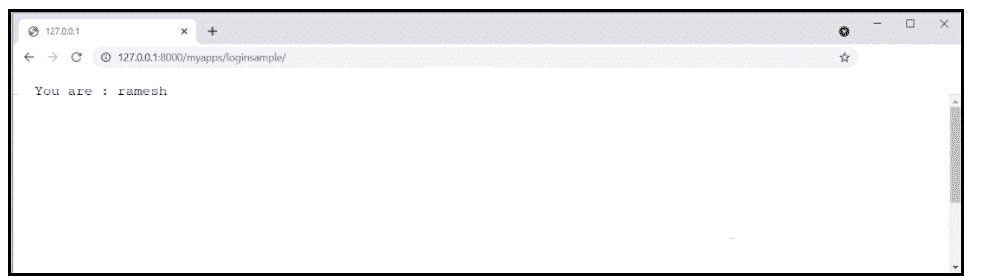
if request.session.has_key('username'):
username = request.session['susername']
return render(request, 'loggedinsample.html', {"username" : username})
else:
return render(request, 'loginsample.html', {})
Now let’s edit the url.py file to match our new view’s url.
from django.conf.urls import patterns, url
from django.views.generic import TemplateView

urlpatterns = patterns('myapp.views',
   url(r'^connection/','formView', name = 'loginform'),
   url(r'^login/', 'login', name = 'login'))
You’ll see the following page when you go to /myapps/connection.

You’ll be forwarded to the following page as a result.
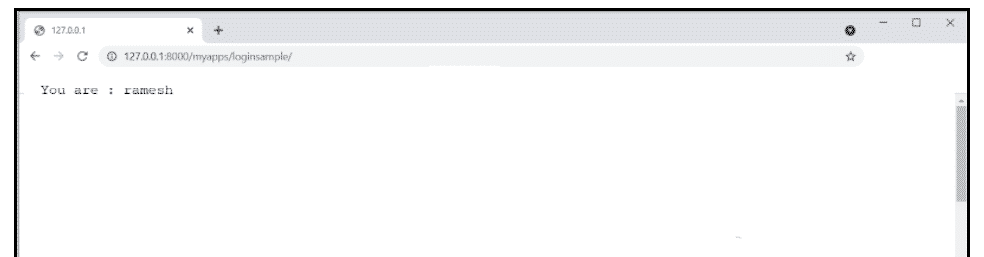
If you try to enter /myapps/connection again, you’ll be taken straight to the second screen.
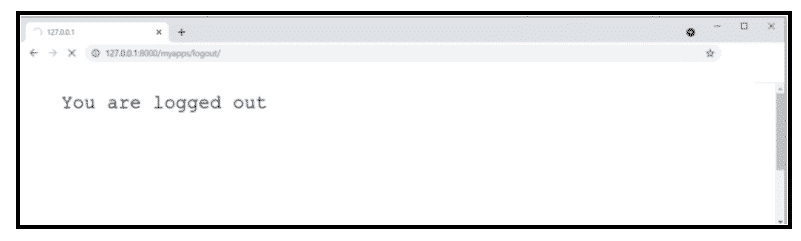
Let’s make a straightforward logout view that clears our cookie.
def logout(request):
   try:
      del request.session['username']
   except:
      pass
   return HttpResponse("<strong>You have logged out now.</strong>")
And pair it with a logout URL in myapps/url.py
url(r’^logout/’, ‘logout’, name = ‘logout’),
Now, if you access /myapps/logout, you will get the following page –
You’ll see the login form if you go to /myapps/connection again (screen 1).
Additional Actions That Can Be Taken Using Sessions
We’ve seen how to store and access a session, but it’s also worth noting that the request’s session attribute has various additional helpful actions, such as
set_expiry (value) : Sets the session’s expiration time.
get_expiry_age ( ) : The number of seconds till this session expires is returned.
get_expiry_date ( ) : The expiration date for this session is returned.
clear_expired ( ) : Expired sessions are removed from the session repository.
get_expire_at_browser_close() : If the user’s session cookies have expired when the user’s web browser is closed, this method returns True or False.
Django – Caching
Caching anything means saving the outcome of a time-consuming calculation so you don’t have to do it again the next time you need it. The pseudocode that follows demonstrates how caching works.
If you're given a URL, try looking it up in the cache.

if the page has been cached:
return the previously cached page
else:
create a webpage
the created page is saved in the cache (for next time)
return the page that was created
Django has its own caching system that allows you to keep your dynamic pages so that you don’t have to calculate them again when you need them. The advantage of the Django Cache framework is that it allows you to cache data.
- The result of a particular vision.
- It’s a piece of a template.
- Your full web page.
The first step in using cache in Django is to determine where the cache will be stored. Caching can be saved in a database, on a file system, or directly in memory, according to the cache framework. The settings are made in your project’s settings.py file.
Caching a View
You can cache a specific view instead of the full site if you don’t want to cache the complete site. The cache page decorator that comes with Django is used to accomplish this. Let’s imagine we wish to save the view’s outcome in a cache. View the articles
from django.views.decorators.cache import cache_page

@cache_page(60 * 15)

def viewArticles(request, year, month):
   text = "Displaying blogs of : %s/%s"%(year, month)
   return HttpResponse(text)
As you can see, the number of seconds you want the view result to be cached is passed as a parameter to cache page. The result will be cached for 15 minutes in our case.
As previously stated, the aforementioned view was mapped to
urlpatterns = patterns('myapps.views',
   url(r'^blogs/(?P<month>\d{2})/(?P<year>\d{4})/', 'viewBlogs', name = 'blogs'),)
Because the URL accepts arguments, each call will be stored separately. Requests to /myapps/articles/02/2007, for example, will be cached independently from requests to /myapps/articles/03/2008.
A view can also be cached directly in the url.py file. The following gives the same result as the previous. Simply replace the related mapped URL (above) in your myapps/url.py
urlpatterns = patterns('myapps.views',
   url(r'^blogs/(?P<month>\d{2})/(?P<year>\d{4})/',
   cache_page(60 * 15)('viewBlogs'), name = 'blogs'),)
Creating a Template Fragment
You can also use the cache tag to cache specific parts of a template. Take a look at our hello.html template.
{% extends "main_templatesample.html" %}
{% block title %}My Hello PageSample{% endblock %}
{% block content %}

Hello Everyone!!!<p>Today is {{today}}</p>
We are
{% if today.day == 1 %}

the first day of month.
{% elif today == 30 %}

the last day of month.
{% else %}

Don’t kmow
{%endif%}

<p>
   {% for day in days_of_week %}
   {{day}}
</p>

{% endfor %}
{% endblock %}
Caching the content blog
{% load cache %}
{% extends "main_template.html" %}
{% block title %}My Hello PageSample{% endblock %}
{% cache 500 content %}
{% block content %}

Hello Everyone!!!<p>Today is {{today}}</p>
We are
{% if today.day == 1 %}

the first day of month.
{% elif today == 30 %}

the last day of month.
{% else %}

Don’t know.
{%endif%}

<p>
   {% for day in days_of_week %}
   {{day}}
</p>

{% endfor %}
{% endblock %}
{% endcache %}
The cache tag, as you can see above, has two parameters: the time you want the block to be cached (in seconds) and the name you want to give the cache fragment.
Entire Site Caching
Caching the entire site is the simplest approach to use cache in Django. This is done in the project settings.py by modifying the MIDDLEWARE CLASSES variable. To the choice, the following must be added:
MIDDLEWARE_CLASSES += (
   'django.middleware.cache.UpdateCacheMiddleware',
   'django.middleware.common.CommonMiddleware',
   'django.middleware.cache.FetchFromCacheMiddleware',
)
It’s worth noting that the sequence matters here: Update should come before the Fetch middleware.
Then you must set a value for in the same file.
CACHE MIDDLEWARE ALIAS – The storage cache alias to use.
CACHE MIDDLEWARE SECONDS – The time each page should be cached in seconds.
Django – Comments
Before you begin, keep in mind that the Django Comments framework has been deprecated since version 1.5. You may now do so using an external feature, but if you still want to utilize it, it’s still available in versions 1.6 and 1.7. It is no longer present in version 1.8, however the source is still available on a different GitHub account.
Any model in your project can have comments attached to it thanks to the comments framework.
To get started with the Django comments framework, follow these steps.
Add ‘django.contrib.sites’ and ‘django.contrib.comments’ to the INSTALLED APPS option in the project settings.py file.
INSTALLED_APPS += ('django.contrib.sites', 'django.contrib.comments',)
Obtain site ID
>>> from django.contrib.sites.models import Site
>>> Site().save()
>>> Site.objects.all()[0].id
u'56194498e13823167dd43c64'
Set the ID obtained in the settings.py file
SITE_ID = u’56194498e13823167dd43c64′
DB Sync
python manage.py syncdb
Add the URLs from the comment app to your project’s urls.py file.
from django.conf.urls import include
url(r'^comments/', include('django.contrib.comments.urls')),
Let’s update our greeting templates to track comments on our Dreamreal model now that we’ve installed the framework. We’ll list and save comments for a single Dreamreal entry, the name of which will be provided as a parameter to the /myapp/hello URL.
Django RSS
Django has a framework for creating syndication feeds. By subclassing the django.contrib.syndication.views.Feed class, you can build RSS or Atom feeds.
Let’s make a feed for the most recent app comments (Also see Django – Comments Framework chapter). Let’s start by creating a myapp/feeds.py file and defining our feed (You can put your feeds classes anywhere you want in your code structure).
from django.contrib.syndication.views import Feed
from django.contrib.comments import Comment
from django.core.urlresolvers import reverse

class DreamrealCommentsFeed(Feed):
   title = "DreamSample's comments"
   link = "/drcomments/"
   description = "Modifies new comments to DreamSample."

   def items(self):
      return Comment.objects.all().order_by("-submit_date")[:5]

   def item_title(self, item):
      return item.user_name

   def item_description(self, item):
      return item.comment

   def item_link(self, item):
      return reverse('comment', kwargs = {'object_pk':item.pk})
- The title, link, and description attributes of our feed class correspond to the standard RSS title, link, and description elements.
- The elements that should be in the feed as item elements are returned by the items method. The last five remarks in our situation.
- The item title method returns the title that will be used for our feed item. The user name will be the title in our case.
- The item description method returns the text that will be used as the feed item’s description. The comment itself in our case.
- The item link method creates a link to the entire item. It will take you to the comment in our situation.
Django – AJAX
Ajax is a collection of technologies that work together to decrease the number of times a website loads. Ajax is commonly used to improve the end-user experience. Ajax can be used directly in Django by using an Ajax library such as JQuery or others. Let’s imagine you want to use JQuery. You’ll need to download the library and serve it on your server using Apache or another server. Then incorporate it into your template, just like you would in any Ajax-based application.
The Django Ajax framework is another approach to use Ajax with Django. The most popular is django-dajax, which is a strong tool for developing asynchronous display logic in web applications using Python and very little JavaScript source code. Prototype, jQuery, Dojo, and MooTools are four of the most popular Ajax frameworks supported.
The first step is to install django-dajax. Easy install or pip can be used to accomplish this.
$ pip install django_dajax
$ easy_install django_dajax
This will install django-dajaxice, which is required by django-dajax. After that, both dajax and dajaxice must be configured.
In your project settings, add dajax and dajaxice. py in the INSTALLED APPS setting
INSTALLED_APPS += (
   'dajaxice',
   'dajax'
)
settings.py should have the following content
TEMPLATE_LOADERS = (
   'django.template.loaders.filesystem.Loader',
   'django.template.loaders.app_directories.Loader',
   'django.template.loaders.eggs.Loader',
)

TEMPLATE_CONTEXT_PROCESSORS = (
   'django.contrib.auth.context_processors.auth',
   'django.core.context_processors.debug',
   'django.core.context_processors.i18n',
   'django.core.context_processors.media',
   'django.core.context_processors.static',
   'django.core.context_processors.request',
   'django.contrib.messages.context_processors.messages'
)

STATICFILES_FINDERS = (
   'django.contrib.staticfiles.finders.FileSystemFinder',
   'django.contrib.staticfiles.finders.AppDirectoriesFinder',
   'dajaxice.finders.DajaxiceFinder',
)

DAJAXICE_MEDIA_PREFIX = 'dajaxice'
By end of this read you would have completed the following concepts under the Django tutorial – Basics of Django, Django Environment, Django tutorial – Models, How to create a project using Django and python, Django App life cycle, Django – URL mapping using Django. If you wish to learn more such concepts, head over to Great Learning Academy and enroll yourself on any of our free Django courses.