- Introduction
- What is a Web Framework?
- What is Micro-framework?
- What is Flask?
- What is WSGI?
- What is Jinja 2?
- Why Flask?
- Setting up Environment
- Setting up your virtual environment
- Your 1st Flask Application
- Let’s understand the syntax of the program
- Debugging
- Routes
- Dynamic Routing
- URL Building
- How Does that work?
- Why should you consider Dynamic URL Building?
- HTTP Methods
- Templates in Flask
- Project Folder Structure
- Static Files
- Jinja 2
- Rendering Templates
- Request object
- Response Object
- Conclusion
Introduction
Python is the most sort after language for web application development and data science as well. It has risen to this height for its ease of use and variety of supportive libraries. There are legacy frameworks like Java’s Enterprise edition and ASP. NET’s MVC framework is still popular for enterprise-level development. But Python is the favourite for new POC and small-time development where an audience that of an enterprise is not immediately expected. And, of course, the fact that Python and most of its libraries are open sources and free is an exceptionally helpful and useful factor too.
In Python, for web application development, the leaders are Django and Flask. Django is very much similar to the MVC framework of ASP. NET. But Flask is different. Let’s see how. Read further and learn more about machine learning deployment using flask and get practical insights.
What is a Web Framework?
To understand Flask, we need to understand what is the traditional web framework. A web application framework is a collection of libraries and modules which helps developers write the business layer without worrying about the protocol, thread management, etc. And Python’s Django follows a traditional web framework which is also called an enterprise framework.
What is Micro-framework?
In contrast to a traditional web framework, a micro-framework is a minimalistic framework where developers are provided with a lot of freedom to build the web application layer. As compared to an enterprise framework, a developer would not need to set up many things in a micro-framework to get the web app hosted and running. This is incredibly useful in cases of small web app development where the needs are not the same as an enterprise-level framework which would save lots of development ~ maintenance time and money as a consequence.
What is Flask?
Now, we are well equipped to understand Flask. Flask is Python’s micro-framework for web app development. It was developed by Armin Ronacher, who led an international team of Python enthusiasts called Pocco. Flask consists of Werkzeug WSGI toolkit and Jinja2 template engine. Both were also developed by Pocco. It was initially released in April 2010. Currently, the latest version as of writing this article is 2.0.2.
What is WSGI?
Web Server Gateway Interface (WSGI) is the standard for Python web application development. WSGI is a specification for a universal interface between the web server and the web applications.
Werkzeug is one of the most advanced WSGI modules that contain various tools and utilities that facilitate web application development. Flask implements Werkzeug.
What is Jinja 2?
Jinja 2 is a template rendering engine. It renders the web pages for the server with any specified custom content given to it by the webserver. Flask renders its HTML based templates using Jinja 2.
Why Flask?
Now, you would be able to understand, when we define Flask as a micro-framework that is built using WSGI and Jinja 2 template engine.
Major advantages of Flask are:
- Ease of setup and use.
- Freedom to build the structure of the web application.
With freedom comes responsibility, similarly, Flask needs the developers to carefully structure it, since Flask doesn’t have “flask rules” to follow as compared to frameworks like Django. As the web app increases in complexity, this structuring is what is going to be the foundation.
Setting up Environment
The first thing to set up Flask on your system is to install the Python2.7 version or more. Here, I’ll guide you through the process of installing Python on the Windows 10 system.
Using this Official Python website, you can select the correct python version to install as per your specific OS and system configurations. You can select the latest Python version, as of writing this article the latest is 3.9.10. Please ensure if pip has been correctly set up after python installation.
The command to check that is `pip -V`

Setting up your virtual environment
Using a virtual environment for a python-based project is considered a best programming practice. In the case of Linux OS, it ensures the OS level python is not disturbed by installing and using other python packages. And, in the case of other OS, this ensures the settings and files are intact in the virtual environment which is incredibly useful when different projects need different versions of the same packages.
`virtualenv` was the tool of choice for creating virtual environments in Python2. But, `venv` is the tool for Python3 and beyond. `virtualenv` is a third-party package whereas `venv` is a default functionality of Python3.x. We’ll be creating a virtual environment using venv here.
To work with `venv` you would just need to ensure you have Python 3.x version installed; x being any version upward of 1.
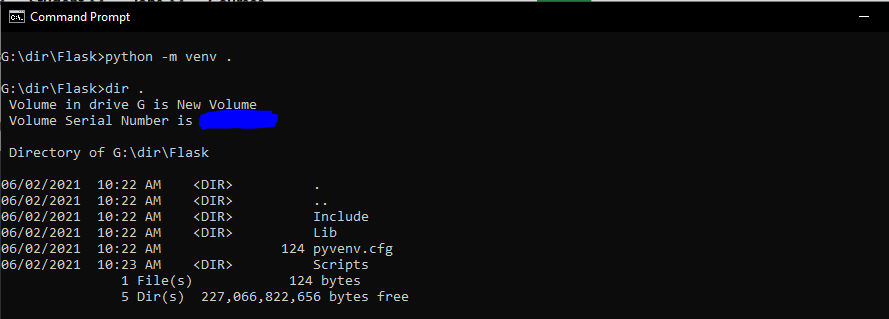
To create a virtual environment, use the following command,
`python -m venv .`
If you have python 2.x versions also installed in your system then, considering using `python3` instead of python. In my case, Python 3.9.5 is the default version of python installed, so not an issue.
Since I have already navigated inside the folder where I want to create my virtual environment, I have used `.` to point to the directory. You can choose to write the full path where you want your virtual environment created as well.

Once completed, the cursor will return, it will not show any output. To verify if the necessary files and folders have been created, you can use the following command:
Now, to activate your virtual environment in Windows OS:
- Navigate to the ‘Scripts’ folder in the virtual environment directory using,
`cd Scripts`
- And, then use the following command:
`activate`
This is how an activated virtual environment looks like, irrespective of the OS.

In the case of Mac OS or Linux OS,
`source env_name/bin/activate`
And, to deactivate, in any OS.
`deactivate`
Now, let’s install Flask:
`pip3 install Flask`
The output will be something like

Your 1st Flask Application
To start with a boilerplate application, let’s use the default as mentioned in the Flask documentation.
I have used Sublime Text Editor here; you can choose any text editor of your choice.
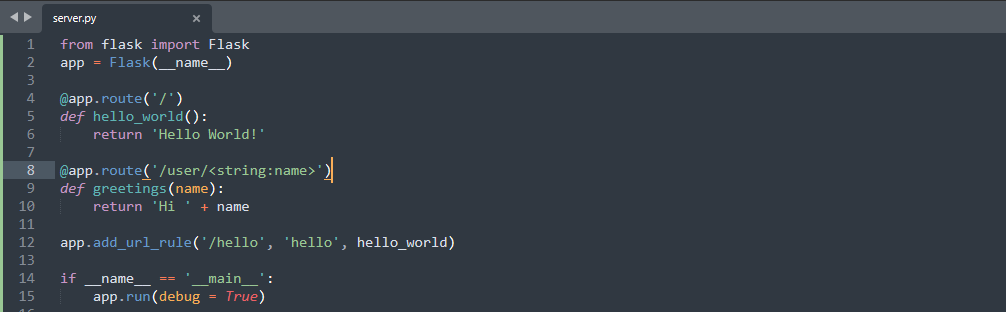
Create a `server.py` file in the virtual environment and write the following code:

Save this file and run this through the command prompt, just as you would any other python file.
`python server.py`
Note: Ensure that you never save this as ‘Flask’ as it would conflict with the Flask itself.
It will give you the following output:

Open the localhost URL mentioned in the command prompt to show an output like:

Congratulations, on running your first Flask application! If you had followed through all the steps, there wouldn’t be any errors in running the Flask application.
Let’s understand the syntax of the program
- The first line of code `from flask import Flask` is basically importing Flask package in the file.
- We next create an object of the flask class using `app = flask()`
- We send the following argument to the default constructor `__name__`, this will help Flask look for templates and static files.
- Next, we use the route decorator to help define which routes should be navigated to the following function. `@app.route(/)`
- In this, when we use `/` it lets Flask direct all the default traffic to the following function.
- We define the function and the action to be performed.
- The default content type is HTML, so our string will be wrapped in HTML and displayed in the browser.
- In the main function created, `app.run()` will initiate the server to run on the local development server.
Debugging
When developing a Flask application, it is important to consider using the debugging mode for these two reasons:
- It will trace errors if and display it.
- Each time a change is made, you would have to restart the app to be able to view the change, in order to avoid that, the app can be started in debugging mode where the changes will reflect instantaneously.
To debug the code, you need to add to add the following to your code:

Routes
There are few basic functionalities about routes that should be discussed to construct a basic application. The `route()` as noted earlier is a Flask decorator:
`app.route(rule, options)`
- Rule is the URL for which the particular function should be called upon
- options are the list of parameters which can be sent to the function as input
You can also use `app.add_url_rule()` to bind a function to the URL.

The result is the same as routing to `/` which would refer to the homepage of the application.

Dynamic Routing
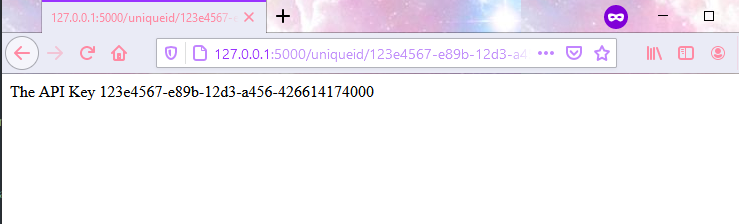
Using `app.route()` we can also send arguments to the python function. Here’s the sample code and result.

Result:
The default variable passed in the above case was a `string`. There are few other variable types that Werkzeug implementation supports. The same can be found in the Official Flask Documentation too.
- `int`: accepts positive integers
- `float`: accepts positive float values
- `path`: like `string` but also accepts slashes
- `uuid`: accepts (universally unique identifier) UUID strings
- `string`: (default) accepts any string without a slash
You can create a dynamic Flask URL routing using the `<>` & `:` symbols. The variable name should be as part of `<>` and the type of variable can be mentioned inside the same brackets using a colon (`:`). For example:
The result remains the same.
Let’s look at few more examples using `uuid` & `path` variable types.

The result for `uuid` based results is:
The result for `path` based results is:

Now that we have covered the basics of routing in Flask. There is one more important concept we need to be aware of. The importance of slash (`/`) in the dynamic routing. Let’s see with an example.

In the above piece of code, we see two routes one not ending with a slash(`/python/flask`) and one ending with a slash(`/python/WSGI/`). The results of the route ending with a slash are:

Flask routing creates a URL with the slash at the end if it is explicitly mentioned in the `route()`. Otherwise,
It will work correctly in routing the URL without slash:

But not if the URL entered contains a slash at the end:

It will result in a 404 Not found error. This is a useful piece of information to keep in mind.
URL Building
There’s another approach to building URLs dynamically in Flask applications. Let’s look at `url_for()` method. This is basically the building routing approach in reverse order. The easy way of hard-coding routing is what we have seen using `app.route()` and `app.add_url_rule()` methods.
How Does that work?
Let’s see with an example. Shall we?

The first thing to note is the additional imports. `redirect` & `url_for()` need to be imported separately, to begin with.
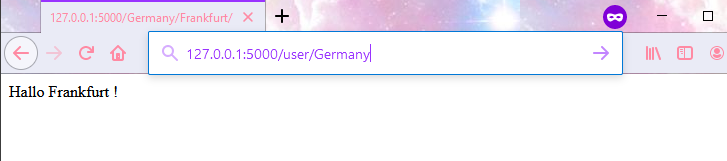
In the above example, we’ve 3 simple routes and their functions hard-coded in the traditional manner. And, then we have a special function `display_user()`. This method takes a user-defined input through their URL. Based on the input of the `country` variable, `url_for()` method redirects it to the appropriate function call.

Similarly, for Spain.

Now, in case of Germany, we’re additionally passing `capital ` variable also to the function.
Why should you consider Dynamic URL Building?
- Reversing of routing is far more descriptive than hard-coding (hard-coding is bad practice) of routes.
- This way escape characters & Unicode characters can be handled efficiently.
- The generated pathways are absolute, removing the uncertainty of unexpected pathways.
- Changes can be made easily now that the paths are built at the same place.
- If the app is placed outside of the root, dynamic URL building will handle that as well.
HTTP Methods
HTTP methods are at the core of communication between different parties of the world wide web, one of them being the Flask app you will be designing. These methods are standard across any frameworks, so let’s see how Flask handles them.
- GET
It is the most basic and unencrypted form of sending data to the website by appending the content to the URL. It can be used in cases where data of invaluable nature (which will not be an issue if disclosed) is being shared with the server. It is most commonly used in cases of fetching data or loading a new HTML page.
- POST
The POST method is the second most used method after GET. The data is encrypted and sent to the server. It is not appended to the URL, it is sent in the body of HTML, most commonly as part of HTML form data. It is also not cached on the system. This is one of the most trusted methods to send sensitive data to the server like login credentials, etc.
- HEAD
The HEAD method is very similar to the Get method. This is can be cached on the end-user’s system, is unencrypted but it is not supposed to have a response body. For example, a URL request can have a large download attached to it, but, using HEAD method, the URL can request to check the `content-length` from the header alone to get the file size without downloading the entire file.
- PUT
The PUT method is similar to the POST method, except for the fact, calling a POST method multiple times will send that many requests to the server as opposed to the PUT method, wherein it will just replace the current result or response with the same response.
In a nutshell, PUT is used to create a resource most often, so that subsequent requests do not create jredundant resources (and end-user receives a `201 created error`) whereas, POST should be used when updating resources, there can be multiple update requests.
- DELETE
The DELETE sends a request to erase the particular resource to the server.
You can add any of the methods to the route by adding an argument to the `app.route()` method. For example:
Note: Create a folder in your project folder by the name of `Templates`. Create a `login.html` file inside this folder structure.

In the `login.html` file, we’ve created a basic HTML form of POST HTTP method type and with one textbox to take user input and one Submit button.
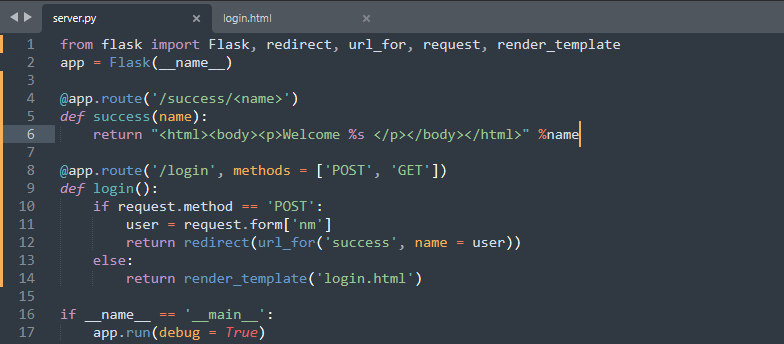
Then, in your `server.py` file make the following changes:

In the `server.py` file, we notice that we need an additional Flask functionality to be imported, namely, `render_template`. We’ll venture in deep regarding that functionality later. Then, we create a routing URL for `login`. In the `@app.route(‘/login’, methods = [‘POST’, ‘GET’])` we’ve added the `methods` argument which contains the list of HTTP methods which will be allowed.
In that function, if the HTTP request type is GET, we use `render_template()` functionality to call upon the static HTML page of `login.html`. And, if the request type is POST, we extract the `nm` parameter from the HTML Form and `redirect` the data to `success` URL.
This is one simple example using GET and POST HTTP method requests. Similarly, any of the HTTP methods can be incorporated based on the need using method argument in `@app.route()` decorator.
Templates in Flask
Now that we’ve seen a working example of loading static HTML pages in a flask application, let’s explore Templates more.
‘Web Templating system’ refers to displaying an HTML page to the end-user. This revolves around 3 parts:
- A Core template engine: In this case it is Jinja2
- Data source: It can be any content hard-coded in HTML or passed to the HTML file
- Template processor: In this, python expressions will help in processing the templates.
In a simple Flask application, we can hard-code our HTML page from the main python script file. For example:
In the above example, let’s replace the content of `success()` function. This gives us the same output as previously.
While this one way of approaching HTML content, most often, this wouldn’t be the optimal way for any project other than a Hello World program. Real-life projects will have more complexity.
Project Folder Structure
Before continuing further, let’s look at the Project Folder structure. It is important we know this before continuing ahead.

This is the Flask application project folder. You’ll have to create a folder by the name of Templates in which you can save all your HTML files. This path structuring is necessary to enable Jinja2 template engine to identify and process the HTML file.
Static Files
Similar to the HTML files, all the necessary static files such as images, videos, CSS files, JS files, etc need to be placed under the folder name of static. This needs to be created in the root folder same as Templates.
Jinja 2
Jinja2 being the web templating system has few templates which would allow us to create Python expressions in the HTML file.
- {{ ….. }} : This will process the Python code written and display accordingly. Example seen earlier.
- { %…..% } : For statements.
- {# …. #} : For comments not to be included in the template output.
Rendering Templates
`render_template()` is the Flask function which helps render the HTML file provided to it.
Referring to the above example, we see the most basic implementation of the function. Only the HTML page’s name is passed as argument.
In the templates, you can also access the `request`, `sessions`, `get_flashed_message` and `g` objects also. Each of these can be further looked up in Flask official Documentation. And, templates especially useful when Template Inheritance is used.
Request object
The communication from end-user to server running Flask happens through the usage of Flask’s global Request object. This has to be specifically imported from Flask module. Request objects important attributes are:
- method:- It defines the HTTP method request object type.
- Form:- It contains a dictionary object of all the Form attributes and its values.
- args:- contents sent as part of query string in the URL after a (?) mark.
- files:- data in which was uploaded to the application.
Of these, we’ve already seen the Form attribute.

In this earlier example, when we used `request.form[‘nm’]` - it requested for a particular value for the key ‘nm’ from the Form dictionary. There are multiple other ways to get data from the Request object. Let’s see the example of args attribute.

This is the same sample re-worked to change the execution when GET HTTP method is called. Earlier, we were directly calling the `login.html` using `render_template()`. Now, we’re taking an input of username from the args attribute of Request object.
When running the application, call the URL : `http://127.0.01:5000/login?nm=Administrator`. You’ll notice, it redirects you to show the following page:

By appending the value for ‘nm’ in the query string after a (?), the Flask application wraps it as part of args attribute of Request object and sends it to the python function linked to it.
Other than Form and args attribute, we’ve also seen the method attribute, of how the HTTP method can be chosen and to received using method argument in `app.route()` decorator.
The only attribute new to us, is files. It is used in case when end-user needs to upload a file to the server via application.
Let’s explore that with an example.

In the above code, first we note `Werkzeug.utils` as an additional package we use to import `secure_filename`. This file is necessary in case you would like to save the file using `secure_filename` function, which is the best practice to retain the file name of the uploaded document as provided by the end-user. You can also do it without using that function, but as the function name suggests, it is not secure otherwise.
Next, we note that we’ve created two URLs one, to render the upload.html and other to retrieve the file using Request object and saving it in the server.

The above shown is the upload.html HTML file. The attribute `enctype = multipart/form-data` in form tag is extremely important, failing which the file will not get uploaded to the application server.
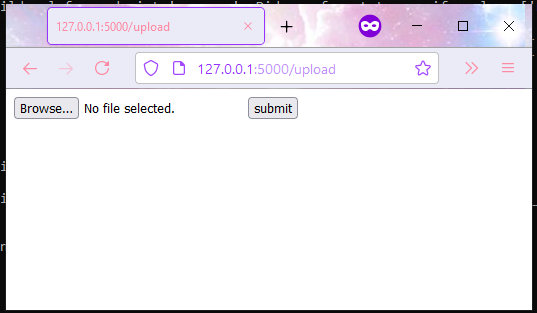
The above is the output of the first URL upload. And below is the output after selecting the file and clicking on the Submit button.

Response Object
Using Request object, we saw how to interpret the data sent from end-user to the application server. And, Response object does the opposite of that, it helps package and send data from application to the end-user. Flask is the most preferred language for creating API’s. And, this is the most important part of it.
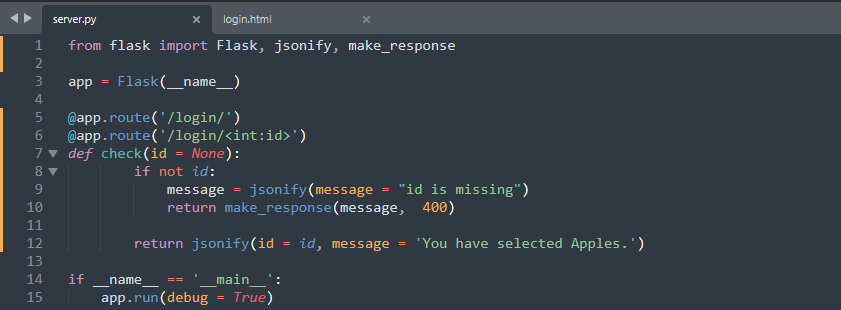
As seen above, we have first imported `jsonify` & `make_response` global objects from Flask. We, the create a URL function `check()` with id argument which can have a default of None type. Inside this function, we check for id argument:
- If id has not been provided, we use `jsonify()` method to create a dictionary with a message which we send back with statuscode 400 wrapped in a `make_response()` object.
- If id is provided, we just send back a dictionary with two sets of key-value pair.
The below is output for (i).

The below is output for (iI).

Conclusion
The above was a basic overview of Flask for beginners. There's a lot more to still explore, but, using this you will be able to kickstart your very own Flask application in no time. Also, check out the Great Learning Academy which offers 200+ free courses.