If you want to analyze information in multiple tables, you need to know SQL joins, a basic skill for data analysts, software developers and database managers. Putting joins to use gives you powerful options for combining related information necessary for creating advanced reports, dashboards and apps.
In this article, we’ll break down the four core SQL join types: Inner Join, Left Join, Right Join, and Full Join, explaining their use cases and providing clear examples. By the end, you'll confidently use joins to extract meaningful insights from your databases.
Master SQL and Database management with this SQL course: Practical training with guided projects, AI support, and expert instructors.
Why Are SQL Joins Important?
Relational databases store data in multiple tables to reduce redundancy. Joins allow you to retrieve data that spans multiple tables based on relationships between columns, typically using keys.
For example, in an e-commerce database:
Customerstable stores customer info.Orderstable stores order details linked to customers bycustomer_id.
To get customer names with their orders, you join these tables on customer_id.
Types of SQL Joins with Examples
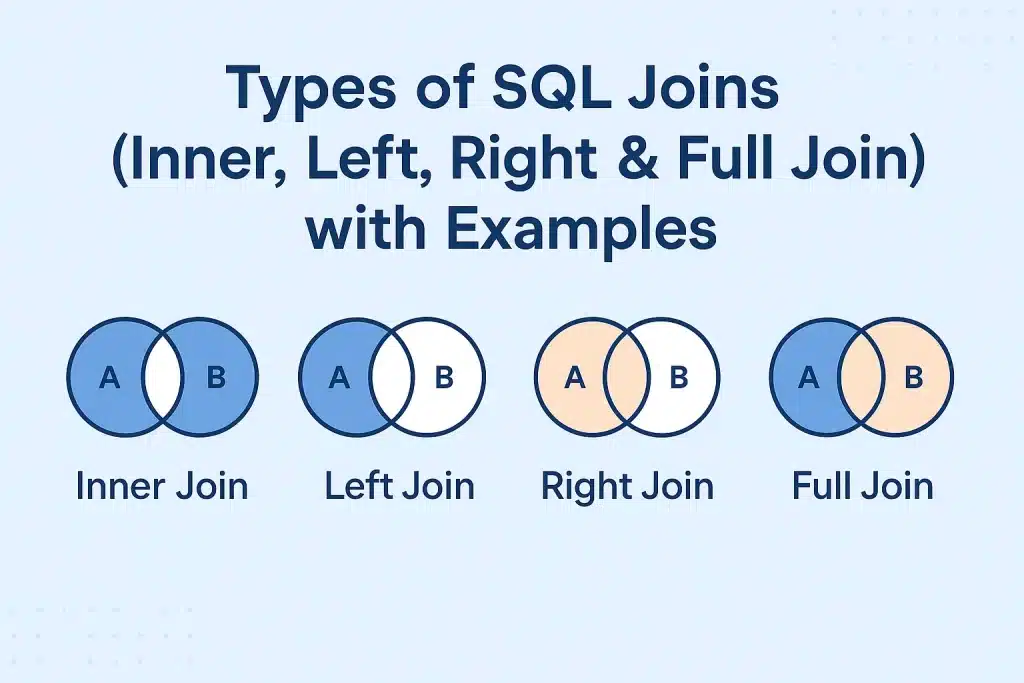
1. Inner Join
What is Inner Join?
Inner Join returns only rows where there is a match in both joined tables. If a row in one table has no corresponding row in the other, it won’t appear in the result. You can use SQL commands like SELECT, FROM, and INNER JOIN to achieve this.
Use Case
Retrieve records that exist in both tables.
Syntax
SELECT columns
FROM table1
INNER JOIN table2 ON table1.common_column = table2.common_column;
Example
Suppose we have two tables:
Customers
| customer_id | customer_name |
|---|---|
| 1 | Alice |
| 2 | Bob |
| 3 | Charlie |
Orders
| order_id | customer_id | amount |
|---|---|---|
| 101 | 1 | 250 |
| 102 | 3 | 450 |
| 103 | 4 | 300 |
Query:
SELECT Customers.customer_name, Orders.order_id, Orders.amount
FROM Customers
INNER JOIN Orders ON Customers.customer_id = Orders.customer_id;
Result:
| customer_name | order_id | amount |
|---|---|---|
| Alice | 101 | 250 |
| Charlie | 102 | 450 |
Note: Bob (customer_id 2) and order 103 (customer_id 4) do not appear because there’s no matching record in the other table.
Also Read- SQL Functions: Aggregate and Scalar Functions with Examples
2. Left Join (or Left Outer Join)
What is Left Join?
Returns all records from the left table and matched records from the right table. If no match exists, columns from the right table are NULL.
Use Case
When you want all records from the main table, regardless of whether they have matches in the joined table.
Syntax
SELECT columns
FROM table1
LEFT JOIN table2 ON table1.common_column = table2.common_column;
Example
Using the same tables, query:
SELECT Customers.customer_name, Orders.order_id, Orders.amount
FROM Customers
LEFT JOIN Orders ON Customers.customer_id = Orders.customer_id;
Result:
| customer_name | order_id | amount |
|---|---|---|
| Alice | 101 | 250 |
| Bob | NULL | NULL |
| Charlie | 102 | 450 |
Bob appears with NULL order values because he has no orders.
3. Right Join (or Right Outer Join)
What is the Right Join?
Returns all records from the right table and matched records from the left table. If no match exists, columns from the left table are NULL.
Use Case
Less commonly used but useful when you want all rows from the joined table (right table) with related left table info.
Syntax
SELECT columns
FROM table1
RIGHT JOIN table2 ON table1.common_column = table2.common_column;
Example
SELECT Customers.customer_name, Orders.order_id, Orders.amount
FROM Customers
RIGHT JOIN Orders ON Customers.customer_id = Orders.customer_id;
Result:
| customer_name | order_id | amount |
|---|---|---|
| Alice | 101 | 250 |
| Charlie | 102 | 450 |
| NULL | 103 | 300 |
Order 103 appears with NULL customer info because there’s no matching customer_id 4.
4. Full Join (or Full Outer Join)
What is Full Join?
Returns all records when there is a match in either the left or right table. Non-matching rows from both tables show with NULL in missing columns.
Use Case
When you want to combine all data from both tables regardless of matches.
Syntax
SELECT columns
FROM table1
FULL OUTER JOIN table2 ON table1.common_column = table2.common_column;
Example
SELECT Customers.customer_name, Orders.order_id, Orders.amount
FROM Customers
FULL OUTER JOIN Orders ON Customers.customer_id = Orders.customer_id;
Result:
| customer_name | order_id | amount |
|---|---|---|
| Alice | 101 | 250 |
| Bob | NULL | NULL |
| Charlie | 102 | 450 |
| NULL | 103 | 300 |
This result shows every row from both tables, filling with NULL when no match.
Summary Table
| Join Type | Returns | Missing Match Behavior |
|---|---|---|
| Inner Join | Only matching rows in both tables | Excludes unmatched rows |
| Left Join | All rows from left table + matching right | Unmatched right columns = NULL |
| Right Join | All rows from right table + matching left | Unmatched left columns = NULL |
| Full Join | All rows from both tables | Unmatched columns = NULL |
Practical Tips for Using Joins
- Always use explicit
JOINsyntax (not comma-separated tables withWHERE) for readability and maintainability. - Index your join columns (
customer_idetc.) for faster queries. - Use
INNER JOINwhen you want to filter to related data only. - Use
LEFT JOINwhen you want to keep all records from a primary table and fill optional related data. - Use
FULL JOINwhen merging datasets with partial overlap. - Be mindful that
RIGHT JOINis often replaced by switching table positions and usingLEFT JOINfor clarity.
Want to learn deeply about Data Analysis in SQL?
Accelerate your skills with this Data Analytics in SQL & Excel Course. Learn to analyze data, write powerful SQL queries, and build dashboards using Excel ideal for aspiring data analysts.
Conclusion
Understanding joins is foundational and mastering them gives you leverage in complex data projects, BI tools, and backend development.
So, this is pretty much all about the Joins in SQL. You can get your hands on free SQL courses to upskill yourself with the concept and earn a completion certificate.
Happy Learning!
Frequently Asked Questions (FAQ’s)
- Can SQL joins cause performance issues, and how can they be optimized?
Yes, joins especially on large tables can slow down queries. Optimizing involves indexing join columns, minimizing the result set with filters, avoiding unnecessary joins, and using query execution plans to identify bottlenecks. - What is the difference between CROSS JOIN and INNER JOIN?
ACROSS JOINreturns the Cartesian product of both tables (all combinations), which can create a very large result set.INNER JOINreturns only matching rows based on a condition. - How do NULL values affect join results in different join types?
NULLs in join columns generally prevent matches inINNER,LEFT, andRIGHTjoins. Special care with functions likeCOALESCEor conditional joins may be needed to handleNULLs explicitly. - How does JOIN behavior differ in SQL vs. NoSQL databases?
Traditional SQL joins work on relational data with structured schemas. NoSQL databases often don’t support joins natively and require data denormalization or application-side joins. - What is a Self Join, and when would you use it?
A self join is when a table is joined with itself to compare or relate rows within the same table. It’s commonly used to work with hierarchical data, such as employees and their managers, or to find related rows within one dataset. For example, you might use a self join to list employees alongside their managers by matching employee records with other employee records.