Contributed by: Sendil A B
What is Steganography?
Steganography is the study and practice of concealing information within objects in such a way that it deceives the viewer as if there is no information hidden within the object. Simply put, it is hiding information in plain sight, such that only the intended recipient would get to see it.
How is this different from cryptography?
It may immediately occur to us that this is similar to cryptography, but it is not so. In cryptography, the objective is to modify the original message in such a fashion it becomes difficult to get to the original message from the modified message. The original and modified messages are explicitly expected to look different. While in image steganography, the objective is to deceptively hide a message within another original message and thereby, modifying it. The modified message is expected to look very similar to the original message.
Let’s consider a scenario where two employees are expected to exchange official messages via email. In this case, we know that they will exchange messages, and hence, there is no need for them to hide those messages. However, as those messages might contain sensitive information, they might want to encrypt-decrypt it using cryptography. On the contrary, consider information exchange between a spy, operating undercover in the opponents’ military regiment and his parent organization, with whom he wants to share important information. In this case, the officers would be monitoring pretty much everything that goes in and out of his room. Hence, if he resorts to using cryptography to share encrypted information, officers might get suspicious. In such a situation, he might prefer image steganography, where he would deceptively hide a message within another object/message, without raising suspicions, and find a way to drop it off to his recipient. In summary, cryptography hides the meaning of the data, while steganography hides the existence of the data. Although they are different techniques, they might as well be used in combination, in the same instance, to get the best of both worlds.
Also Read: What is Image Recognition? How is it used?
Incidents from history
Steganography has been with us for ages, be it the spies in the Revolutionary War writing in invisible ink or Da Vinci embedding a secret meaning in a painting. Steganography traces its roots back to 500 BC. The first physical case of steganography is found in Histories by Herodotus, where he talks about the Greek leader Histiaeus' act. Histiaeus was stuck in an enemy camp and was in dire need of sending a message to his camp. He then resorted to shaving a trusted slave’s head, tattooing a secret message on his scalp, letting his hair grow, and then sending him off to be shaved again by the message’s recipient
On the other end of the timeline, steganography is also being used recently. It is expected to be in use in the forthcoming years. For example, it was used very recently to drop malware into user’s computers, by sending them innocent-looking messages but hiding the malware within, using steganography techniques.
Use cases or applications of steganography
Although the prime objective is to share messages or information discreetly, it has found varied fields of applications such as
- Hackers using steganography techniques for malware transmission
- Intelligence agencies use them for communication.
- Printers also use micro-dots as a steganography tool to embed timestamps and date information within the document. Also, the same technique is used in bank-note printing, to prevent colour copiers from reproducing images of currency as fake-notes.
Types of steganography techniques
There are several types and forms of steganography, and in the sections below, we’ll explore a few interesting and commonly used ones. Broadly steganography techniques could be classified into
- Physical: One that does not involve the use of digital mediums or files. Examples of such techniques include
- Passing messages written with invisible ink, which can then be read by the intended recipient by applying certain chemical techniques
- By using ciphering techniques to hide information within textual information. Here is an example of a null cypher technique used by a prisoner to convey a secret message to his outfit, which was intercepted and decoded by the FBI. See graphic below, which looks like an ordinary letter, however, when one looks at every fifth word (highlighted in red) it reveals a plot to murder someone i.e, refer to the last few red words “IF GUILTY OF WRITEUP, HE SHOULD BE HIT.”
- Microdots involve shrinking messages to such tiny dimensions, they are made almost invisible. These also involve positioning ‘hard-to-see’ dots within a message to convey a specific message.
- Digital: Involves the usage of digital mediums such as hiding information within
- Text files
- Image or picture files
- Audio files
- Video files
Hiding information within each medium or file type involves a different technique and each technique has its own set of pros and cons and is appropriately deployed per requirement. In this article, we will look at the most popular method of hiding information within an image file using a technique called the Least Significant Bit (LSB). We will also look at an implementation of the same.
Understanding image steganography
Before diving into steganography, it is important to understand pixels and colour models. A pixel is the smallest building of an image and the colours in any pixel are (assume RGB) a function of the combination of proportions of red, green, and blue. So a pixel with a value of 0, 0, and 1 would mean 0 parts of red, 0 parts of green and 1 part of blue; in essence, this would turn out to be a blue pixel. In the case of an 8-bit system, a pixel can accommodate up to 8 digits (zeros or ones), and the largest number that could be represented in 8 digits is 11111111 which would be 255, and the smallest number that could be represented in 8 digits, would be 00000000 which would be 0. So any pixel in an 8-bit scenario could accommodate anything between 0 to 255 as a value for each of the colours. Now let’s say a random 8-bit grid has 3 pixels and each pixel having the below values for R, G, and B.
| The proportion of Red (R) | The proportion of Green (G) | The proportion of Blue (B) | |
| Pixel 1 | 00101101 | 00011100 | 11011100 |
| Pixel 2 | 10100110 | 11000100 | 00001100 |
| Pixel 3 | 11010010 | 10101101 | 01100011 |
And if we want to house a secret number 200, we get the binary value of that number, i.e, 11001000. and use each digit of that number to replace the least significant digit (mostly the last digit) of our pixel grid, indicated in bold red font. The new colour scheme would be as below:
| The proportion of Red (R) | The proportion of Green (G) | The proportion of Blue (B) | |
| Pixel 1 | 00101101 | 00011101 | 11011100 |
| Pixel 2 | 10100110 | 11000101 | 00001100 |
| Pixel 3 | 11010010 | 10101100 | 01100011 |
This would alter colours in the original image in the three channels for the 3 pixels by the smallest amount, thereby rendering the alerted image almost indistinguishable from the original image.
Detecting steganography
Although it might be possible to detect physical steganography, it is extremely difficult to detect digital steganography. Even if some activity is suspected, say some messages are hidden within images, trying to monitor all images that are exchanged, and comparing them to source images would result in lots of false positives and false negatives. That said, experts still use a variety of techniques, including image histogram comparisons to detect hidden messages, ‘conditional’ to them suspecting some covert message exchange.
Image steganography demonstration in R
Nothing drives home the point like a demonstration. So I am presenting herewith a demo in R.
Example 1: Here let us try to embed the secret message “this is the secret code for the heist-10100110 11000100 00001100” into an image of a kitten. Note that R uses an implementation of the Least Significant Bit (LSB) for embedding the message into the image. Let’s now dive into the implementation
Firstly, ensure the working directories are set correctly. This is the location where the images to be used is located, also the output would be deposited in this location. Next, install the required packages and get them loaded
Next, run the below code to embed the message into the original image (encode), and then create an image with the message baked-in (decode).
PS: In the code below, the line for loading of the image has not been run. It was already loaded. However, one needs to run that line if you are loading the image for the first time.
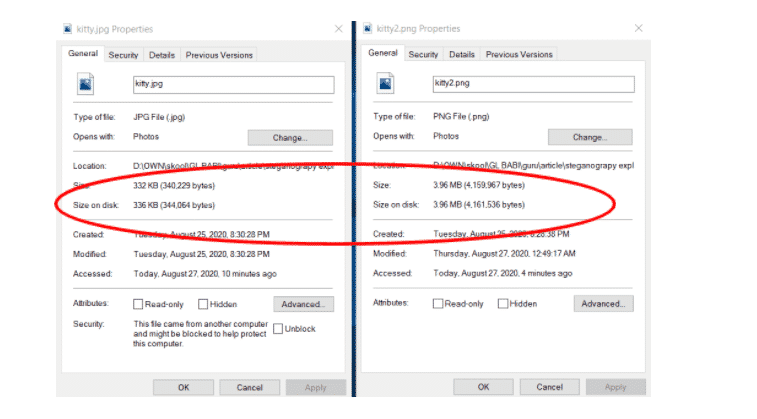
The original and transformed images are as indicated below. Note that the images do not look very different at all. However if we look into the file properties, marked in red, their sizes are very different.
Original image (kitty.jpg) vs. Image after the message has been baked in (kitty2.png)

Example 2: In this case let us try to generate a scatter plot and use that image to house the secret message “this is the secret code for the heist-zyxw9876”. Run the below code snippet and the output is as below.
Again, the original and transformed images look similar, but their sizes vary, indicating transformation.
Original image (randomplot.png) vs. Image after the message has been baked in (randomplot2.png)


As we would imagine in the real-world, the sender and intended receiver would be in different locations. Hence, this implementation is expected to work even without the original images. This is what we have simulated and shown below by running the decode line outside of the original code, without the original images loaded in the environment. See below.
Embark on a learning adventure like no other with our extensive collection of free online courses. Whether you're interested in diving into the world of Cybersecurity, mastering the art of Management, exploring the wonders of Cloud Computing, or delving into the intricate realm of IT and Software or Artificial Intelligence and Machine Learning, we have courses that cater to your interests and goals.