- Introduction to Jenkins
- What is DevOps?
- There are 5 Phases of DevOps
- What is Continuous Integration?
- What is Jenkins?
- Jenkins History
- Benefits of Jenkins
- Jenkins Architecture
- Jenkins Case Study
- Jenkins Installation
- Setup & Configuration
- Master Slave Architecture Setup [OPTIONAL]
- How does Jenkins work?
- Jenkins Freestyle Job
- What is a CI/CD Pipeline?
- What is a Jenkins File?
- Jenkins Pipeline
- Conclusion
Introduction to Jenkins
Software Development process isn’t as simple as one might think, back in college I used to think software deployment was just a 3 step process – Create Code, Test Code, Run Code. Is this the workflow followed in actual development process? Well yes, but actually no. When I say yes I mean that Yes, this is the base on which a software development pipeline is created, so it does act as the basis but it’s not the same thing. Usually you would have a more intricate process in which you are developing the code, there are way more thing to think about than just creating, testing & running.
The software development process is such an intricate field that there are specific career fields in which people only concentrate on the pipeline itself rather than developing the code. This is where DevOps comes in, where it helps us to automate the whole process and make it as efficient as possible. DevOps has many phases within it, like Continuous Integration which helps us to continuously integrate all the parts of software development. And this is where Jenkins comes in, it is a continuous integration tool that helps us to integrate all the parts of software development process.
All right, are you confused enough with the wall of text I just threw at you? Don’t worry I’ll tell you everything you need to know to understand Jenkins Tool in as detailed matter as possible. So Let’s get started.
What is DevOps?
DevOps by definition is a mix of Developer and Operations. The Dev in the name coming from Developer and the ops coming from operations. As the name implies the DevOps field is something that bridges the gap between developer and operations teams. But if you ask me, DevOps is more than that, it is many things at the same time –It is a culture, it is a mindset, it is a philosophy, it is methodology, it is a set of tools or you can say it may even be a mix of all of these things but the goal is always clear, it focuses on delivering a product and creating a healthy working environment where everyone can freely exchange ideas without being bogged down by silos that are present in traditional software development. So this is DevOps.
There are 5 Phases of DevOps
- Continuous Development
- Continuous Testing
- Continuous Integration
- Continuous Deployment
- Continuous Monitoring
We will be focusing on Continuous Integration.
Read: How to Become a DevOps Engineer
What is Continuous Integration?
Continuous integration is a phase of devops in which we continuously integrate all the different parts of the software development process, like development, building, testing, staging, deployment, monitoring. It helps us to not only integrate all of these parts together but it also helps us automate a lot of the processes.
- The benefits of continuous integration:
- Increases the quality of software produced
- Makes life easier for testers by allowing them to easy test the software
- Reduces the amount deployment failures
- Automates the build process
- Increases the speed with which software is deployed
We generally tend to use a tool for this phase and the candidates for this are: Jenkins, teamcity, bamboo, gitlab, circleci, travisci, etc.
Out of all of these options we will be focusing on Jenkins as it is our article topic.
What is Jenkins?
Jenkins is an Open Source continuous integration tool written in java that allows us to automate the software development process, making sure that there is minimum involvement from us. It integrates all the different parts of the development in one place, this makes it easier to handle all the different parts of the software development process.
For eg. If you wanted to automatically build your software from your gihtub repository, you can configure a job to clone the repo into a local workspace and then build that code using a build file like pom.xml and then you can save your artefact generated in an archive or directly send it for testing.
Also, check out Jenkins Free Course.
Jenkins History
Jenkins was originally developed under the name Hudson back in 2004 by the organisation sun microsystems. Slowly but surely Hudson started becoming popular with other companies and other people.
When sun microsystems were bought over by oracle they kept the project but there were conflicts between the community supporting Hudson and oracle. So it was decided that the tool would be split into two; something oracle could call its own, “Hudson” and “Jenkins” which was to be a completely community driven project. Though both of them originally shared similar source trees, the tools are now quite different and Jenkins has become more popular than ever now. It is now one of the most used CI/CD tools in the industry out there.
Benefits of Jenkins
There are a lot of benefits to using Jenkins such as:
- Jenkins is a community driven tool, this means that there is no corporate meddling and that Its open source and any one can use it without licensing it. This also means that it has a very very large community that constantly contributes to it. Any time a new trendy tool comes along and you can be assured that someone will make a plugin for it for Jenkins.
- Another benefit is that It’s completely free, so you don’t have to pay a single penny for it, for any reason that you may use it for. This makes it very attractive for those who do not wish to accrue anymore subscription costs, like start-ups, small companies, individuals.
- Jenkins is a highly modifiable and adaptable tool. It has a support for a very large number of plugins. Especially compared to its paid competitors such as bamboo, teamcity which only have only a limited number of supportability for plugins.
- Jenkins can run on any major platform without any compatibility issues. This makes it useful for inconsistent environments.
Jenkins Architecture
Jenkins is a continuous integration tool which means that it creates build jobs to perform multiple different tasks in different phases. To do this in an organization with multiple teams and multiple projects is difficult if you do so only using one server. It will lead to server overload more often than not, which will lead to bottlenecks in the software development process which is a big no no in our eyes. To make sure such a problem does not happen Jenkins divides all of the tasks it receives onto its slaves. So Jenkins makes use of a master slave architecture, where one Jenkins server is the master from where all the tasks are distributed onto the multiple slaves. You can call these slaves as also agents that execute tasks based on your configurations. If you want, you can specify which task should be executed on which slave or you can leave it up to the master to decide. It will decide this by checking which slave is idle or which slave has enough of a resource pool to execute the tasks. That’s the Jenkins architecture.
Jenkins Case Study
Let’s see how a big company fared on choosing Jenkins as their CI/CD tool.
We will be look at the example of the Large telecommunication company T-Mobile. T-Mobile is a very large service provider, now for the sake of it if you wanted to call it a telecommunications company you could but the thing is that they provide a lot of different services such as; Mobile services, TV services, banking facilities, On-Road assistance and many more and they do this in multiple country though their main market is the USA.
They produce a lot of software to supplement their services and products, for that they need to maintain large number of developing teams and software development infrastructure. How do they manage all of these services and the constant software demand that comes with it? Surely they make use of some kind of breakneck technology to do this? Well, they do it’s called Jenkins.
They use Jenkins as their favored choice of continuous integration and pipelining tool. It allows them to handle, manage and deploy multiple project with ease and efficiency.
They have gone a step further and improved upon whatever Jenkins already provided them by streamlining a lot of their processes and reducing unnecessary complexity such as by reducing the number of plugins from 200 to 4 and by creating a super streamlined and optimized set of pipelines. This allows all of their developers to focus on what they are good at; development. They shifted from having multiple master Jenkins agents to a single that allows 10 teams to work at a time.
You can see that using Jenkins has not only benefited the company but also its customers as they get top notch software quickly without any hassle. Jenkins is a very flexible tool that can be very carefully molded into what a company needs and finds useful.
Okay so now that we have understood what Jenkins is, what its history is, what it’s benefits are, how it works and what kind of impact it has had on certain companies we can now dive into installing it and using it.
Jenkins Installation
So you can install Jenkins on a lot of different operating systems without a hitch, a few popular ones are:
- Linux – Ubuntu
- Windows
- Mac
So here in our tutorial for Jenkins we will be learning how to install Jenkins in Ubuntu Linux distro, I will also be using the Ubuntu Linux VM available on AWS (cloud provider). (optional) I recommend you also use the Ubuntu Linux VM available on AWS as we will need it later when we create multiple Jenkins nodes to create a master slave architecture.
Now I’ve kept it Ubuntu because of two reasons:
- Ubuntu is easy to use and even has a GUI if you are using your own system or VM.
- It will give you some exposure to using Jenkins on Linux, which is something you will see a lot in the industry.
Here are the pre-requisites for installing Jenkins on your Ubuntu OS:
Hardware pre-requisites:
At the minimum you need to have these requirements:
- At least 500 MB of RAM
- At least 2GB of hard-drive space.
But this is if you only wish to practice with Jenkins, if your intention is to run it on your system for actual Continuous Integration Purpose then check the recommended system requirements:
- At least 1GB of Ram
- At least 50 GB of Hard-drive Space.
Software Pre-requisites:
- A working web browser
- Java
Alright, now that we are past the requirements let me tell you that I will be showing you how to install Jenkins in two ways; directly & using Docker. If you are a beginner, I would recommend trying the default way.
Directly installing Jenkins in your system:
First we will update our apt package manager
$ sudo apt update
Now, we will install java in Ubuntu:
$ sudo apt install openjdk-8-jdk –y
To verify the java installation type in this command:
$ java –version
Now we will go ahead and add the key to the Jenkins repository, without this we cannot install Jenkins.
$ sudo wget -q -O - https://pkg.jenkins.io/debian-stable/jenkins.io.key | sudo apt-key add –
You should see a message saying “OK”
Now we will setup the Jenkins repository for the latest stable version using this command:
$ sudo sh -c 'echo deb https://pkg.jenkins.io/debian-stable binary/ > /etc/apt/sources.list.d/jenkins.list'
This will add the Jenkins URL directly to apt, so we can download it using apt.
But after this we need to refresh the apt repositories again:
$ sudo apt update
Now we install Jenkins:
$ sudo apt install jenkins –y
The process to install Jenkins is as simple as that. J
Now that we have completed the download of Jenkins using the direct method, let us now download it using Docker.
Update your OS package manager
$ sudo apt update
First install Docker in your system:
$ sudo apt install docker.io –y
Now we will create a network:
$ sudo docker network create jenkins
Now we will create two volumes to store Jenkins data permanently and share the Docker TLS certificates for connecting to it.
$ sudo docker volume create jenkins-docker-certs
$ sudo docker volume create jenkins-data
We will be needing to run a few Docker commands in the Jenkins agents, to do this we need the help of something called docker:dind, so let’s run a container for it using the below command:
$ sudo docker container run
  --name jenkins-docker
  --rm
  --detach
  --privileged
  --network jenkins
  --network-alias docker
  --env DOCKER_TLS_CERTDIR=/certs
  --volume jenkins-docker-certs:/certs/client
  --volume jenkins-data:/var/jenkins_home
  --publish 2376:2376
  docker:dind
Now we will run Jenkins itself in a container as such:
$ sudo docker container run
  --name jenkins-blueocean
  --rm
  --detach
  --network jenkins
  --env DOCKER_HOST=tcp://docker:2376
  --env DOCKER_CERT_PATH=/certs/client
  --env DOCKER_TLS_VERIFY=1
  --publish 8080:8080
  --publish 50000:50000
  --volume jenkins-data:/var/jenkins_home
  --volume jenkins-docker-certs:/certs/client:ro
  jenkinsci/blueocean
So now, our installation for Jenkins using Docker is also completed.
In both the cases; directly & using Docker, you will be able to access Jenkins at the port 8080 of either your localhost.
For this go to any browser you have and type this in the navigation bar:
Localhost:8080
If you are doing the installation on a VM from a cloud service like AWS or Azure go to <Your_VM_IP>:8080.
Setup & Configuration
Let’s now set it up, once you access it at 8080, you should see this:
This is security measure, copy the address and then come back to your terminal,
Type in the following command if you directly installed Jenkins
$ sudo cat /var/jenkins_home/secrets/initialAdminPassword
If you are using docker you need to first go into the docker container, do that using this command:
$ sudo docker exec -it jenkins-blueocean bash
Inside the container you can use this command to get the initial password:
$ cat /var/jenkins_home/secrets/initialAdminPassword
Next you will be asked to customize Jenkins, I would recommend choosing install suggested plugins.
It will install all of the suggested plugins and then will ask you to setup the admin.
Enter all the relevant details and then click on Save and Continue:
Leave the Jenkins URL as default.
Click on Save and Finish.
This is what your dashboard should somewhat look like.
Here you can see a lot of different options to choose from, but you need only pay attention to these for now: New Item, People, Build history & Manage Jenkins on the left hand side and your profile on the right hand side.
On clicking Manage Jenkins you will be able to view all of the different settings you can configure for Jenkins, such as Security, Configure system, global Tool config, Plugins, Node and Cloud management.
Here you will also be able to view how well Jenkins is doing under Status information using a few tools available at your hand such as: system information, system log, about Jenkins, load statistics.
People shows you the list of users that can use the Jenkins server you have setup.
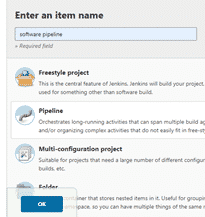
New item allows you to create Jenkins objects such as: Freestyle Project, Pipeline, Multi-configuration Project, Multi-branch Pipeline, Folder, GitHub Organisation.
And Build history lets you view the history of all the builds that have happened on your Jenkins server till date if not removed. As of right now this is what you should see when you click Build history:
This is because we have not started any build yet.
So those were some important things within Jenkins that we will be working with today.
Master Slave Architecture Setup [OPTIONAL]
This next step is optional, if you do not wish to you can avoid this step. Now we will learn to setup a Master Slave Architecture for Jenkins, for this you will definitely need to make use of a cloud service such as AWS to launch multiple Instances.
We will consider the current Jenkins server we have launched as our Jenkins Master Node, For the other two Slave Nodes we will launch two extra VM (so for this I would again recommend you use a Cloud provider for launching).
Once you have launched the other two Virtual machine we can begin the setup process,
So first we need to configure these nodes within Jenkins itself, to do that you need to first head to configure global security in manage Jenkins.
Now you need to change the TCP port inbound agents from disable to Random, this way they will have a random TCP port assigned to them for communication purposes.
Next you need to go to manage nodes and cloud to add your slaves or agents
Here click on new node to add a new node
You will need to mention the name of the node and select permeant agent, then you can click on OK to do further configuration.
Here, for now we only need to add the working directory path and the remote root directory, you can set these to /home/ubuntu/Jenkins and then click on save.
Now, do the same for Agent 2.
So, once you have completed your configuration of the slaves on the master your node dashboard should look something like this:
Click on Agent 1 and download the agent.jar file by clicking on it.
You will need to copy the agent.jar file to your slave 1 and run the given command.
To copy your agent.jar from your host system to your virtual machine you can either make use of filezilla or you can use a very simple command.
First locate where your agent.jar file has been downloaded on your host system. It should probably be in your downloads folder. Once you have located the agent.jar file, open up powershell in the directory.
Type in the following command to transfer the file from your host to the Slave 1:
$ scp -i ./<PRIVATE_KEY> agent.jar ubuntu@<IP_OF_SLAVE_1>:/home/ubuntu/
Make sure the private key you use to access the slave 1 is also in the same folder.
Alternatively, you can use git bash also if you want to transfer the file using the same command.
Now transfer the same file to your slave 2 as well, the only thing yuou have to change here is the IP you are sending to.
$ scp -i ./<PRIVATE_KEY> agent.jar ubuntu@<IP_OF_SLAVE_2>:/home/ubuntu/
Make sure the private key you use to access the slave 2 is also in the same folder.
Your slaves do not need to have Jenkins installed on them, though you do need java on them.
You can install java on both of them using the command:
$ sudo apt update && sudo apt install -y openjdk-8-jdk
Once you have transferred the file to both slave 1 & slave 2 and you have installed java on both of them you can go ahead and run the command given within each node. You can view this command by going to manage Jenkins -> manage nodes and clouds -> agent 1 and manage Jenkins -> manage nodes and clouds -> agent 2 respectively.
The commands should look something like this:
Copy the command for agent 1 and then paste it in your slave 1, if you have followed the steps correctly you should see this as the output:
Do the same for Slave 2, head to and manage Jenkins -> manage nodes and clouds -> agent 2 on your Jenkins, copy the command and paste it in your slave 2.
Once, you do all of the above steps you should see that both of your agents are now connected as slaves. You can verify this in the node dashboard, it should look something like this:
Congratulations! Now we will move ahead and create Jenkins build jobs and execute them.
How does Jenkins work?
Jenkins allows you to create build Jobs. Build Jobs are processes that allow you configure a string of software development processes that help you develop your software.
e.g. If you wanted to automatically test your code. You would create a job that detects new code pushed to your repository and automatically triggers the cloning process and then automatically starts running the test cases you had configured earlier to run on the code.
There are countless number of ways in which you can configure these build jobs.
You can choose what kind of job you want too. Jenkins allows you choose from a set of different styles of projects like:
- Freestyle Project – Allows you great configurability / flexibility and you can even run non software development processes with the help of this.
- Pipeline – Allows you to create a pipeline that will execute a set of stages that can be configured to have a several set of commands within it. This is useful when you wish to create the software development pipeline.
- Multi-configuration Project – This is for those project where you want to have a very large number of configurations that you want to make to the software development process.
- Multi-branch Pipeline – This allows you to create multiple pipelines in conjunction with each other, it is useful when you have a large set of projects that you want to develop, configure together and deploy together.
- Folder – This just an object that allows you to group other items together, allows you to organise all of your items under user defined categories.
- GitHub Organisation- This allows you to scan a organisation’s repository for all the software and markets for them.
In this tutorial we will be learning about two of these items; Free-style jobs and Pipelines. So let’s start of with Freestyle jobs.
Jenkins Freestyle Job
To create and item you have to select the type of item you wish to create, then give it a name and then click on OK. In our case it’s going to be freestyle job and the name is going to be

As the project opens up you will see that there are a lot of options from which you can choose from and configure your project. There are several things to configure over hear such as:
- General
- Source Code Management
- Build Triggers
- Build Environment
- Build
- Post-build Actions
General
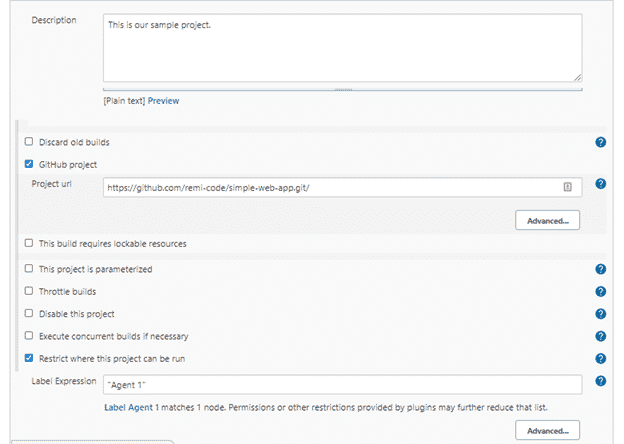
Here I have entered a description, this is basically a meta description of what your project is about. Next, we will mention the github project URL from where we will be pulling code. This github URL will be to our project.
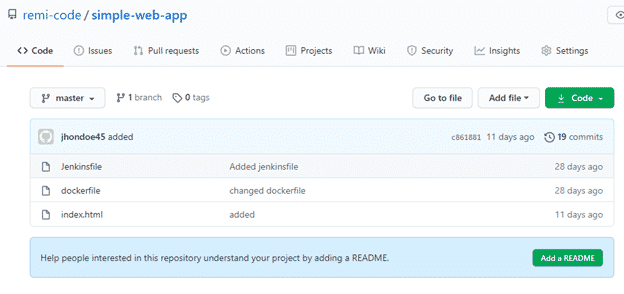
You guys can refer to same piece of code if you want. Here is the URL: https://github.com/remi-code/simple-web-app.git
The next option we will configure is the “Restrict where this project can be run” option. Here, Enter the name of the Agent you had configured earlier, you will have to mention the name in double quotes as in the screenshot.
Source Code Management
Here, you can configure the type of source code manager you are using. Since we will be using git, git should be selected.
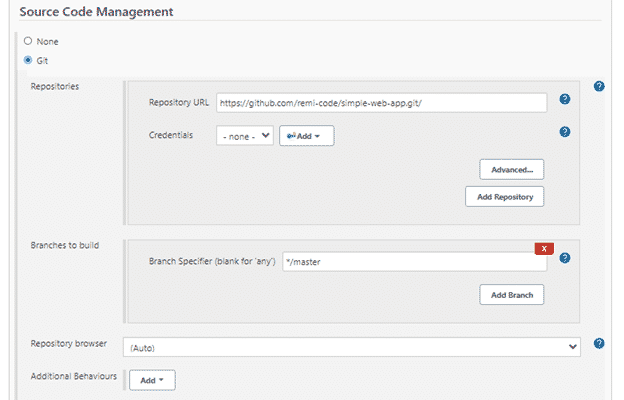
You can enter the same URL again. Under this type of configurability, you have a much wider range of settings you can changes, such as which branch you want the code cloned from. We will leave it as master as that’s where our code is. You can also choose the credentials for the GitHub URL. In our case we don’t need a set of credentials as my repo id public and open to all, hence it does not need any credentials.
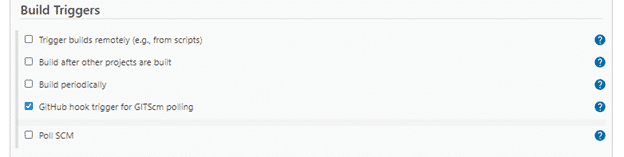
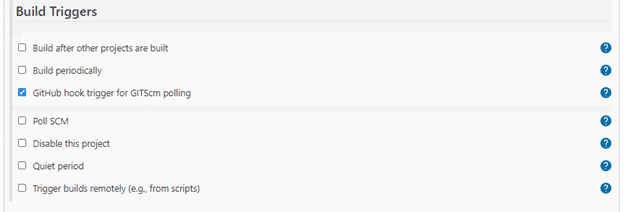
Build Triggers
Under this category we will be configuring how our build job gets triggered. Now we can always manually start our build job, but the whole purpose of Jenkins is to automate processes, which means we need to reduce the amount of human intervention, to do this we need to trigger the build remotely, i.e. we need to start it when some other process ends. For our purpose we will be selecting “GitHub hook trigger for GITScm polling”, this will allow us to trigger our build job whenever we push code to our GitHub repository.
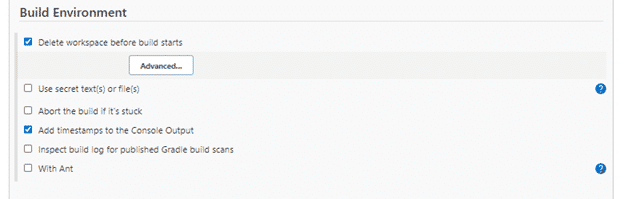
Build Environment
This category allows us to our build environment. We will be selecting the “Delete workspace before build starts”, this will clean up the workspace in the Jenkins server where this build job will run, in our case “Agent 1”.
We will also be selecting the “Add timestamps to the Console Output”. This will let us know in the console which log was executed when.
Build
Here you will be configuring what happens in the build itself.
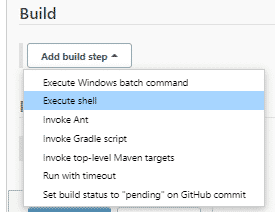
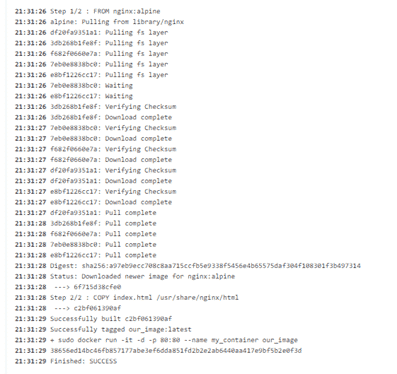
Click on Add build step and choose Execute shell. We will be basically launching a HTML static web page in nginx using Docker. So Here is the list of commands we will be executing in our Jenkins execution shell.
echo “This project is now building”
sudo apt update
sudo apt install docker.io -y
sudo docker build -t our_image .
sudo docker run -it -d -p 80:80 --name my_container  our_image
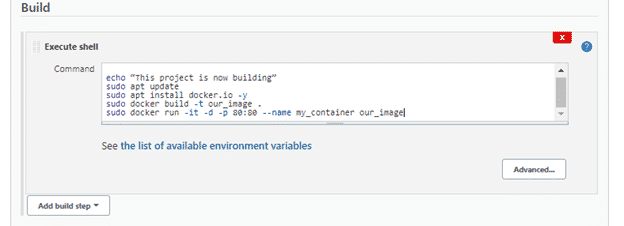
The code will be automatically cloned into the workspace. The Github also contains a dockerfile which will help us create our image. These steps will basically launch a docker container from the docker image we create out of our dockerfile.
Post-build Actions
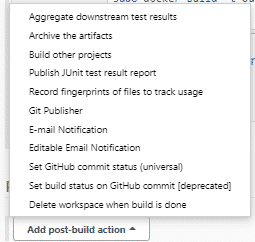
Here you can add more configurations such as being notified when through email whenever a job build goes wrong. For our purpose we will leave it be.
Now you can go ahead and click on save to save your project configurations.
But before we execute the job there is however one more thing we need to do and that is to make sure that our github url is pullable through a webhook.
I would recommend forking this URL repository first for that purpose, you can do that by clicking on fork option given above in the URL location.
Once you have forked the code over to you github account, you can configure it accordingly.
Head to settings.

Over Here you need to select Webhooks as your option of choice.
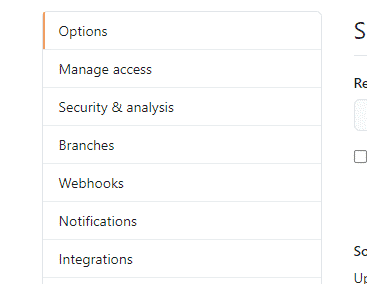
Select the add webhooks option to add a webhook.

The only thing you need to change over here is the payload URL
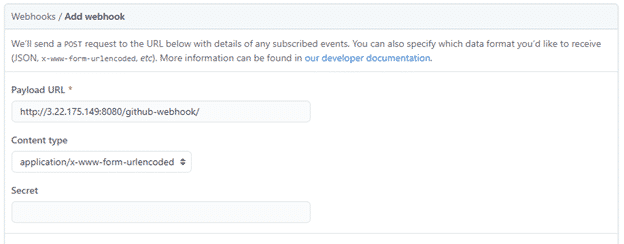
You can copy it from below:
make sure to enter the IP of the Virtual Machine on which you launched the Jenkins Master Node.
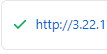
Then click on add webhook to finish the process.
Now you will have to verify if the webhook is working or not by looking at the webhook. If it shows a green tick mark, then your webhook is working.
Now you need to make sure that Jenkins on the agent 1 can make use of the sudo in the shell. To do that you can go to the VM on which you have your Agent 1.
sudo visudo
Then go ahead and paste the following command in the file that opens up like so:

jenkins ALL=(ALL) NOPASSWD: ALL
Save the file and come back to the Jenkins Freestyle project you created, you will see a lot of options such as:
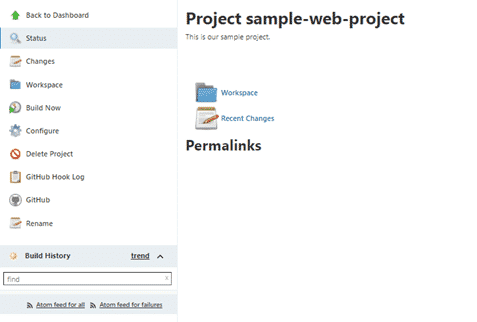
Here you can click on Build Now to start the job.
Under the build history you can click on the glowing orb to see the console output.

You can see the console output; it will look a something like this:
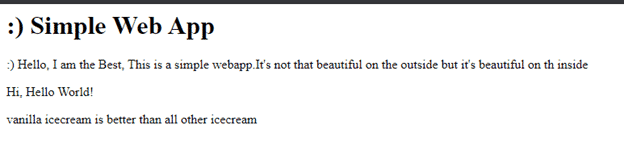
Now that our process has finished you can view it by going to IP address of the Slave - 1. You should see something like this:
Now to see the github trigger work in action, clone the github URL in your local system.
$ git clone <URL of the forked repo>
then make a change, and then stage the file.
$ git stage .
then go ahead and commit the file
$ git commit -m “made changes”
before you push the code, go to your slave and remove the docker container created during the process using this command:
$ sudo docker rm -f $(sudo docker ps -a -q)
then you can go ahead push the code back to your forked repo using the below command:
$ git push origin master
You should see this under the build history

There! Now we learned how to create a freestyle Jenkins build job and triggered it automatically using github webhook.
Now let’s move on to learn how to create a pipeline.
What is a CI/CD Pipeline?
First, let’s get to know what a pipeline is.
A pipeline is a set of stages that define how the software is developed in different phases of the software development process. If you remember the software development life cycle, you will know that there are multiple parts to it such as: planning, designing, implementing, testing, staging, deploying, etc. These parts can be defined virtually in a pipeline as stages. Each stage serves a specific purpose and each stage will have a certain number of steps that help it achieve its goal.
To know more about CI/CD check out this Aws Ci/Cd Pipeline Tutorial.
So again:
Stage: A bigger block of unit that represents a stage of the software development process. It contains a set of steps to be executed.
and
Step: a defined task that get’s executed in a specific stage.
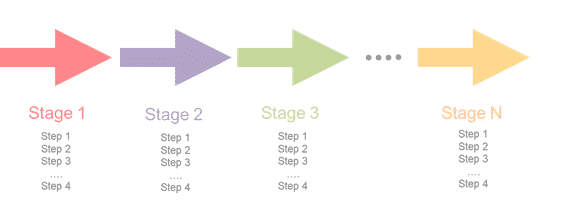
This is what a pipeline would generally look like. Now, this is a very simplified version, and it does not constitute the content of every pipeline ever, that will depend on your requirements and the phases of software development you will choose to execute.
Jenkins allows us to create these pipelines, and a very simplified Jenkins pipeline might look something like this:
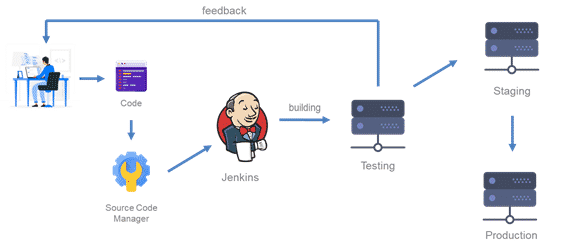
You can see over here that the source code will be pushed along to a source code manager, from there it will be automatically be detected by Jenkins and it will trigger the pipeline, this pipeline will consist of stages such as building, testing, staging, deploying.
Now to create a Jenkins pipeline you need to write a Jenkins file, these files basically describe the stages, the steps involved in the stages and all the other configurations that maybe necessary for the pipeline.
What is a Jenkins File?
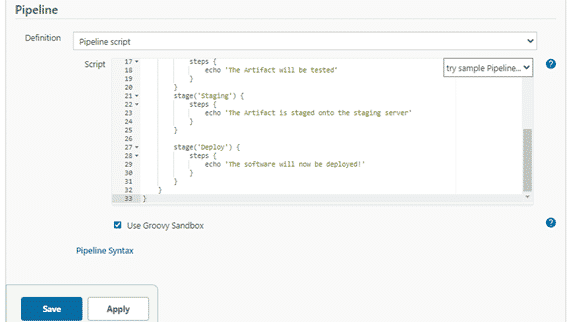
Jenkins file is a text file in which we write the pipeline script. This script is used to configure the stages and steps of a Jenkins pipeline. This file is written in the groovy language. Here is an example of a Jenkins File:
pipeline {
  stages {
    stage(“Build") {
       steps {
         echo “We are going to build our application in this stage”
   }
    stage(“Test") {
       steps {
         echo “Tests are going to be now executed”
   }
      stage(“Deploy") {
       steps {
         echo “Software is going to be deployed”
   }
 }
}
As you can see in the above example, we have set three stages: Build, Test, deploy with very simple steps to be executed within them; echo statements that will print what happens in the stage.
The Jenkins file can either be directly written during the configuration of the Jenkins pipeline item creation or you can mention the URL where you Jenkins pipeline script is located and it will then scan for it in the URL and then pull the URL and then use the Jenkins pipeline script from there.
So now, Let’s go ahead and create our own Jenkins pipeline in Jenkins.
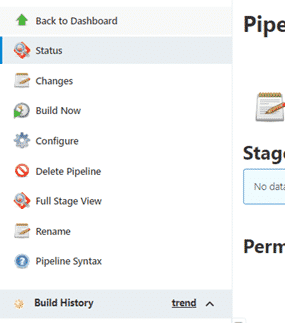
Jenkins Pipeline
Go to new item and then click on pipeline and give it a suitable name as given below:
Then click on OK.
Under general configurations we will just enter the description and add the Github project URL.

You can use the same URL you used for your freestyle project.
Under Build Triggers we will be selecting the “GitHub hook trigger for GITScm polling” option again. So this pipeline will be triggered whenever we push any new code to the repository.
Next comes the pipeline where you will be writing the Jenkins pipeline script.
You have two options, you can either write the pipeline script over here as it is or you can click on the definition drop down and select pipeline from script option.
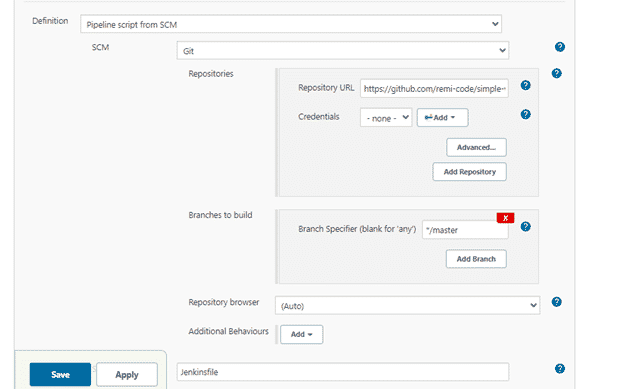
Here you can paste in the URL where your Jenkins File is located. But since our file is located in our own repository we can just mention the same URL, if you have forked my repository mention your URL.
There are some other configurations within here that you can choose such as what branch we will be on, but I would recommend leaving them default for now.
With that done, click on save and save the Pipeline.
Once you have save it you should see similar options to that you saw before.
You have some extra options such as full stage view, that lets you view the stages a s whole. Click on build view and once the processing gets completed you can see the logs for all the stages that have been completed.
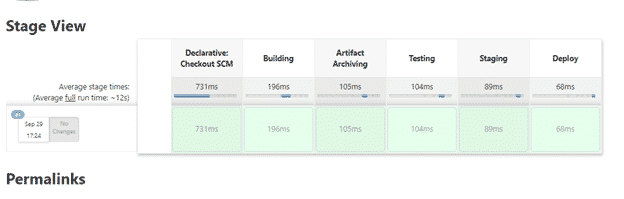
This is what your stages should be looking like. Each should show your stages being executed. And once they are completed you can see the logs and their success or failure.
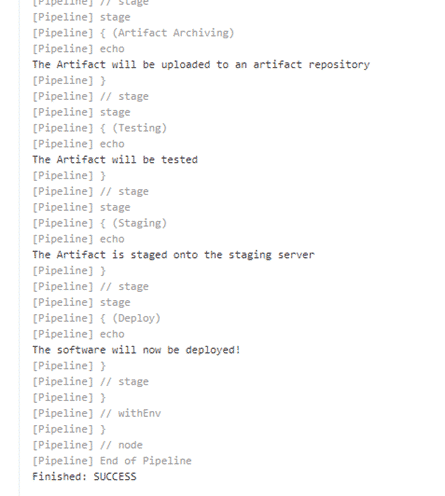
If you check the console logs you can see that the proces has been completed and your stages have been successfully executed.
So there you have it guys, we learned how to create a pipeline here, now you can go ahead and configure this however you want to, add more stages, add very specific stages, it’s your canvas, do what you want or what you require, checkout any Great learning articles for extra help or you always have internet search god google at your fingertip, Use it liberally.
Conclusion
So that was Jenkins, a beautiful tool that helps us to automate a lot of our software development processes and connect all the different phases together. It’s completely free and has a very large community. You can use a lot of different plugin depending upon your needs.
Hope this article was your comprehensive introduction to Jenkins. Feel free to leave a comment if you have any doubts. And all the best! For free courses on programming and more, you can check out Great Learning Academy.