- What is VueJS?
- Why VueJS?
- VueJS vs. Angular:
- Installing Vue
- VueJS - Instance
- VueJS - Component
- The building blocks of a component
- VueJS - Computed Properties
- VueJS - Watch Property
- VueJS - Binding
- VueJS - Events
- Event Modifiers
- Key Modifiers
- Custom Events
- VueJS - Rendering
- VueJS - Mixins
- Types of Mixins
- VueJS- Reactive Interface
- vue.set
- vue.delete
- VueJS - Render Function
- VueJS - Transition & Animation
- VueJS - Animation
- VueJs - Directives
- VueJS - Routing
- VueJS - Application example
What is VueJS?
VueJS is an open-source JavaScript framework that is typically used to develop interactive interfaces. From an MVC point of view, while developing with VueJS, it focuses on the view part. What makes VueJS stand apart is its beginner-friendly learning curve and ability to easily integrate with any web project and libraries.
A very popular framework that is experiencing tremendous growth (in 2019 alone, the downloads have doubled) being free, tiny and very informant. A driving force for its rise has most certainly been the growth of the popular PHP framework Laravel that adopts Vue functionalities.
Do you know what the word vue means? Vue stands for sight or vision (not a Scrabble word, though). So to broaden our “vision” and to dig deeper into this new JavaScript framework world, we may need to know what sets VueJS apart and why you should take up learning something new.
Now before getting into the technicalities, one may want to know more about why you should learn VueJS and what it offers in contrast to similar JavaScript frameworks. So let’s dive into that.
Learn advanced JavaScript concepts, including ES6+, async programming, and modern frameworks. Strengthen your skills and build dynamic applications to become a proficient JavaScript developer.
Why VueJS?
VueJS is known for being a progressive framework. That means whether you are a complete beginner to this JavaScript framework or an experienced developer who is simply transitioning, VueJS adapts to your needs. It is simple, tiny (~24KB) and mostly performance-oriented. Being lightweight, it definitely feels different from all the other JavaScript front-end frameworks and view libraries and offers great performance.
While other frameworks require a complete makeover while implementing new JavaScript frameworks because they come with their own exclusive set of conventions, Vue can effortlessly glide into your project by a mere <script> tag. You heard that, right! This is a great pro considering the growing demand of JavaScript front-end developers and the existing, complex frameworks perplexing both debutant devs and veteran ones alike. You don’t need to be overwhelmed with complex words like npm, Babel etc., to get started with Vue.
If you are a Laravel developer, you are in for a stroke of luck because learning VueJS would be a breeze. Don’t fret even if you’re already adept in ReactJS or AngularJS. VueJS stands on a pedestal for being the best of all worlds, taking the essential parts of other popular frameworks and simply enhancing from there.
VueJS vs. Angular:
With Angular, implementing TypeScript is mandatory. As not everyone enjoys TypeScript is a polarizing decision by the authors of Angular. Vue decided on not making TypeScript compulsory.
Vue is less opinionated than Angular. This means there is no one-way of writing code in vue.js. Software developers can be more inventive and use vue.js in the manner they want to. As a result, quick wins are faster to achieve, and the learning curve of vue.js is a lot less steep compared to the learning curve of Angular.
Angular directives are typically more complex than vue.js directives. Vue differentiates directives and components more lucidly.
Vue.js directives encapsulate DOM manipulations only, whereas Angular directives are able to satisfy a wider variety of use cases.
Both Angular and Vue.js are feasible choices for web application development. They are also alike in nature when it comes to writing code. Vue.js is more lightweight, while Angular is much more enterprise-ready for generating compact applications.
VueJS vs. React:
React assumes the JSX format, where HTML is written in JavaScript. Vue is easier to adopt compared to React. Vue separates concerns in a manner that web developers are already used to, dealing with HTML, CSS, and JavaScript. It also permits the use of JSX for developers who are already familiar with its workings.
React, and Vue performs the same manipulations within an almost similar timeframe. The variation between the performance efficiency for Vue and React is almost negligible, as it just varies by a few milliseconds. React offers versatility, a very much in-demand job market, and is as well-built as Vue. Yet Vue is more structured, easier to figure out and set up.
Reasons to learn VueJS
Developers love building web applications using Vue.js, here’s why -
- No complex building application required
A critical aspect while developing vue was keeping it simple. It’s not necessary for a building tool to develop projects using VueJS. Even the installation for VueJS is very easy, to begin with. In a matter of time, any developer can clearly understand and produce interactive web interfaces. One can do so by using the HTML <script> tag. Just include the src tag pointing to the latest development or production version and you are good to go!
- Easy to use a command-line interface
Vue command-line interface gives a plethora of useful supplementary features, including an interactive project initialization wizard (available through the terminal or a web-based UI), a plugin system to maintain generators and configuration for community add-ons, and the capacity to define alternative build targets, like web components or as libraries.
- Robust Environment
Vue provides standard support for several inherent add-ons, including vue-router for client-side routing, the vue-devtools browser extension for debugging, vuex for managing state, vue-test-utils for unit testing components, Vue CLI as specified earlier.
- An interactive and ever-growing community
The Vue forums are a magnificent way to get insight from specialists on complicated issues. Vue conferences are also a great way to reach out to other members of the community and attend more in-depth workshops that are already taking place worldwide. Vue has a distributed, hard-working core unit, who are continually enhancing the framework without over-burdening developers with a bunch of painful upgrades.
- The Vue instance
A vue instance invocation is how every Vue application is initialised. It also produces a fully-reactive root component of the application. Vue's reactivity system is impressive in its simplicity.
- Beginner-friendly learning curve
Vue is easy to learn. Developers do not have to go through an ocean of plug-ins and setups to get started with Vue. It’s mostly pretty straightforward. If you’re adept with HTML, CSS and JavaScript, you’re raring to go.
Installing Vue
- Using the <script> tag in HTML file
As mentioned above, one of the easiest ways to use Vue is by directly implementing it via HTML with the <script> tag. Simply download Vue (from the home site https://vuejs.org/v2/guide/installation.html) and include with a script tag. Vue will be registered as a global variable.
There are two versions available. Use the development version if you don’t want to miss out on basic warnings and avoiding common mistakes.
- Using NPM
NPM is the suggested installation method when developing large scale applications with Vue. It comes with Browserify and Webpack along with other necessary tools, which help with more straightforward development. Following is the command to install using npm.
npm install vue
- Using Command Line Interface
The Vue CLI is a command line utility, and you install it globally using npm. The CLI is important for rapid Vue.js development.
npm install -g @vue/cli
or using Yarn:
yarn global add @vue/cli
Once you do so, you can invoke the vue command as below -
VueJS - Instance
To start with VueJS, we need to create the instance of Vue, which is called the root Vue instance. A Vue application consists of a root Vue instance created with new Vue, optionally organized into a tree of nested, reusable components.
Syntax:
var instance = new Vue({
   // options
})
Example
HTML -
<html>
   <head>
  	<title>VueJs Instance</title>
  	<script type = "text/javascript" src = "js/vue.js"></script>
   </head>
   <body>
  	<div id = "vue_instance">
     	<h1>Firstname : {{firstname}}</h1>
     	<h1>Lastname : {{lastname}}</h1>
     	<h1>{{mydetails()}}</h1>
  	</div>
  	<script type = "text/javascript" src = "js/vue_instance.js"></script>
   </body>
</html>
VueJS -
var  vm = new Vue({
   el: '#vue_instance',
   data: {
      firstname : "John",
      lastname  : "Doe",
      subject    : " GreatLearning VueJS Tutorial"
   },
   methods: {
      mydetails : function() {
         return "I am "+this.firstname +" "+ this.lastname + " studying " + this.subject;
      }
   }
})
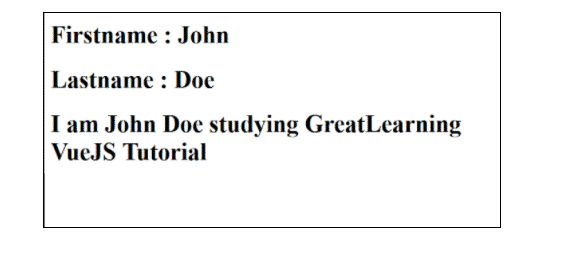
In VueJS, there is a parameter that we have used called el. It takes the id of the DOM element. In the above example, we have the id #vue_instance. It is the id of the div tag, that is present in HTML.
<div id = "vue_instance"></div>
Here, whatever we are going to do will only have an effect on the div element and nothing outside it. Next, we have defined the data object. It has a value firstname, lastname, and address.
The same is denoted inside the div. For example,
<div id = "vue_instance">
     	<h1>Firstname : {{firstname}}</h1>
     	<h1>Lastname : {{lastname}}</h1>
     	<h1>{{mydetails()}}</h1>
  </div>
The Firstname : {{firstname}} value will be replaced inside the interpolation, i.e. {{}} with the value assigned in the data object, i.e. John. The same goes for last name.
Furthermore, we have methods where we have written a function mydetails and a return value. It is assigned inside the div as:
<h1>{{mydetails()}}</h1>
Therefore, inside {{} } the function mydetails is called. The value that is returned by the Vue instance will be shown to usinside {{}}. Check the output for reference.
VueJS - Component
Vue Components are one of the most essential features of VueJS that provides custom elements that can be used repeatedly in HTML. Components are individual, detached units of an interface. They can have their own state, markup and behaviour.
There are four ways in which you can define a component -
- Vue instance
new Vue({
  /* options */
})
- Using the .component directive
Vue.component('component-name', {
  /* options */
})
- Declaring a local component i.e components that are accessible only within itself and not available to be used anywhere else (encapsulation property)
- Using .vue extension in a file
Example -
new Vue({				    //Vue instance using el ‘element’
  el: '#app'
})

Vue.component('user-name', {	//.component global directive
  props: ['name'],
  template: '<p>Hi {{ name }}</p>'
})
The building blocks of a component
So far we’ve discussed how a component can accept the el and props properties.
- el is only utilised in root components initialized using new Vue({}), and checks the DOM element the component will mount on.
- props enlist all the properties that we can pass down to a child component
A component also allows other properties:
- Data - the component local states
- Methods - the component methods
- Watch - the component watchers (next topic)
Advantages of components
Computed properties are well known for handling use cases like:
- Acquiring a new data value from existing (e.g. fullName = firstName + lastName)
- Extracting a complicated JS expression into a clearer property
- You require a property to react have greater than one data dependency
Thus with components, we can ensure better readability and maintainability of JavaScript code.
Reusability of Components
A child component can be added multiple times. Each separate instance is independent of the others:
HTML -
<div id="app">
  <user-name name="Anthony"></user-name>
  <user-name name="Akbar"></user-name>
  <user-name name="Amar"></user-name>	<!-- reuse component-->
</div>
Vue -
Vue.component('user-name', {
  props: ['name'],
  template: '<p> {{ name }} is learning VueJS. </p>'
})

new Vue({
  el: '#app'
})
Below we can see the output with the reusability of the component in multiple div tags of HTML.
VueJS - Computed Properties
A Vue method is a function concomitant with the Vue instance. Methods are defined inside the methods property. Methods are mainly beneficial when you need to execute an action, and you attach a v-on directive on an element to handle events. Computed properties are somewhat like methods but with some difference in comparison to methods in terms of behaviour. However, the difference is that computed properties are cached centred on their reactive dependencies. A computed property will only re-evaluate when some of its reactive dependencies have transformed.
Why do we need caching? Imagine we have a performance-extensive computed property A, which calls for looping through a huge array and doing many computations. Then we may have additional computed properties that, in turn, are dependent on A. Without caching, we would be executing A’s getter many more times than needed. In cases where caching is not required, use a method as an alternative.
Example:
<html>
   <head>
  	<title>VueJs Instance</title>
  	<script type = "text/javascript" src = "js/vue.js"></script>
   </head>
   <body>
  	<div id = "computed_props">
     	City : <input type = "text" v-model = "city" /> <br/><br/>
     	Country : <input type = "text" v-model = "country"/> <br/><br/>

     	<h1>Using computed method : {{getaddress}}</h1>
  	</div>
  	<script type = "text/javascript" src = "js/vue_computedprops.js"></script>
   </body>
</html>
vue_computeprops.js
var vm = new Vue({
   el: '#computed_props',
   data: {
  	city :"",			//computed property
  	country :"",		//computed property

   },
   computed :{
  	getaddress : function(){
     	return this.city +" is in "+ this.country;
  	}
   }
})
Here, we have created an HTML file with city and country. city and country is a textbox that is bound using properties city and country.
When we type in the textbox the same is returned by the function, then the properties of the city or country are changed. Therefore, with the help of computed properties, we don’t have to do anything specific, such as recalling to call a function. With computed properties, it gets called by itself, as the properties used inside the textbox changes, i.e. city and country.
VueJS - Watch Property
A Vue watch property observes a specific attribute and is able to identify when that attribute changes. It basically acts as an event listener to a specific data attribute i.e it allows you to perform a function on the property as and when it changes.
The only thing you need to think about while using the watch property is a feature you want to track. It’s as simple as that!
Format:
export default {
	data () {
		return {
			title: '',
			description: ''
		}
	},
	watch: {
		// the things you want to track go here!
	}
}
Watchers can heavily be relied upon while one needs to observe data until it reaches a specific value and to make asynchronous API calls when values change. The function assigned to watch (below name) can be assigned at most 2 parameters - the first being new and the second being the old.
watch: {
	city: (newCity, oldCity) => {
		console.log("City changed from " + oldCity+ " to " + newCity)
	}
}
Since you have already read up on VueJS components, you can think of watchers as an extended and more generalised form of it. Primarily, if you need to perform an action based on the change of an attribute, watchers are your saving grace. However, watchers can be quite redundant in their use-case if you see the example below -
new Vue({
	el: '#app',
	data: {
   	 km2: 0,
    	cm: 0,
    	mm: 0
	},
	watch: {
    	km2: function(val){
        	this.km2 = val;
        	this.cm = val * 100000;
        	this.mm = val * 1000000;
    	},
    	cm: function(val){
        	this.km2 = val / 100000;
        	this.cm = val;
        	this.mm = val * 10;
    	},
    	mm: function(val){
        	this.km2 = val / 1000000;
        	this.cm = val / 10;
        	this.mm = val;
    	},
	}
});
As you can see, we have to define the conversion properties n times for n attributes i.e n2 declarations. Thus it is often a better alternative to use computed properties instead of watchers.
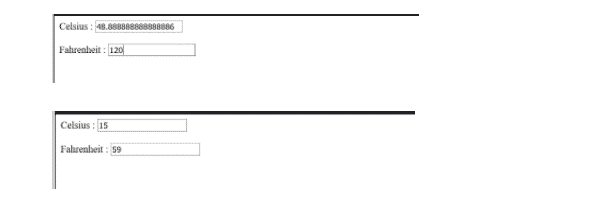
Example -
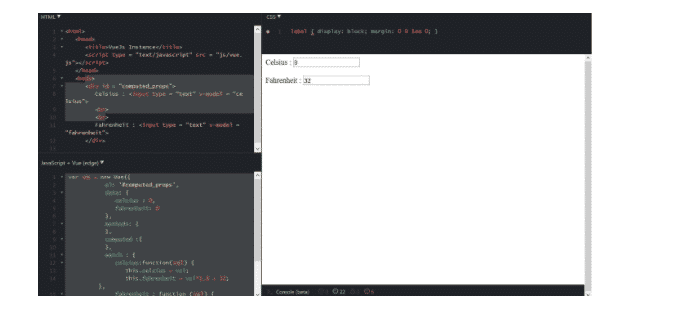
Code:
<html>
   <head>
      <title>VueJs Instance</title>
      <script type = "text/javascript" src = "js/vue.js"></script>
   </head>
   <body>
      <div id = "computed_props">
     	Celsius : <input type = "text" v-model = "celsius">
     	<br> <br>
     	Fahrenheit : <input type = "text" v-model = "fahrenheit">
  	</div>
      <script type = "text/javascript">
          var vm = new Vue({
        	el: '#computed_props',
        	data: {
           	celsius : 0,
           	fahrenheit: 0
        	},
        	methods: {
        	},
        	computed :{
        	},
        	watch : {
           	celsius:function(val) {
              	this.celsius = val;
              	this.fahrenheit = val*1.8 + 32;           	},
           	fahrenheit : function (val) {
              	this.celsius = (val-32)/1.8;
              	this.fahrenheit = val;
           	}
        	}
     	});
      </script>
   </body>
</html>
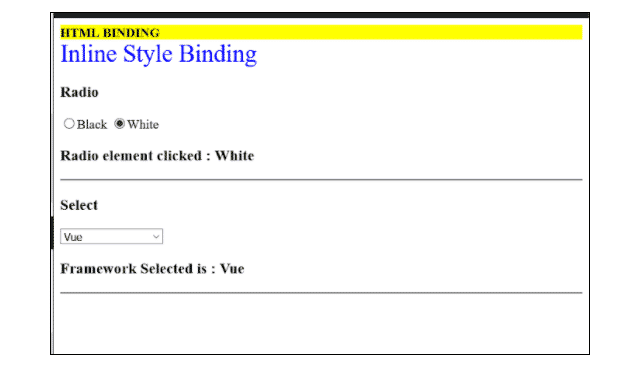
VueJS - Binding
VueJS offers an excellent feature of binding HTML attributes in order to manipulate the class or its style. In order to do this, we use a vue.js directive called the ‘v-bind’. It not only modifies strings but can also help in modifying objects and arrays.
Syntax -
<a v-bind:href="url">{{ linkText }}</a>
V-bind is used so frequently that there also exists an alternative syntax -
<a v-bind:href="url">{{ linkText }}</a>
<a :href="url">{{ linkText }}</a>
v-bind can be used for the following purposes -
- Binding HTML classes
- Binding in-line styles
- Form input bindings
Example
HTML:
<html>
   <head>
  	<title>VueJs Instance</title>
  	<script type = "text/javascript" src = "js/vue.js"></script>
   </head>
   <body>
  	<style>
     	.active {
        	background: yellow;
     	}
  	</style>

  	<div id = "classbinding">		//HTML Class binding
     	<div v-bind:class = "{active:isactive}"><b>{{title}}</b></div>
  	</div>

    	<div id = "databinding">		//Inline CSS binding
     	<div v-bind:style = "{ color: activeColor, fontSize: fontSize + 'px' }">{{title}}</div>
  	</div>

  	<div id = "formbinding">		//Form element binding
     	<h3>Radio</h3>
     	<input type = "radio" id = "black" value = "Black" v-model = "picked">Black
     	<input type = "radio" id = "white" value = "White" v-model = "picked">White
     	<h3>Radio element clicked : {{picked}} </h3>
     	<hr/>
     	<h3>Select</h3>
     	<select v-model = "languages">
        	<option disabled value = "">Please select one</option>
        	<option>Angular</option>
        	<option>React</option>
        	<option>Vue</option>
        	<option>Vanilla</option>
     	</select>
     	<h3>Framework Selected is : {{ languages }}</h3>
     	<hr/>
  	</div>

   </body>
</html>
Vue.js -
var vm = new Vue({
        	el: '#classbinding',
        	data: {
           	title : "HTML BINDING",
           	isactive : true
        	}
     	});

 var vm = new Vue({
        	el: '#databinding',
        	data: {
           	title : "Inline Style Binding",
           	activeColor: 'blue',
           	fontSize :'30'
        	}
     	});

 var vm = new Vue({
        	el: '#formbinding',
        	data: {
           	picked : 'White',
           	languages : "Vanilla"
        	}
     	});
VueJS - Events
When you develop a dynamic website using Vue you'll most likely want it to be able to respond to some actions or events. For example, if a user glides over an image, submits a form, or even clicks a button, you may want your Vue site to respond somehow.
When you think of event handling in VueJS, remember v-on. v-on is the property added to the DOM elements to listen to the events in VueJS and trigger some action. We add an argument to the v-on element, here click which is the name of the event to be handled. We also bind an expression to the event, here clickEvent.
<button v-on:click="clickEvent"></button>
Event handling also involves web and mobile native events. Other events that can be handled using v-on are :
- submit
- keyup
- drag
- scroll
Event Modifiers
A modifier can be added on v-on property. A dot operator is required to be added while dealing with modifiers. Vue offers a myriad of different event modifiers that are essential in common event handling scenarios:
- .stop - event propagation will be stopped
- .prevent - Prevents default behaviour
- .self - Target of the event is itself
- .once - Run the function at most once
Eg. Instead of
formHandler (event) {
	event.preventDefault();
	// form handling logic
}

 Use

 <form @submit.prevent="formHandler"></form>
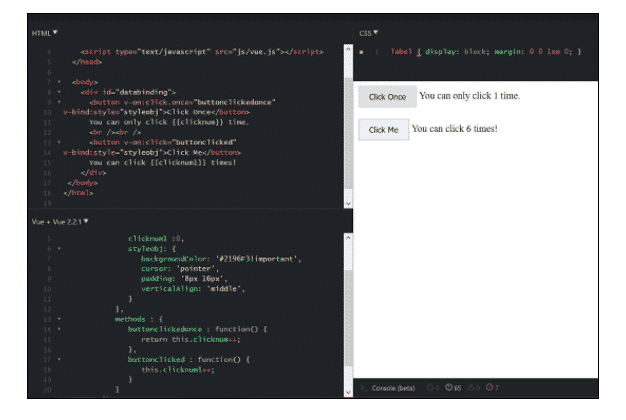
.once event modifier example code
HTML -
<html>
  <head>
	<title>VueJs Instance</title>
	<script type="text/javascript" src="js/vue.js"></script>
  </head>

  <body>
	<div id="databinding">
  	<button v-on:click.once="clickedonce"
v-bind:style="styleobj">Click Once</button> <! .once modifier -->

  You can only click {{var1}} time.    	<br /><br />
  	<button v-on:click="clickedmultiple"

v-bind:style="styleobj">Click Me</button> <!-- no event modifier -->
  	You can click {{var2}} times!
	</div>
 </body>
</html>
VueJS -
var vm = new Vue({
        	el: '#databinding'
        	data: {
           	clicknum : 0,
           	clicknum1 :0,
           	styleobj: {
              	backgroundColor: '#2196F3!important',
              	cursor: 'pointer',
              	padding: '8px 16px',
              	verticalAlign: 'middle',
           	}
        	},
        	methods : {
           	clickedonce : function() {
              	this.var1++;  //since .once is used, this won’t be added after value 1 is reached
           	},
           	clickedmultiple : function() {
              	this.var2++; //this gets added as usual
           	}
        	}
     	});
In the given example, we have created two buttons. The button with Click Once label has been provided with the .once modifier and the other button is without any modifier. Thus we can see the working of the event modifier in this manner.
<button v-on:click.once = "buttonclickedonce" v-bind:style = "styleobj">Click Once</button>
<button v-on:click = "buttonclicked"  v-bind:style = "styleobj">Click Me</button>
The former button calls the method “clickedonce” and the latter button calls the method “clickedmultiple”.
clickedonce : function() {
   this.clicknum++;
},
clickedmultiple: function() {
   this.clicknum1++;
}
There are two variables defined in var1 and var2. Both are incremented when the button is clicked. Both the variables are initialized to 0 and the display is seen in the output above.
When we click the former button, the variable var1 increments by 1. On the second click, the number is not incremented as the .once event modifier prevents it from executing or performing any action item assigned on the click of the button.
On the click of the latter button, the same action is carried out, i.e. the variable is incremented. On every click, the value is incremented and displayed.
The output we get in the browser is as shown below -
Key Modifiers
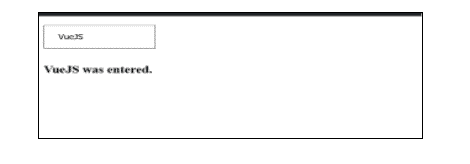
Just like we have event modifiers, VueJS offers key modifiers based on which we can control the event using input keys. Consider we have a textbox and we want to submit only when we press Enter. We can do so by denoting the key modifier to the submit function as below.
<!-- only call `vm.submit()` when the `key` is `Enter` -->
<input v-on:keyup.enter="submit">
Vue contains aliases for the most commonly used key codes when necessary for browser support:
- .enter
- .tab
- .delete (captures both “Delete” and “Backspace” keys)
- .esc
- .space
- .up
- .down
- .left
- .right
Example -
<html>
   <head>
  	<title>VueJs Instance</title>
  	<script type = "text/javascript" src = "js/vue.js"></script>
   </head>
   <body>
  	<div id = "databinding">
     	<input type = "text" v-on:keyup.enter = "showinputvalue" v-bind:style =
"styleobj" placeholder = "Value you want to enter/> <!-- key modifier .enter used -->
     	<h3> {{name}}</h3>
  	</div>
  	<script type = "text/javascript">
     	var vm = new Vue({
        	el: '#databinding',
        	data: {
           	Name:'',
           	styleobj: {
              	width: "30%",
              	padding: "12px 20px",
              	margin: "8px 0",
              	boxSizing: "border-box"
           	}
        	},
        	methods : {
           	showinputvalue : function(event) {
              	this.name=event.target.value + “ was entered.”;
           	}
        	}
     	});
  	</script>
   </body>
</html>
Type anything into the box and press enter to view, as you can see below.
Custom Events
All that was mentioned above were in-built, native events. VueJS being a component-based framework also allows for custom events. We have learnt in Vue that parents can send prop data to a child, but not the other way round. This can only be achieved through custom events - the child component emits the event to the parent who listens to it.
Example -
HTML
<html>
   <head>
      <title>VueJs Instance</title>
      <script type = "text/javascript" src = "js/vue.js"></script>
   </head>
   <body>
      <div id = "databinding">
         <div id = "counter-event-example">
            <p style = "font-size:25px;">VueJS Feature selected : <b>{{ featureclicked }}</b></p>
            <button-counter 		<-- parent component -->
            v-for = "(item, index) in features"
            v-bind:item = "item"
            v-bind:index = "index"
            v-on:showfeature = "featuredisp">
		</button-counter>
         </div>
      </div>

   </body>
</html>
Vue.js
Vue.component('button-counter', {
        	template: '<button v-on:click = "displayfeature(item)"><span style = "font-size:25px;">{{ item }}</span></button>',
        	data: function () {
           	return {
              	counter: 0
           	}
        	},
        	props:['item'],
        	methods: {
           	displayfeature: function (ftr) {
              	console.log(lng);
              	this.$emit('showfeature', ftr);
           	}
        	},
     	});
     	var vm = new Vue({
        	el: '#databinding',
        	data: {
           	featureclicked: "",
           	features : ["Instance", "Component", "Watchers", "Directives", "Binding", "Animation", "Rendering", "Routing"]
        	},
        	methods: {
           	featuredisp: function (a) {
              	this.featureclicked = a;
           	}
        	}
     	})
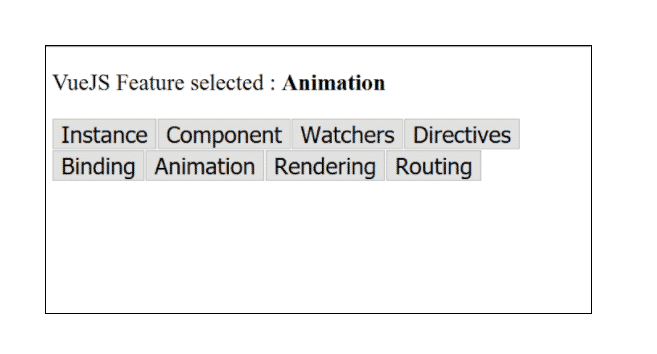
The name of the custom event is showfeature and it calls a method called featuredisp which is defined in the Vue instance. The method displayfeature calls this.$emit(‘showfeature’, ftr);
$emit is used to call the parent component method. The method showfeature is the event name given on the component with v-on. Here, the emit triggers showfeature which in turn calls featuredisp from the Vue instance methods. It assigns the feature clicked to the variable featureclicked and the same is displayed in the browser as shown in the following screenshot.
VueJS - Rendering
VueJS offers rendering in two widely used formats :
Conditional Rendering
Here we want the output to be displayed or method to be performed only when a certain condition is met. Anyone and everyone who is even a novice developer knows that while dealing with conditions, we use if, else and else if etc. The very same goes for VueJS. The tags used are -
- v-if
- v-else
- v-else-if
Some things to note in conditional rendering -
- The block can be rendered only if the condition is met.
- V-else requires the use of at least one v-if block and should be written immediately after v-if in order to be recognised.
- The above is also true for v-else-if i.e it should follow a v-if statement. V-else-if can be rendered for multiple conditions.
 <div v-if="type === 'A'">
  A
</div>
<div v-else-if="type === 'B'">
  B
</div>
<div v-else-if="type === 'C'">
  C
</div>
<div v-else>
  Not A/B/C
</div>
v-show
Another substitute for conditionally representing an element is the v-show directive. The usage is largely the same:
<h1 v-show="ok">Hello World!</h1>
With v-show, the difference is that an element will be rendered every time and remain in the DOM; v-show only toggles the display CSS property of the element. Note that v-show doesn’t support the <template> element and also does not work with v-else.
Difference between v-if and v-show
V-if and its associates stand for “real” conditional rendering because it assures that event listeners and child elements inside the conditional block are properly terminated and re-created. In comparison, v-show is much more manageable - the element is always rendered regardless of the initial condition, with CSS-based toggling. So favour v-show if you need to toggle something very frequently, and prefer v-if if the condition is unlikely to vary at runtime.
Example -
<html>
   <head>
  	<title>VueJs Instance</title>
  	<script type = "text/javascript" src = "js/vue.js"></script>
   </head>
   <body>
  	<div id = "databinding">
     	<button v-on:click = "showdata" v-bind:style = "styleobj">Click Me</button>
     	<span style = "font-size:25px;"><b>{{show}}</b></span>
     	<h1 v-if = "show">This is h1 if </h1> <!-- if condn -->
     	<h2 v-else>This is h2 else </h2>		<!-- else condn -->
     	<h3 v-show = "show">This is h3 show </h3>	<!-- show condition -->
    	 </div>
  	<script type = "text/javascript">
   	  var vm = new Vue({
        	el: '#databinding',
       	data: {
           	show: true,
           	styleobj: {
              	backgroundColor: '#2196F3!important',
              	cursor: 'pointer',
              	padding: '8px 16px',
              	verticalAlign: 'middle',
           	}
        	},
        	methods : {
           	showdata : function() {
              	this.show = !this.show;
           	}
        	},
     	});
  	</script>
   </body>
</html>
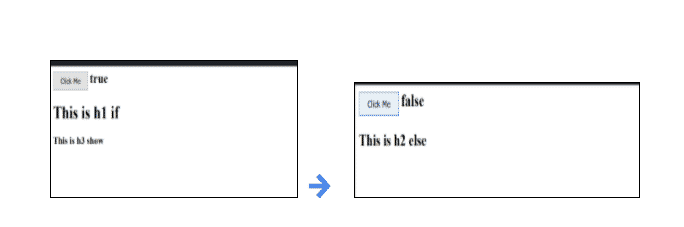
As you can see by the above output, when the result on clicking the button is true, we can see the contents of the v-if and v-show tag. And on value false, we only see the content of the v-else tag. You can easily infer from this what we have already discussed, v-if needs to be accompanied by a v-else tag and v-show can work independently.
List Rendering
In case of managing arrays and other such objects dynamically and consistently, we use the list rendering property offered by VueJS.
One can utilise the v-for directive to render a list of items based on an array. The v-for directive asks for a specialised syntax in the form of item in a list of items, where items is the source data array and item is an alias for the array element being rendered on:
HTML -
<ul id="example-1">
  <li v-for="item in items" :key="item.message">
    {{ item.message }}
  </li>
</ul>
VueJS -
var example1 = new Vue({
  el: '#example-1',
  data: {
    items: [
      { message: 'Amar' },
      { message: 'Akbar' }
    ]
  }
})
Result:
We have complete access to parent scope properties inside v-for blocks. It also gives support to an optional second argument for the index of the present item. One can also use of as a delimiter instead of in, making it closer to JavaScript’s syntax for iterators.
<div v-for="item of items"></div>
Example -
<html>
<head>
<title>VueJs Instance</title>
<script type = "text/javascript" src = "js/vue.js"></script>
</head>
<body>
<div id = "databinding">
<input type = "text" v-on:keyup.enter = "showinputvalue"
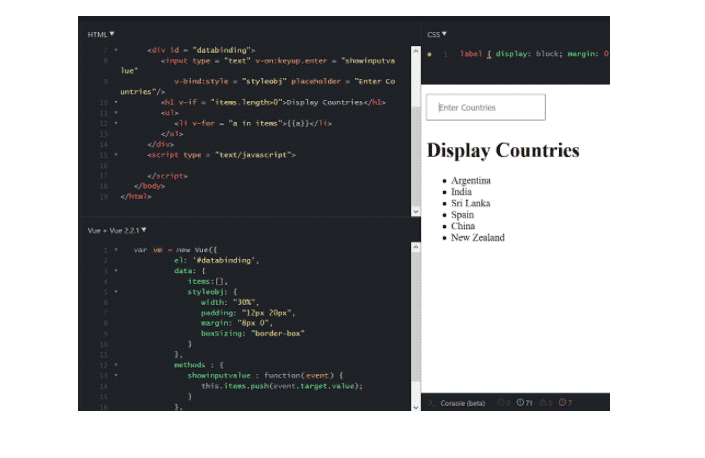
v-bind:style = "styleobj" placeholder = "Enter Countries"/> <!-- v-for triggered with key event .enter -->
<h1 v-if = "items.length>0">Display Countries</h1>
<ul>
<li v-for = "a in items">{{a}}</li>
</ul> <!-- v-for rendered as a list item -->
</div>
<script type = "text/javascript">
var vm = new Vue({
el: '#databinding',
data: {
items:[],
styleobj: {
width: "30%",
padding: "12px 20px",
margin: "8px 0",
boxSizing: "border-box"
}
},
methods : {
showinputvalue : function(event) {
this.items.push(event.target.value);
}
},
});
</script>
</body>
</html>
VueJS - Mixins
Mixins are a piece of predefined code that can be used across Vue components and instances in order to extend functionalities. Vue Mixins can be shared amongst components without the need to repeat logic. Mixins are a flexible way to reuse functionalities of Vue elements. A mixin object can contain any component alternatives. A component using a mixin has all options “incorporated” into the component’s own options.
// define a mixin object
var myMixin = {
  created: function () {
    this.hello()
  },
  methods: {
    hello: function () {
      console.log('hello from mixin!')
    }
  }
}

// define a component that uses this mixin
var Component = Vue.extend({
  mixins: [myMixin]
})

var component = new Component() // => "hello from mixin!"
Types of Mixins
Following are the types of mixins that can be declared in Vue:
- Local Mixins: This is the type that is mentioned above. It is scoped to the element it is imported into and expressed in. The capabilities of the local mixin are bound by the component it is imported in.
- Global Mixins: It is a modified type of mixin that is generally defined in the Main.js file of any Vue project. The Vue team advises that it is to be used with caution as it affects all Vue components in an application. The syntax of a global mixin looks like this:
Vue.mixin({
  created: function () {
	var myOption = this.$options.myOption
	 if (myOption) {
		console.log(myOption)
		}
	}
})
new Vue({
		myOption: 'hello!'
	})

	// => "hello!"
So why exactly do we need mix-ins?
- One can easily adhere to the DRY principle in programming with Vue mixins, which is simply ensuring that you do not repeat yourself.
- Flexibility of code can easily be attained with the help of Vue mixins.
- Vue mixins are also safe, they do not affect changes outside their defined scope if they are well written.
- They are a great platform for code reusability.
Example:
<html>
<head>
<title>VueJs Instance</title>
<script type = "text/javascript" src = "js/vue.js"></script>
</head>
<body>
<div id = "databinding"></div>
<script type = "text/javascript">
var vm = new Vue({
el: '#databinding',
data: {
},
methods : {
},
});
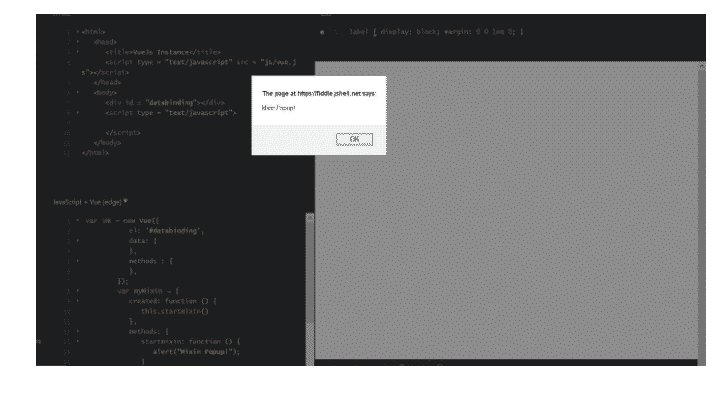
var myMixin = {
created: function () {
this.startmixin()
},
methods: {
startmixin: function () {
alert("Mixin Popup!");
}
}
};
var Component = Vue.extend({
mixins: [myMixin]
})
var component = new Component();
</script>
</body>
</html>
VueJS- Reactive Interface
Vue reactive interface is one of the essential features of the Vue.js framework. Vue.js offers the possibility to utilise the reactivity interface on the features that are dynamically added. Here, we are going to generate a Vue Instance, and then attach a watch property to the Vue instance.
import Vue from 'vue'
import App from './App'
import router from './router'
Vue.config.productionTip = false
var vm = new Vue({
   el: '#app',
   data: {
      items: 0
   }
});
vm.$watch('items', function(nval, oval) {
   alert('Item is incremented :' + oval + ' to ' + nval + '!');
});
setTimeout(
   function(){
      vm.items = 25;
   },2500
);
The above reactive property increments items based on button clicks (even the Alert dialog box ‘OK’ button). Vue.js cannot detect the property of addition. The best way to categorize the property is always to define the properties, which are needed to be reactive upfront in the Vue instance. There are several methods of the Vue reactivity Interface, which are very necessary in the Vue.js application. Some of the most popular methods are as follows:
vue.set
The vue.set method is used to set an attribute on an object. Vue.js cannot identify the addition or deletion property in the Vue component. This is due to the fact that Vue conducts the conversion process of getter/setter during the initialisation of instances. A getter/setter property must be at hand in the object of data in order for Vue to convert it and make it reactive. The vue.set method works according to the following syntax :
Syntax:
vue.set( target, key, value )
Here the target, key, and value denote for:
Target: It could be an object/ an array.
Key: It could be a string/ number.
Value: It could be of any type.
Example :
HTML -
<html>
<head>
<title>VueJs Instance</title>
<script type = "text/javascript" src = "js/vue.js"></script>
</head>
<body>
<div id = "app">
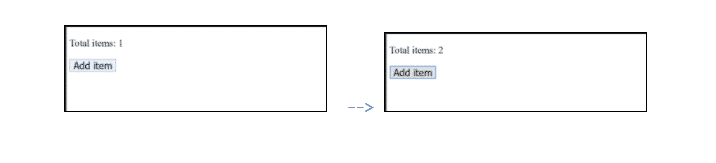
<p style = "font-size:25px;">Total items: {{ items.id }}</p>
<button @click = "items.id++" style = "font-size:25px;">Add item</button>
</div>
</body>
</html>
Vue.js -
var myitem = {"id":1, name:"item", "price":"20.00"};
     	var vm = new Vue({
        	el: '#app',
        	data: {
           	counter: 1,
           	items: myitem
        	}
     	});
     	Vue.set(myitem, 'qty', 1);
     	console.log(vm);
     	vm.$watch('total', function(nval, oval) {
        	alert('Total items are incremented :' + oval + ' to ' + nval + '!');
     	});
vue.delete
The Vue.delete method is used to dynamically delete the property. We can have the following syntax to use the vue.delete method:
Syntax:
vue.delete( target, key )
Here the target and key are used for:
Target: It could be an object or an array.
Key: It could be a string or a number.
Example -
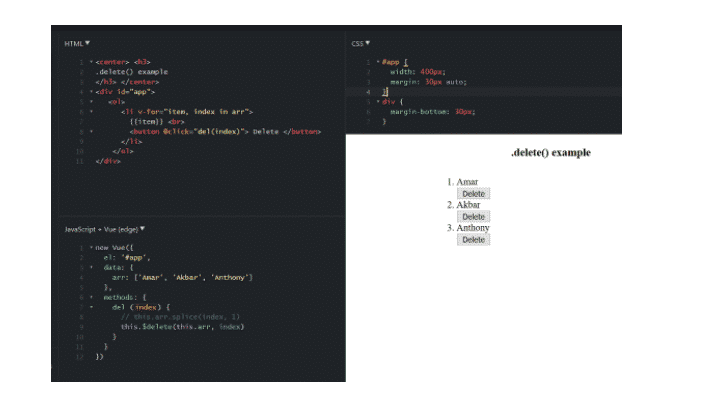
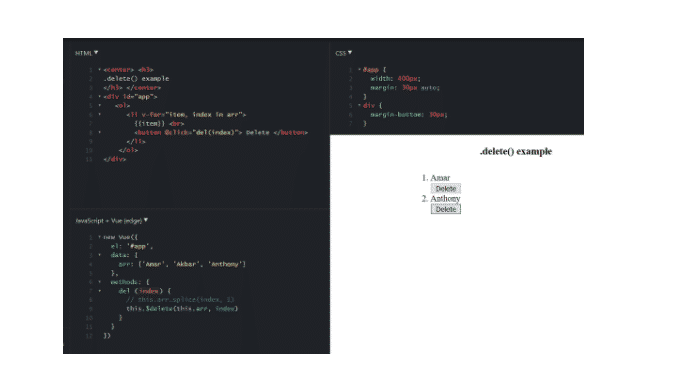
HTML:
<center> <h3>
.delete() example
</h3> </center>
<div id="app">
   <ol>
  	<li v-for="item, index in arr">
    	{{item}} <br>
    	<button @click="del(index)"> Delete </button>
  	</li>
	</ol>
</div>
Vue.js:
new Vue({
  el: '#app',
  data: {
	arr: ['Amar', 'Akbar', 'Anthony']
  },
  methods: {
	del (index) {
  	// this.arr.splice(index, 1)
  	this.$delete(this.arr, index)
	}
  }
})
CSS:
#app {
  width: 400px;
  margin: 30px auto;
}
div {
  margin-bottom: 30px;
}
After deleting ->
VueJS - Render Function
Every Vue element utilises a render function in the Vue.js application. Mostly, the Vue compiler generates the Vue function. While we specify a template on our component, the Vue compiler will prepare the contents of this template that will deliver a rendering function.
We have already seen the Vue components and their uses. Here, we are going to take an example to understand it more easily. Suppose if we have content that requires to be reusable across the project of Vue.js, then we can convert it as a component and use it.
Render function helps make the component dynamic and use the way it is required by keeping it common and helping pass arguments using the same component.
Example :
HTML-
<html>
<head>
<title>VueJs Instance</title>
<script type = "text/javascript" src = "js/vue.js"></script>
</head>
<body>
<div id = "component_test">
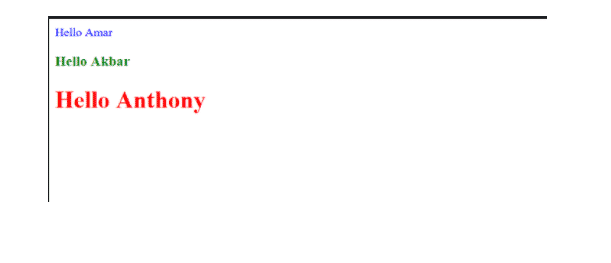
<testcomponent :elementtype = "'div,blue,27,div1'">Hello Amar</testcomponent> //component 1 for render
<testcomponent :elementtype = "'h3,green,25,h3tag'">Hello Akbar</testcomponent> //component 2 for render
<testcomponent :elementtype = "'h1,yellow,25,h1tag'">Hello Anthony</testcomponent> </div> //component 3 for render
</body>
</html>
Vue.js-
 Vue.component('testcomponent', {
	render: function(createElement) {
	var a = this.elementtype.split(",");
	return createElement(a[0], {
     	attrs: {
       	id: a[3],
       	style: "color:" + a[1] + ";font-size:" + a[2] + ";"
     	}
   	},
   	this.$slots.default
 	)
   },
   props: {
 	elementtype: {
   	attributes: String,
   	required: true
 	}
   }
 });
var vm = new Vue({
   el: '#component_test'
 });
In the above code, we have changed the different HTML components and added a specific render function with props property using the given piece of code. Thus we can implement a Vue render function in any Vue component. Also, given Vue reactivity, the render function will be called again whenever a reactive property of the component gets updated.
VueJS - Transition & Animation
Transitions and Animations are a great way to make a website feel more contemporary and to give site visitors a better user experience. Luckily, for developers, setting up VueJS animations is quite easy. VueJS offers several ways to implicate transition to the HTML elements when they are added/updated in the DOM.
Given below is the basic syntax of a transition:
<transition name = "nameoftransition">
	<div></div>
</transition>
Let us consider an example:
HTML-
<center><h3>
Transition example
</h3> </center>
<div id="demo">
  <button v-on:click="show = !show">
	Click me!
  </button>
  <p>
   When we click the button the following fades :
   </p>
  <transition name="fade">
  <center> <p v-if="show">I am fading!</p></center>
  </transition>
</div>
Vue.js -
new Vue({
  el: '#demo',
  data: {
	show: true
  }
})
CSS-
.fade-enter-active, .fade-leave-active {
  transition: opacity .5s;
}
.fade-enter, .fade-leave-to /* .fade-leave-active below version 2.1.8 */ {
  opacity: 0;
}
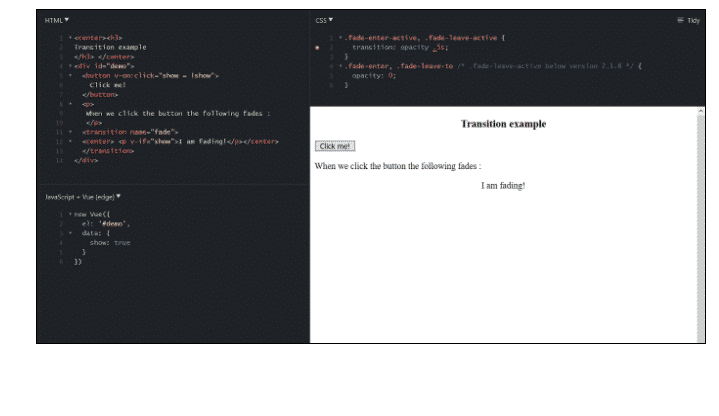
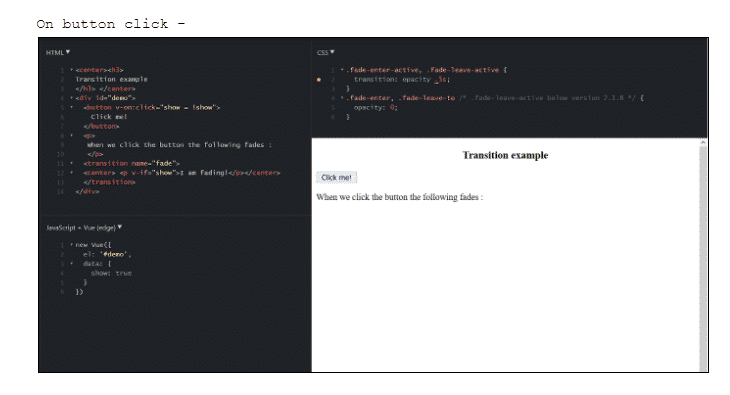
Given there is a button called clickme created using which we can modify the value of the variable shown from true, to false and vice versa. There is a p tag, which showcases the text element only if the variable is true. We have enclosed the p tag with the transition element. Below are some conventional classes for transition−
- v-enter − This class is declared initially before the element is updated. It's the opening state.
- v-enter-active − This class is employed to limit the delay, time span, and easing curve for starting in the transition phase. This is the active state and the class is accessible during the entire entering phase.
- v-leave − Added when the leaving transition is triggered, discarded.
- v-leave-active − Used during the leaving phase. It is removed when the transition is performed.
VueJS - Animation
Animations are used the same way as transition is used. Animation also possesses classes that require it to be declared for the effect to take place. Let us consider an example to observe how animation works.
Example -
HTML:
<h3>
Example of Vue.js animations
</h3>

<div id="example">
  <center><button @click="show = !show">Animate!</button></center>
  <transition name="bounce">
	<p v-if="show">Animations work in the same way as transitions, the only contrast being that v-enter is not removed immediately after the element is inserted, but on an animationend event.</p>
  </transition>
</div>
Vue.js:
   new Vue({
  el: '#example',
  data: {
	show: true
  }
})
CSS:
.bounce-enter-active {
  animation: bounce-in .5s;
}
.bounce-leave-active {
  animation: bounce-in .5s reverse;
}
@keyframes bounce-in {
  0% {
	transform: scale(0);
  }
  50% {
	transform: scale(1.5);
  }
  100% {
	transform: scale(1);
  }
}
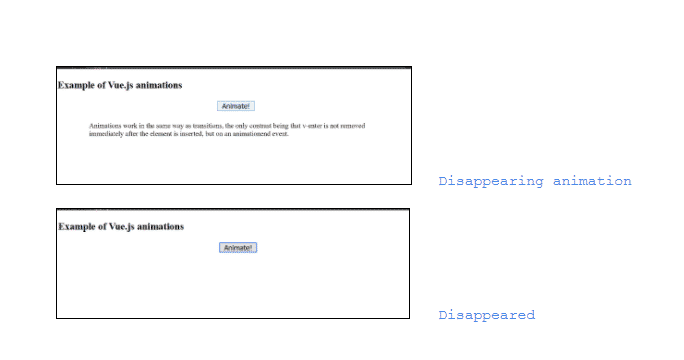
To implement animation, it follows the mechanism same as transition. In the preceding code, we have an image enclosed in p tag as shown in the following piece of code.
<transition name = "shiftx">
   <p v-show = "show"><img src = "images/img.jpg" style = "width:100px;height:100px;" /></p>
</transition>
VueJS provides a list of custom classes, which can be added as attributes to the transition element.
- Enter-class
- enter-active-class
- Leave-class
- leave-active-class
We can implement transition and animation on the element using VueJS. Vue waits for the transition-end and animation-end event to detect if the animation or transition is done. Sometimes the transition can cause a delay. In such cases, we can apply the duration explicitly as follows.
<transition :duration = "1000"></transition>
<transition :duration = "{ enter: 500, leave: 800 }">...</transition>
You can utilise the duration property with a ‘:’ on the transition component as shown. In case there is a need to stipulate the duration distinctly for entering and exiting, it can be done as shown in the above piece of code.
VueJs - Directives
A directive is an exceptional token in the markup that tells the library to do something to a DOM element. In Vue.js, the notion of a directive is considerably simpler than that in Angular. Directives are instructions for VueJS to do things in a particular manner. We have already observed directives such as v-if, v-show, v-else, v-for, v-bind, v-model, v-on, etc. A Vue.js directive can only give the idea in the form of a prefixed HTML attribute that takes the following format:
<element prefix-directiveId="[argument:] expression [| filters...]">
</element>
Let us consider a simple example:
1. <div v-text="message"></div>
Here the prefix is v, which is the default. The directive ID is text and the expression is a message. This directive initiates Vue.js to update the div’s textContent whenever the message property on the Vue instance changes.
Now, let us examine a more elaborate example:
<html>
   <head>
  	<title>VueJs Instance</title>
  	<script type = "text/javascript" src = "js/vue.js"></script>
   </head>
   <body>
  	<div id = "databinding">
     	<div v-changestyle>VueJS Directive</div>
  	</div>
  	<script type = "text/javascript">
     	Vue.directive("changestyle",{
        	bind(e1,binding, vnode) {
           	console.log(e1);
           	e1.style.color = "blue";
           	e1.style.fontSize = "35px";
        	}
     	});
     	var vm = new Vue({
        	el: '#databinding',
        	data: {
        	},
        	methods : {
        	},
     	});
  	</script>
   </body>
</html>
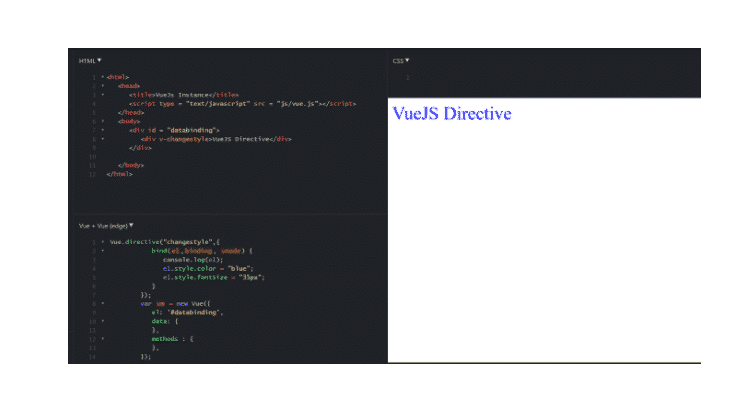
In this example, we have formulated a custom directive changestyle. We have implicated the bind method, which is a part of the directive. It takes three arguments e1, the component element to which the custom directive needs to be applied. Binding is somewhat like arguments passed to the custom directive, e.g. v-changestyle = ”{color:blue}”, where blue will be read in the binding argument and vnode is the element, i.e. nodename.
FILTERS:
VueJS provisions filters that aid with text formatting. It is employed along with v-bind and interpolations ({{}}). We want a pipe symbol at the end of JavaScript expression for filters.
<html>
   <head>
  	<title>VueJs Instance</title>
  	<script type = "text/javascript" src = "js/vue.js"></script>
   </head>
   <body>
  	<div id = "databinding">
     	<input  v-model = "name" placeholder = "Enter Name" /><br/>
     	<span style = "font-size:25px;"><b>Number of letters are : {{name |
countletters}}</b></span>
  	</div>
  	<script type = "text/javascript">
     	var vm = new Vue({
        	el: '#databinding',
        	data: {
           	name : ""
        	},
        	filters : {
           	countletters : function(value) {
              	return value.length;
           	}
        	}
     	});
  	</script>
   </body>
</html>
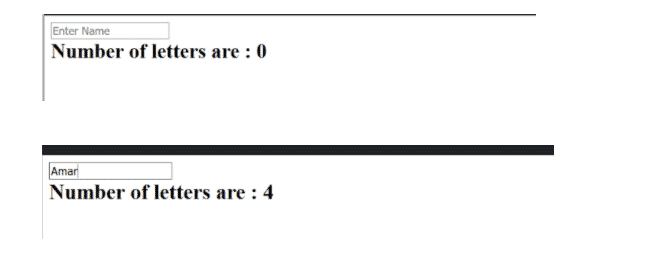
In the above example, we have made a simple filter countletters. Countletters filter calculates the numbers of characters passed into the textbox. To make use of filters, we need to use the filter property and define the filter used.
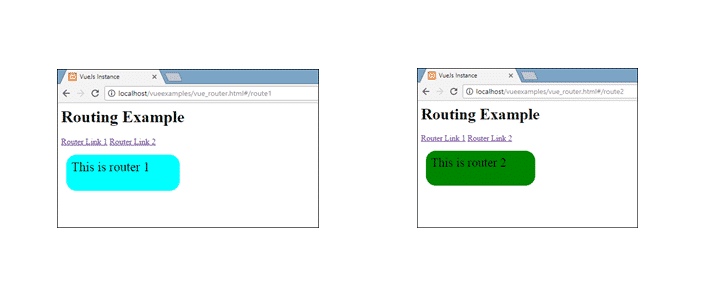
VueJS - Routing
Routing is one of the several features provided by Vue.js to permit the users to toggle between pages, eliminating the need to refresh every time a page is loaded. This results in smooth transitions between pages, giving a better feel for the user. VueJS doesn’t possess a built-in router feature. We need to entail some additional steps to install it.
Direct Download from CDN
The newest version of vue-router is available at https://unpkg.com/vue-router/dist/vue-router.js . Unpkg.com provides npm-based cdn links. The above link is always updated to the recent version. You can simply download and host it, and use it with a script tag along with vue.js.
Using NPM
Run the following command to install the vue-router.
npm install vue-router
Using GitHub
We can clone the repository from GitHub as follows:
git clone https://github.com/vuejs/vue-router.git node_modules/vue-router
cd node_modules/vue-router
npm install
npm run build
Let us see a simple example, which shows routing:
<html>
   <head>
  	<title>VueJs Instance</title>
  	<script type = "text/javascript" src = "js/vue.js"></script>
  	<script type = "text/javascript" src = "js/vue-router.js"></script>
   </head>
   <body>
  	<div id = "app">
     	<h1>Routing Example</h1>
     	<p>
        	<router-link to = "/route1">Router Link 1</router-link>
        	<router-link to = "/route2">Router Link 2</router-link>
     	</p>
     	<!-- route outlet →
     	<!-- component matched by the route will render here →
     	<router-view></router-view>
  	</div>
  	<script type = "text/javascript">
     	const Route1 = { template: '<div style =
"border-radius:20px;background-color:cyan;width:200px;height:50px;margin:10px;font-size:25px;padding:10px;">This is router 1</div>' }
 	const Route2 = { template: '<div style = "border-radius:20px;background-color:green;width:200px;height:50px;margin:10px;font-size:25px;padding:10px;">This is router 2</div>' }
     	const routes = [
        	{ path: '/route1', component: Route1 },
        	{ path: '/route2', component: Route2 }
     	];
     	const router = new VueRouter({
        	routes // short for `routes: routes`
     	});
     	var vm = new Vue({
        	el: '#app',
        	Router
     	});
  	</script>
   </body>
</html>
Output:
VueJS - Application example
HTML code for Furniture Inventory
<html>
<head>
<title>VueJs Instance</title>
<script type = "text/javascript" src = "js/vue.js"></script>
</head>
<body>
<style>
#databinding{
padding: 20px 15px 15px 15px;
margin: 0 0 25px 0;
width: auto;
}
span, option, input {
font-size:20px;
}
.Table{
display: table;
width:80%;
}
.Title{
display: table-caption;
text-align: center;
font-weight: bold;
font-size: larger;
}
.Heading{
display: table-row;
font-weight: bold;
text-align: center;
}
.Row{
display: table-row;
}
.Cell{
display: table-cell;
border: solid;
border-width: thin;
padding-left: 5px;
padding-right: 5px;
width:30%;
}
</style>
<div id = "databinding" style = "">
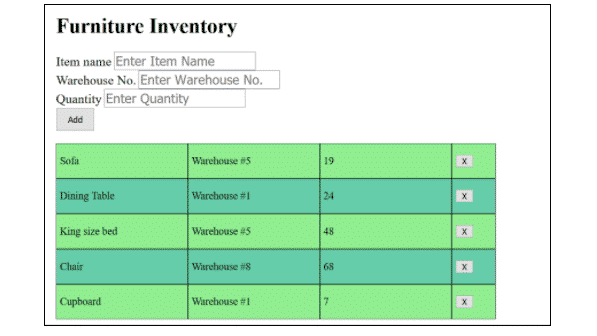
<h1>Furniture Inventory</h1>
<span>Item name</span>
<input type = "text" placeholder = "Enter Item Name" v-model = "item"/><br>
<span>Warehouse No.</span>
<input type = "text" placeholder = "Enter Warehouse No." v-model = "warehouse"/><br>
<span>Quantity</span>
<input type = "text" placeholder = "Enter Quantity" v-model = "quantity"/><br>
<button v-on:click = "showdata" v-bind:style = "styleobj">Add</button>
<br/>
<br/>
<inventorycomponent
v-for = "(i, index) in invdet"
v-bind:item = "i"
v-bind:index = "index"
v-bind:itr = "i"
v-bind:key = "i.item"
v-on:removeelement = "invdet.splice(index, 1)">
</inventorycomponent>
</div>
<script type = "text/javascript">
</script>
</body>
</html>
Vue.js code -
Vue.component('inventorycomponent',{
        	template : '<div class = "Table"><div class = "Row"  v-bind:style = "styleobj"><div class = "Cell"><p>{{itr.item}}</p></div><div class = "Cell"><p>{{itr.warehouse}}</p></div><div class = "Cell"><p>{{itr.quantity}}</p></div><div class = "Cell"><p><button v-on:click = "$emit(\'removeelement\')">X</button></p></div></div></div>',
        	props: ['itr', 'index'],
        	data: function() {
           	return {
              	styleobj : {
                 	backgroundColor:this.getcolor(),
                 	fontSize : 20
              	}
           	}
        	},
        	methods:{
           	getcolor : function() {
              	if (this.index % 2) {
                 	return "#66CDAA";
              	} else {
                 	return "#90EE90";
              	}
           	}
        	}
     	});
     	var vm = new Vue({
        	el: '#databinding',
        	data: {
           	item:'',
           	warehouse:'',
           	quantity : '',
           	invdet:[],
           	styleobj: {
              	backgroundColor: '#2196F3!important',
              	cursor: 'pointer',
              	padding: '8px 16px',
              	verticalAlign: 'middle',
           	}
        	},
        	methods :{
           	showdata : function() {
              	this.invdet.push({
                 	item: this.item,
                 	warehouse: this.warehouse,
                 	quantity : this.quantity
              	});
              	this.item = "";
              	this.warehouse = "";
              	this.quantity = "";
           	}
        	}
     	});
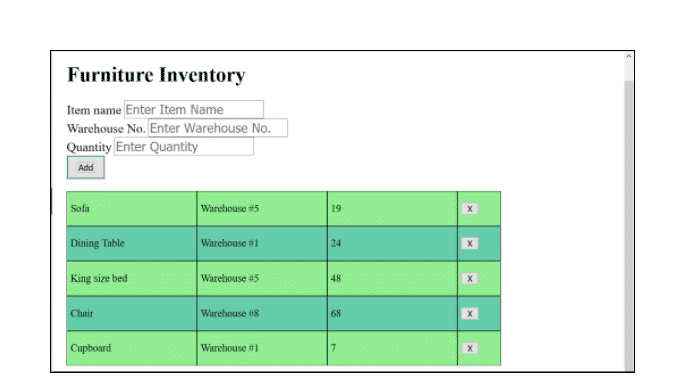
In this example, we have three textboxes and via the binding properties for components, we can now showcase the details entered in them through a table rendered by a list. Following are the actions you can perform -
- Add item

- Delete item
We have used the emit event for deletion of a table row.
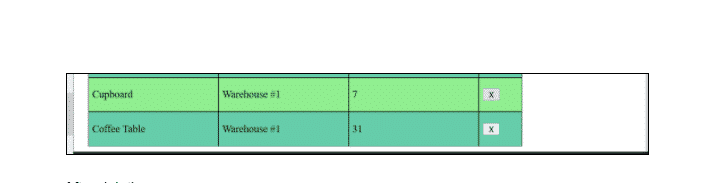
- After deleting -
This brings us to the end of the blog on VueJS Tutorial. We hope that you enjoyed this VueJS Tutorial and were able to gain knowledge from the same. If you wish to learn more such concepts, you can head over to Great Learning Academy and check out the free online courses available.