

- What Is LangGraph and Why Is It Used for Stateful AI Agents?
- 1. Set Up the LangGraph Project
- 2. Define the State for the Agent
- 3. Create the Plan, Tool, and Answer Nodes
- 4. Connect the Three Nodes With LangGraph Edges
- 5. Run the LangGraph Agent
- 6. See How State Moves Through the Agent
- 7. Add Persistence So the Agent Can Remember State
- 8. Understand What Makes This Agent Stateful
- 9. Add Conditional Routing to the Agent
- 10. Full LangGraph Agent Code
- 11. How to Extend This LangGraph Agent
- 12. Best Practices for Building LangGraph Agents
- Conclusion
Building an AI agent is more than connecting an LLM to a prompt. As soon as an application needs to plan a task, call a tool, retain intermediate results, and use those results to produce an answer, the workflow becomes stateful.
This is where LangGraph becomes useful.
In this LangGraph tutorial, you will build a small but complete AI agent in Python with three nodes:
Plan → Tool Call → Answer
The workflow will accept a user request, create a structured plan, call a tool based on that plan, and use the tool result to generate the final response.
This fixed workflow provides a simple foundation for understanding how LangGraph manages state, nodes, tools, and execution flow.
You will then extend the basic workflow with persistence and conditional routing to show how LangGraph can move toward more agentic behavior, where the next step can depend on the current state and model output.
The final workflow will look like this:
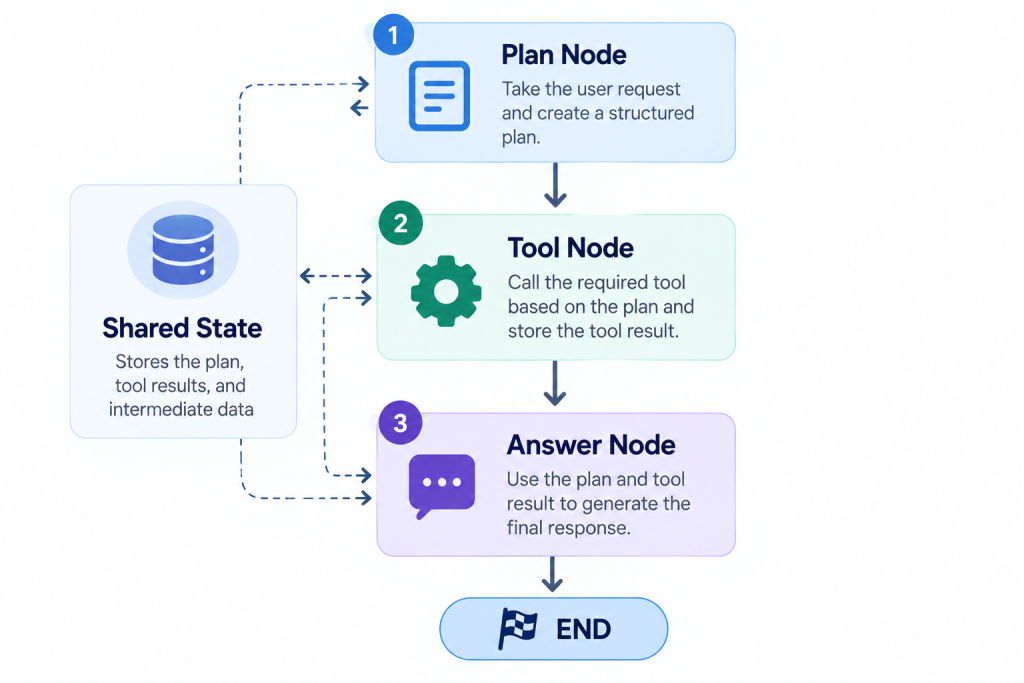
By the end, you will have a working LangGraph application that you can extend with more tools, conditional routing, memory, human approval, or additional agent steps.
What Is LangGraph and Why Is It Used for Stateful AI Agents?
LangGraph is a framework for building stateful AI agents and multi-step LLM workflows. It models an AI application as a graph of nodes and edges, with shared state used to store and pass information between steps.
This allows developers to build agents that can plan tasks, call tools, make decisions, maintain context, and execute complex workflows in a controlled manner.
LangGraph is particularly useful when an AI application needs explicit control over its execution flow.
Developers can define what each step does, determine what happens next, and preserve relevant information throughout the workflow, making it well suited for tool-using agents, conditional workflows, and stateful AI applications.
If you want to build practical skills with LangGraph, explore Great Learning’s AI Agents in LangGraph. It covers LangGraph fundamentals, graph-based workflows, stateful AI agents, and multi-agent orchestration using Python.
1. Set Up the LangGraph Project
We will use Python and an OpenAI-compatible chat model through LangChain's OpenAI integration.
Create a project directory:
mkdir langgraph-agent
cd langgraph-agent
Create a virtual environment:
python -m venv .venvActivate it on macOS or Linux:
source .venv/bin/activateOn Windows:
.venv\Scripts\activateInstall the required packages:
pip install -U langgraph langchain-openaiLangGraph provides the graph orchestration layer, while langchain-openai provides the ChatOpenAI integration used by the example.
Set your API key as an environment variable.
On macOS or Linux:
export OPENAI_API_KEY="your-api-key"On Windows PowerShell:
$env:OPENAI_API_KEY="your-api-key"For a real project, store credentials through your environment or secret-management system rather than hard-coding them in Python.
Create an agent.py file:
langgraph-agent/
│
├── .venv/
└── agent.py
The rest of the tutorial will be implemented in this file.
2. Define the State for the Agent
The first thing to define in a LangGraph workflow is the state.
State is the shared data that nodes can read and update as the graph executes. LangGraph's documentation recommends keeping state focused on information that needs to persist between steps rather than storing values that can simply be derived again.
For this agent, we need four pieces of information:
- The user's request
- The plan created by the planning node
- The result returned by the tool
- The final answer
Add the following to agent.py:
from typing_extensions import NotRequired, TypedDict

class AgentState(TypedDict):
    user_request: str
    plan: NotRequired[str]
    tool_result: NotRequired[str]
    answer: NotRequired[str]
The important point is that the nodes do not need to manually pass values to one another.
Instead, they operate on the same state.
Initially, the graph might receive:
{
    "user_request": "What is 27 + 43?"
}
After the planning node executes, the state can become:
{
    "user_request": "What is 27 + 43?",
    "plan": "Use the addition tool with 27 and 43."
}
After the tool node:
{
    "user_request": "What is 27 + 43?",
    "plan": "Use the addition tool with 27 and 43."
}
Finally, the answer node adds:
{
    "user_request": "What is 27 + 43?",
    "plan": "Use the addition tool with 27 and 43.",
    "tool_result": "70"
}
That is the basic state model behind the agent.
Developers who want to build practical AI agents can explore Great Learning’s Building Intelligent AI Agents course, which covers LangGraph implementation, workflow design, and AI agent design patterns.
3. Create the Plan, Tool, and Answer Nodes
Now we can build the three actual nodes.
A LangGraph node is a function that receives the current state and returns updates to that state. Nodes can perform different kinds of work, including LLM calls, API calls, database operations, or other application logic.
Create the Planning Node
For the planning step, we want the LLM to determine which numbers need to be added.
Instead of asking the model to return free-form text and then parsing it ourselves, we can ask it for structured output.
Add these imports:
from pydantic import BaseModel, Field
from langchain_openai import ChatOpenAI
Define the planning schema:
class AdditionPlan(BaseModel):
    first_number: float = Field(description="The first number to add")
    second_number: float = Field(description="The second number to add")
Initialize the model:
model = ChatOpenAI(model="gpt-4.1-mini")Create a structured-output version:
planner = model.with_structured_output(AdditionPlan)Now define the planning node:
def plan_node(state: AgentState):
    result = planner.invoke(
        f"""
        Identify the two numbers that need to be added
        based on the user's request.

        User request:
        {state["user_request"]}
        """
    )

    plan = (
        f"Add {result.first_number} "
        f"and {result.second_number}."
    )

    return {
        "plan": plan
    }
The node reads:
state["user_request"]and returns:
{
    "plan": "Add 27 and 43."
}
It does not need to return the entire state. LangGraph applies the returned update to the existing state.
Create the Tool
Next, create the actual tool that performs the calculation.
LangChain tools can be defined using the @tool decorator.
Add:
from langchain.tools import toolThen define the tool:
@tool
def add_numbers(first_number: float, second_number: float) -> str:
    """Add two numbers and return the result."""
    result = first_number + second_number
    return str(result)
The tool has one simple responsibility: perform the addition.
Now create the tool node:
def tool_node(state: AgentState):
    plan_result = planner.invoke(
        f"""
        Extract the two numbers from this plan.

        Plan:
        {state["plan"]}
        """
    )

    result = add_numbers.invoke(
        {
            "first_number": plan_result.first_number,
            "second_number": plan_result.second_number,
        }
    )

    return {
        "tool_result": result
    }
There is a small design improvement we can make here.
The planning node already has the structured numbers, but our state currently stores only the formatted plan. In a production application, it would be better to store the structured planning result itself rather than reconstructing it from text.
For this tutorial, however, keeping plan as a readable string makes the state easier to inspect.
A production version could instead define:
class AgentState(TypedDict):
    user_request: str
    plan: NotRequired[AdditionPlan]
    tool_result: NotRequired[str]
    answer: NotRequired[str]
and return the structured object directly from the planning node.
The important principle is to avoid storing information in state merely as formatted prompt text when the raw structured data is more useful. LangGraph's documentation recommends keeping raw data in state and formatting prompts when a node needs them.
Create the Answer Node
The final node will use the original request and the tool result to generate the answer.
Add:
def answer_node(state: AgentState):
    response = model.invoke(
        f"""
        Answer the user's request using the tool result.

        User request:
        {state["user_request"]}

        Tool result:
        {state["tool_result"]}

        Give a concise and clear answer.
        """
    )

    return {
        "answer": response.content
    }
At this point, the three nodes are ready:
plan_node()
    ↓
tool_node()
    ↓
answer_node()
But defining functions does not create a LangGraph workflow.
We still need to connect them.
4. Connect the Three Nodes With LangGraph Edges
Import the graph primitives:
from langgraph.graph import StateGraph, START, ENDCreate a graph builder using the state schema:
builder = StateGraph(AgentState)Register the three nodes:
builder.add_node("plan", plan_node)
builder.add_node("tool", tool_node)
builder.add_node("answer", answer_node)
Now connect them:
builder.add_edge(START, "plan")
builder.add_edge("plan", "tool")
builder.add_edge("tool", "answer")
builder.add_edge("answer", END)
Finally, compile the graph:
graph = builder.compile()The complete workflow is now:
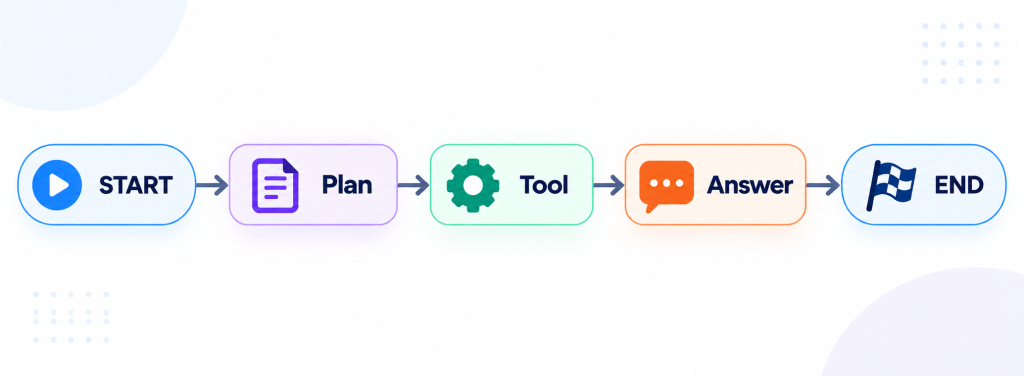
Here, the nodes represent the work and the edges represent execution flow.
START is the graph's entry point, while END marks completion. StateGraph lets you register nodes and connect them with edges before compiling the workflow into a runnable graph.
5. Run the LangGraph Agent
Now invoke the graph with the initial state.
Add:
result = graph.invoke(
    {
        "user_request": "What is 27 + 43?"
    }
)

print(result["answer"])
The execution follows this sequence:
User Request
     │
     ▼
Plan Node
     │
     │  "Add 27 and 43"
     ▼
Tool Node
     │
     │  "70"
     ▼
Answer Node
     │
     │  "27 + 43 equals 70."
     ▼
Final State
The final result contains the state produced by the graph:
{
    "user_request": "What is 27 + 43?",
    "plan": "Add 27.0 and 43.0.",
    "tool_result": "70.0",
    "answer": "27 + 43 equals 70."
}
The exact wording of the generated plan and answer can vary because those portions are generated by the model.
The important part is the execution path:
request → plan → tool result → answer6. See How State Moves Through the Agent
The easiest way to understand LangGraph is to stop thinking of each node as an isolated function.
Instead, think of the graph as repeatedly transforming shared state.
Before the Plan Node
{
    "user_request": "What is 27 + 43?"
}
The planning node reads user_request and returns:
{
    "plan": "Add 27 and 43."
}
LangGraph applies that update to the existing state.
The state becomes:
{
    "user_request": "What is 27 + 43?",
    "plan": "Add 27 and 43."
}
After the Tool Node
The tool node reads the plan and calls:
add_numbers.invoke(...)It returns:
{
    "tool_result": "70"
}
The state becomes:
{
    "user_request": "What is 27 + 43?",
    "plan": "Add 27 and 43.",
    "tool_result": "70"
}
After the Answer Node
The final node reads the relevant state:
state["user_request"]
state["tool_result"]
and returns:
{
    "answer": "27 + 43 equals 70."
}
The final state therefore contains the complete execution context.
This is the core idea behind LangGraph:
Nodes perform work. State carries information. Edges control what runs next.
7. Add Persistence So the Agent Can Remember State
The graph above maintains state during a single graph execution. If you want the graph to retain state between separate invocations, you need a checkpointer.
LangGraph supports checkpointers for short-term, thread-level persistence. A checkpointer saves the graph's state as checkpoints, while a thread_id identifies the conversation or execution thread whose state should be retrieved during a later invocation.
For local development and testing, LangGraph provides InMemorySaver.
First, import it:
from langgraph.checkpoint.memory import InMemorySaverCreate a checkpointer:
checkpointer = InMemorySaver()Then compile the graph with the checkpointer:
graph = builder.compile(
    checkpointer=checkpointer
)
Next, provide a thread_id when invoking the graph:
config = {
    "configurable": {
        "thread_id": "user-123"
    }
}
You can now run the first request:
result = graph.invoke(
    {
        "user_request": "What is 27 + 43?"
    },
    config
)
print(result["answer"])
The graph creates a checkpoint associated with:
thread_id = user-123The same thread can then be used for another invocation:
result = graph.invoke(
    {
        "user_request": "Subtract 10 from 50."
    },
    config
)
print(result["answer"])
In this example, the second request explicitly provides both values required for the calculation. This is important because using the same thread_id does not automatically make the planner understand references to previous results. The planner must be explicitly designed to read relevant information from the persisted state.
For example, a request such as:
"Now subtract 10 from that result."would require additional state-aware planning logic to identify what "that result" refers to. Simply adding a checkpointer does not provide that capability automatically.
The checkpointer allows the graph to save and retrieve state associated with a specific thread, but it should not be confused with a complete long-term memory system.
There is an important distinction:
- Short-term memory: preserves state within a specific thread or conversation.
- Long-term memory: stores information that can be retrieved across different threads or sessions.
For this tutorial, InMemorySaver is sufficient for demonstrating thread-level persistence. However, it stores data in memory and is intended for development and testing rather than production persistence.
For production applications, a durable database-backed checkpointer, such as a PostgreSQL-based implementation, is more appropriate.
8. Understand What Makes This Agent Stateful
It is tempting to call every multi-step LLM workflow “stateful,” but there are two different ideas involved.
State During a Run
Even without a checkpointer, the graph has state:
Request
   ↓
Plan
   ↓
Tool Result
   ↓
Answer
Each node can access the updates made by earlier nodes.
State Across Runs
With a checkpointer and a thread_id, LangGraph can persist checkpoints and restore the state associated with that thread in later invocations.
The difference is:
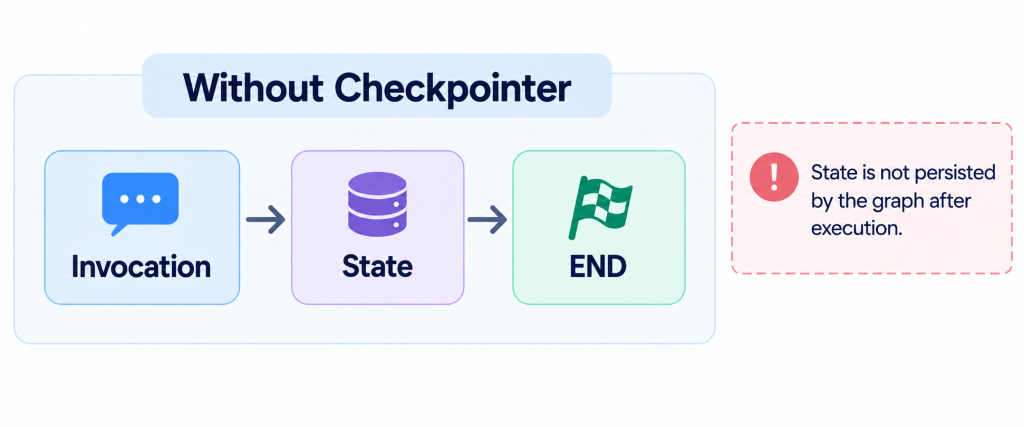
Versus:
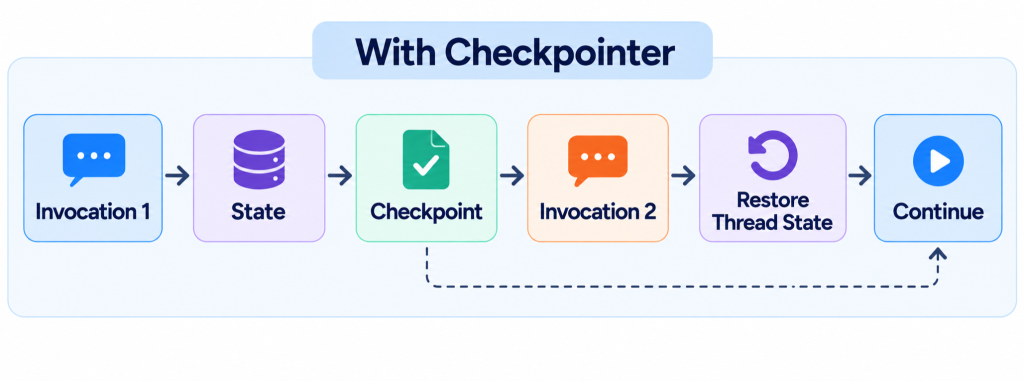
This distinction becomes important when building conversational agents, approval workflows, long-running processes, or applications that need to resume execution.
9. Add Conditional Routing to the Agent
Our current graph always follows the same path:
Plan → Tool → AnswerReal agents rarely work this way.
An agent may need to choose between multiple tools depending on the request.
For example:
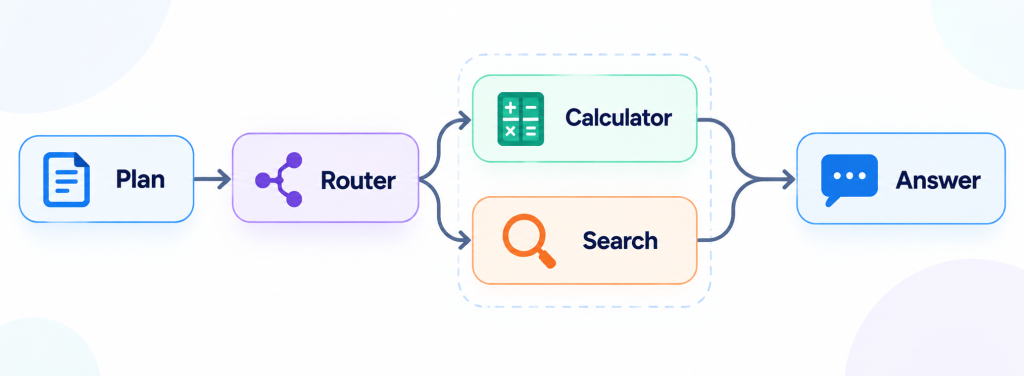
LangGraph supports conditional edges for this type of routing. The official Python quickstart demonstrates routing from an LLM node to a tool node or END based on whether a tool call was produced.
For example, you could define:
def route_after_plan(state: AgentState):
    if "search" in state["plan"].lower():
        return "search"
    return "tool"
Then register the conditional routes:
builder.add_conditional_edges(
    "plan",
    route_after_plan,
    {
        "tool": "tool",
        "search": "search"
    }
)
The graph can now choose the next node based on the current state.
This is where a simple three-node workflow starts becoming an actual agent architecture.
For professionals looking to build a broader technical foundation around these systems, the Data Science course from MIT covers AI, machine learning, generative AI, and agentic AI, including single- and multi-agent systems and agentic workflows with tools such as LangGraph.
MIT Professional Education's Data Science Course
Gain the expertise top companies seek and open doors to Data Science jobs.
The agent starts by creating a plan, passes the required information to the tool node, and then uses the tool result to generate the final answer.
If you want to explore how AI agents are being applied beyond individual workflows, read this guide on Agentic AI courses for non-coders to understand the broader Agentic AI ecosystem and learning paths.
10. Full LangGraph Agent Code
Here is the complete version of the basic three-node agent in one file:
from typing_extensions import NotRequired, TypedDict

from pydantic import BaseModel, Field

from langchain_openai import ChatOpenAI
from langchain.tools import tool

from langgraph.graph import StateGraph, START, END
from langgraph.checkpoint.memory import InMemorySaver


# -----------------------------
# 1. Define the agent state
# -----------------------------

class AgentState(TypedDict):
    user_request: str
    plan: NotRequired[str]
    tool_result: NotRequired[str]
    answer: NotRequired[str]


# -----------------------------
# 2. Initialize the model
# -----------------------------

model = ChatOpenAI(model="gpt-4.1-mini")


# -----------------------------
# 3. Define structured plan
# -----------------------------

class AdditionPlan(BaseModel):
    first_number: float = Field(
        description="The first number to add"
    )

    second_number: float = Field(
        description="The second number to add"
    )


planner = model.with_structured_output(AdditionPlan)


# -----------------------------
# 4. Plan node
# -----------------------------

def plan_node(state: AgentState):
    result = planner.invoke(
        f"""
        Identify the two numbers that need to be added
        based on the user's request.

        User request:
        {state["user_request"]}
        """
    )

    return {
        "plan": (
            f"Add {result.first_number} "
            f"and {result.second_number}."
        )
    }


# -----------------------------
# 5. Tool
# -----------------------------

@tool
def add_numbers(
    first_number: float,
    second_number: float
) -> str:
    """Add two numbers and return the result."""

    return str(first_number + second_number)


# -----------------------------
# 6. Tool node
# -----------------------------

def tool_node(state: AgentState):
    plan = planner.invoke(
        f"""
        Extract the two numbers from this plan.

        Plan:
        {state["plan"]}
        """
    )

    result = add_numbers.invoke(
        {
            "first_number": plan.first_number,
            "second_number": plan.second_number,
        }
    )

    return {
        "tool_result": result
    }


# -----------------------------
# 7. Answer node
# -----------------------------

def answer_node(state: AgentState):
    response = model.invoke(
        f"""
        Answer the user's request using the tool result.

        User request:
        {state["user_request"]}

        Tool result:
        {state["tool_result"]}

        Give a concise and clear answer.
        """
    )

    return {
        "answer": response.content
    }


# -----------------------------
# 8. Build the graph
# -----------------------------

builder = StateGraph(AgentState)

builder.add_node("plan", plan_node)
builder.add_node("tool", tool_node)
builder.add_node("answer", answer_node)

builder.add_edge(START, "plan")
builder.add_edge("plan", "tool")
builder.add_edge("tool", "answer")
builder.add_edge("answer", END)


# -----------------------------
# 9. Add persistence
# -----------------------------

checkpointer = InMemorySaver()

graph = builder.compile(
    checkpointer=checkpointer
)


# -----------------------------
# 10. Run the agent
# -----------------------------

config = {
    "configurable": {
        "thread_id": "demo-thread"
    }
}

result = graph.invoke(
    {
        "user_request": "What is 27 + 43?"
    },
    config
)

print("Final answer:")
print(result["answer"])
The important architecture is not the calculator itself. The calculator is deliberately simple so that the graph mechanics remain visible.
The reusable pattern is:
Input
  ↓
Planning Node
  ↓
Tool Node
  ↓
Answer Node
  ↓
Output
You can replace the calculator with a database lookup, search API, CRM operation, internal service, code execution tool, or another application-specific function.
11. How to Extend This LangGraph Agent
Once the basic workflow works, you can expand it without changing the fundamental state-node-edge model.
Add More Tools
Instead of one tool:
Plan
  ↓
Tool
you can create:
Plan
  ↓
Router
 ├── Search Tool
 ├── Calculator
 ├── Database
 └── API
  ↓
Answer
Add Validation
A validation node can check whether the tool result is usable:
Plan
 ↓
Tool
 ↓
Validate
 ├── Valid → Answer
 └── Invalid → Tool
Add Human Approval
For sensitive operations, the graph can pause for human input using LangGraph's interrupt functionality and resume from the saved state. LangGraph's persistence model is designed to support these pause-and-resume workflows.
A workflow could become:
Plan
  ↓
Tool
  ↓
Human Approval
  ↓
Answer
Add Error Recovery
Production agents also need to handle failures.
A temporary network error might be retried, while a user-fixable problem might require additional input. LangGraph supports node-level retry policies and workflows that can route based on errors or human input.
The graph therefore becomes more than a sequence of LLM calls. It becomes an explicit execution model.
12. Best Practices for Building LangGraph Agents
A few design principles become important as the graph grows.
Keep State Focused
Do not put every possible value into state.
Store information that downstream nodes actually need. If something can be derived cheaply from existing state, it usually does not need its own state field. LangGraph's documentation specifically recommends designing state around information that must persist between steps.
Keep Nodes Focused
A node should have a clear responsibility.
For example:
Plan Node  → Decide what needs to happen
Tool Node  → Perform the operation
Answer Node → Produce the response
This makes the workflow easier to test and debug.
Store Raw Data Where Possible
Avoid filling state with large prompt templates or instructions.
Instead, keep useful raw information in state and construct prompts inside the node that needs them. This keeps the state reusable across different nodes.
Use Checkpointers for Persistent Workflows
If an application needs to resume conversations or long-running workflows, compile the graph with an appropriate checkpointer and provide a stable thread_id.
For local experiments, InMemorySaver is useful. For production, use a durable backend such as PostgreSQL rather than relying on in-memory storage.
Make Routing Explicit
As the workflow becomes more complex, make transitions visible through graph edges or explicit routing logic.
A developer should be able to look at the graph and understand:
What happens first?
What happens next?
When does a tool run?
When can the workflow stop?
When can it loop?
That visibility is one of the main benefits of using a graph-based architecture.
As LangGraph workflows move toward production, developers also need to consider evaluation, security, reliability, and how multiple agentic components work together.
The Generative AI course Johns Hopkins University provides practical coverage of generative AI, agentic workflows, RAG, evaluation, and secure AI development.
Certificate Program in Applied Generative AI
Master the tools and techniques behind generative AI with expert-led, project-based training from Johns Hopkins University.
Conclusion
A LangGraph agent does not have to start with a complex multi-agent architecture.
A three-node workflow is enough to understand the core model:
Plan → Tool → AnswerThe state carries information between those steps. The nodes perform the individual operations. The edges define how execution moves through the workflow.
In this tutorial, the agent:
- Received a user request.
- Created a structured plan.
- Called a tool based on that plan.
- Stored the tool result in state.
- Generated an answer using the accumulated state.
- Used a checkpointer to demonstrate thread-level persistence.
From here, the same architecture can be extended with multiple tools, conditional routing, validation, retries, human approval, and more persistent storage.
The key is to start with a graph that is easy to reason about and add complexity only when the workflow requires it.