


- What is Face Detection?
- Common Use Cases and Applications Of Face Recognition
- Computer Vision and Face Recognition
- Understanding Face Recognition Using Deep Learning and Example
- What is OpenCV, and How Does it Help Face Recognition?
- How To Install Opencv For Python Only For Face Recognition?
- Face Recognition Coding: Extracting, Comparing, and Recognizing
- Further Reading
- FAQs
Face recognition technology has become integral to our daily lives, from unlocking smartphones to enhancing security systems. Its ability to identify and verify individuals based on facial features makes it a powerful tool across various applications.
In this blog, we will explore the theory of face recognition using Python and OpenCV, two versatile tools that make this advanced technology accessible to developers and enthusiasts alike.
Whether you’re a beginner or an experienced programmer, this guide will help you set up your environment for face recognition in python, understand the core concepts of opencv face recognition, and build a practical face recognition system.
What is Face Detection?
Face recognition is a biometric technology that identifies or verifies individuals by analyzing and comparing patterns based on facial features.
This process involves capturing an image of a person’s face and then converting it into a digital representation that can be compared against a database of stored facial images.
The technology relies on advanced algorithms and machine learning techniques to ensure accuracy and efficiency.
Key Aspects of Face Recognition
- Image Capture: Using cameras to capture facial images.
- Feature Extraction: Identifying and extracting distinctive facial features.
- Face Matching: Comparing the extracted features with stored templates.
- Verification/Identification: Determining the identity or verifying the person based on the comparison.
Common Use Cases and Applications Of Face Recognition
Face recognition technology is widely used across various industries, enhancing security, improving user experience, and enabling new functionalities.
Some of the most common applications include:
1. Security and Surveillance
- Access Control: Granting or restricting access to secure areas based on facial recognition.
- Law Enforcement: Identifying suspects and missing persons using surveillance footage.
2. Consumer Electronics
- Smartphones: Unlocking devices and authorizing payments through face recognition.
- Personal Devices: Customizing user-profiles and preferences on personal gadgets.
3. Retail and Marketing
- Customer Insights: Analyzing customer demographics and behavior to tailor marketing strategies.
- Personalized Shopping Experiences: Offering recommendations based on recognized customers.
4. Healthcare
- Patient Identification: Ensuring accurate patient identification and reducing medical errors.
- Health Monitoring: Using facial analysis for early detection of certain health conditions.
5. Automotive
- Driver Monitoring: Enhancing safety by monitoring driver attention and alertness.
Computer Vision and Face Recognition
Face recognition is a subset of computer vision, a broader field that enables machines to interpret and understand visual information from the world.
Computer vision encompasses various tasks such as object detection, image classification, and scene reconstruction.
Core Components of Computer Vision
- Image Processing: Enhancing and manipulating images for better analysis.
- Feature Detection: Identifying key features such as edges, corners, and textures.
- Machine Learning: Training models to recognize patterns and make predictions.
Face recognition leverages these components to identify individuals accurately. By combining computer vision techniques with advanced algorithms, face recognition systems can process and analyze large volumes of visual data quickly and accurately.
Face recognition technology, powered by computer vision, is transforming numerous industries by providing secure, efficient, and personalized solutions.
Its vast applications continue to expand as technology advances, making it an essential tool in the modern digital landscape.
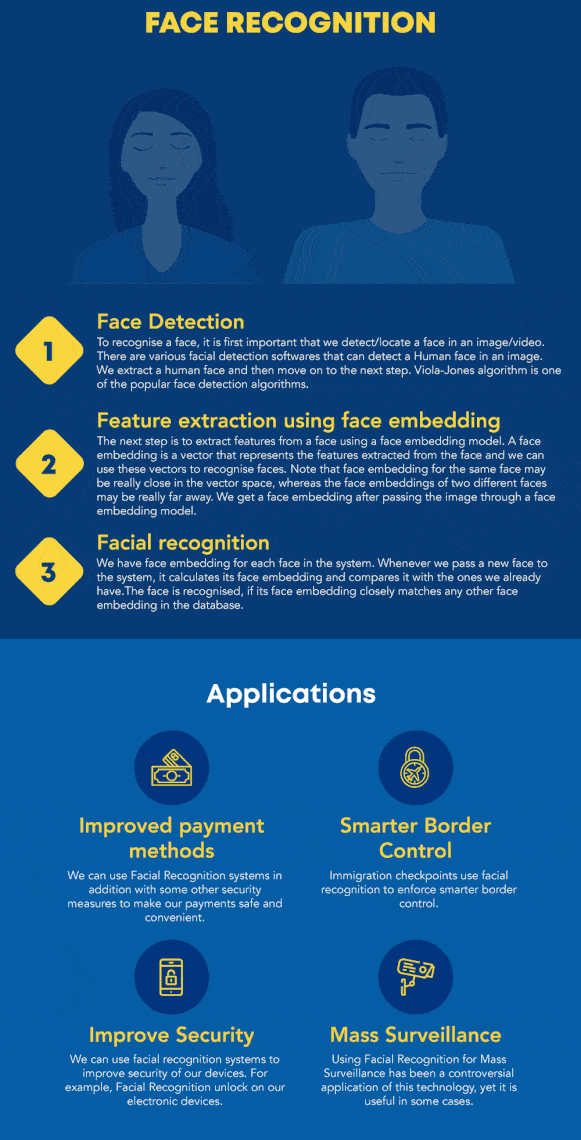
Understanding Face Recognition Using Deep Learning and Example
Recognizing faces using deep learning involves the technique of face embedding, which converts each face into a vector using deep metric learning. Let’s understand with an example:
1. Face Detection
- The first task is to detect faces in an image or video stream. Once the exact location or coordinates of the face are identified, the face is extracted for further processing.
2. Feature Extraction

- After cropping the face from the image, features are extracted using face embeddings. A neural network processes the face image and outputs a vector representing the most essential features of the face, known as face embedding.

- During training, the network learns to produce similar vectors for similar-looking faces. For instance, multiple images of a person over different times will result in similar vectors, as the core facial features remain relatively constant.
3. Using Pre-trained Networks

- Training such a network requires extensive data and computational power. Therefore, we use a pre-trained network by Davis King, trained on approximately 3 million images.
- This network outputs a 128-number vector representing the key features of a face.
4. Applying the Network to Data
- We pass all our images through this pre-trained network to obtain the respective embeddings, which are then saved in a file for future use.
5. Comparing Faces

- With face embeddings saved for each face in our data, the next step is to recognize a new image not in our data. We compute the face embedding for this new image using the same network and compare it with the saved embeddings. A face is recognized if its embedding is closer or similar to any saved embeddings.
- For example, if we have embeddings for George W. Bush but not Vladimir Putin, a comparison will show Bush’s embeddings close to other Bush embeddings, whereas Putin’s embeddings will not match any, leading to no recognition.
This process efficiently identifies and recognizes faces by comparing vectors in the embedding space.
Master face recognition and other AI applications with Great Learning’s Post Graduate Program in Artificial Intelligence & Machine Learning. Designed for aspiring AI professionals, this course offers:
- Learn anytime, anywhere
- Exclusive access to Great Learning job board
- Live career mentorship with industry experts
- Dedicated program support
Advance your career in AI and machine learning now!
What is OpenCV, and How Does it Help Face Recognition?
OpenCV (Open Source Computer Vision Library) is an open-source computer vision and machine learning software library.
It contains over 2500 optimized algorithms for various tasks, such as image and video processing, face detection, object identification, and more.
OpenCV provides a comprehensive suite of tools and functions, making it a powerful resource for developers working on computer vision projects, including face recognition.
Key Features and Functionalities of OpenCV
1. Image Processing
OpenCV provides numerous functions for image manipulation, including filtering, color space conversion, geometric transformations, and image enhancement techniques such as histogram equalization.
2. Face Detection
Utilizes pre-trained Haar cascades and deep learning-based models to accurately detect faces in images and video streams. These tools are essential for security, surveillance, and user authentication applications.
3. Object Detection
Offers robust algorithms for detecting various objects in images, such as vehicles, pedestrians, and everyday items. This feature is used in applications like autonomous driving and inventory management.
4. Feature Detection and Matching
Implements algorithms like SIFT, SURF, and ORB to detect key points and compute descriptors. These features are used for object recognition, image stitching, and augmented reality.
5. Video Analysis
Provides tools for processing and analyzing video streams, including motion detection, background subtraction, and tracking. These functionalities are critical for surveillance and activity recognition applications.
6. Machine Learning Integration
OpenCV includes a machine learning library (ml module) that supports various algorithms, such as:
- K-Nearest Neighbors (KNN)
- Support Vector Machines (SVM)
- Decision Trees
For more advanced tasks, it also integrates with deep learning frameworks like TensorFlow and PyTorch.
7. Image Segmentation
Offers techniques for partitioning an image into multiple segments or regions, which helps understand the image at a higher level. Applications include medical imaging and object localization.
8. Camera Calibration and 3D Reconstruction
It provides functions for calibrating camera parameters and performing 3D reconstruction from multiple images, which is helpful in applications like 3D scanning and augmented reality.
9. Cross-Platform Support
OpenCV is highly versatile, supporting multiple operating systems, including Windows, Linux, macOS, iOS, and Android. This cross-platform capability makes it ideal for developing applications that run on various devices.
These features and functionalities make OpenCV a robust and comprehensive library for computer vision tasks, enabling developers to build complex and efficient applications across various domains.
Deepen your expertise in face recognition and OpenCV with our “Post Graduate Program in Artificial Intelligence & Machine Learning.”
Why Enroll?
- Learn anytime, anywhere
- Exclusive access to Great Learning job board
- Live career mentorship with industry experts
- Dedicated program support
How To Install Opencv For Python Only For Face Recognition?
To implement face recognition using OpenCV and Python, you will need several libraries, including OpenCV, dlib, and face_recognition.
Here’s a step-by-step guide on how to get started on face recognition python code.
Step 1- Set Up Your Environment:
Create a new virtual environment to keep your dependencies isolated for face recognition using opencv:
1 2 3 | python -m venv face_recognition_envsource face_recognition_env/bin/activate # For Unix/Macface_recognition_env\Scripts\activate # For Windows |
Alternatively, create and activate a new conda environment:
1 2 | conda create -n face_recognition_env python=3.8conda activate face_recognition_env |
Step 2 Install OpenCV:
Using pip:
1 | pip install opencv-python |
Using conda:
1 | conda install -c conda-forge opencv |
Step 3. dlib Installation
dlib is a modern C++ toolkit containing machine learning algorithms and tools for creating complex software in C++ to solve real-world problems.
It is mainly known for its robust face and facial landmark detection capabilities, which are essential for precise face recognition tasks.
Installation:
1 2 | Using pip:pip install dlib |
Using conda:
1 | conda install -c conda-forge dlib |
Step 4. face_recognition
face_recognition is a Python library built on dlib’s facial recognition functionalities. It provides simple and easy-to-use face detection and recognition using opencv with recognition interfaces, making it a popular choice for developers.
Installation:
1 | pip install face_recognition |
Using conda (for Anaconda environment):
1 | conda install -c conda-forge face_recognition |
Boost your expertise in face recognition with python and beyond with Great Learning’s Post Graduate Program in Artificial Intelligence & Machine Learning. Here’s what you get:
- Flexible learning that fits your lifestyle
- Access exclusive job listings
- Get advice from the best in the field
- Receive comprehensive support
Start your journey to becoming an AI expert today!
Now that we have all the necessary libraries installed for face recognition in python, it’s time to start coding. We’ll create three separate files to handle different parts of our face recognition process:
Face Recognition Coding: Extracting, Comparing, and Recognizing
File 1. Extract Face Embeddings
- Create a file named extract_embeddings.py.
- This script will load your dataset of images, detect faces, and extract their embeddings using dlib.
- Save these embeddings to a file (e.g., embeddings.pickle).
File 2. Recognize Faces in Images
- Create a file named recognize_faces_in_images.py.
- This script will load the saved embeddings and compare them with faces in new images to recognize known faces.
File 3. Recognize Faces in Live Webcam Feed
- Create a file named recognize_faces_in_webcam.py.
- This script will use your webcam to detect faces in real time and compare them with the saved embeddings to recognize known faces.
With these three files, you can extract face embeddings, recognize faces in static images, and recognize faces in real time using your webcam.
This modular approach of face recognition using opencv-python project report makes the code easier to understand and maintain.
Extracting features from Face
First, you need to get a dataset or even create one of you own. Just make sure to arrange all images in folders with each folder containing images of just one person.
Next, save the dataset in a folder the same as you are going to make the file. Now here is the code:
1 2 3 4 5 6 7 8 9 10 11 12 13 14 15 16 17 18 19 20 21 22 23 24 25 26 27 28 29 30 31 32 33 | from imutils import pathsimport face_recognitionimport pickleimport cv2import os#get paths of each file in folder named Images#Images here contains my data(folders of various persons)imagePaths = list(paths.list_images('Images'))knownEncodings = []knownNames = []# loop over the image pathsfor (i, imagePath) in enumerate(imagePaths): # extract the person name from the image path name = imagePath.split(os.path.sep)[-2] # load the input image and convert it from BGR (OpenCV ordering) # to dlib ordering (RGB) image = cv2.imread(imagePath) rgb = cv2.cvtColor(image, cv2.COLOR_BGR2RGB) #Use Face_recognition to locate faces boxes = face_recognition.face_locations(rgb,model='hog') # compute the facial embedding for the face encodings = face_recognition.face_encodings(rgb, boxes) # loop over the encodings for encoding in encodings: knownEncodings.append(encoding) knownNames.append(name)#save emcodings along with their names in dictionary datadata = {"encodings": knownEncodings, "names": knownNames}#use pickle to save data into a file for later usef = open("face_enc", "wb")f.write(pickle.dumps(data))f.close() |
Now that we have stored the embedding in a file named “face_enc”, we can use them to recognise faces in images or live video stream.
Face Recognition in Live webcam Feed
Here is the script to recognise faces on a live webcam feed:
1 2 3 4 5 6 7 8 9 10 11 12 13 14 15 16 17 18 19 20 21 22 23 24 25 26 27 28 29 30 31 32 33 34 35 36 37 38 39 40 41 42 43 44 45 46 47 48 49 50 51 52 53 54 55 56 57 58 59 60 61 62 63 64 65 66 67 68 69 70 71 72 73 | import face_recognitionimport imutilsimport pickleimport timeimport cv2import os#find path of xml file containing haarcascade file cascPathface = os.path.dirname( cv2.__file__) + "/data/haarcascade_frontalface_alt2.xml"# load the harcaascade in the cascade classifierfaceCascade = cv2.CascadeClassifier(cascPathface)# load the known faces and embeddings saved in last filedata = pickle.loads(open('face_enc', "rb").read())print("Streaming started")video_capture = cv2.VideoCapture(0)# loop over frames from the video file streamwhile True: # grab the frame from the threaded video stream ret, frame = video_capture.read() gray = cv2.cvtColor(frame, cv2.COLOR_BGR2GRAY) faces = faceCascade.detectMultiScale(gray, scaleFactor=1.1, minNeighbors=5, minSize=(60, 60), flags=cv2.CASCADE_SCALE_IMAGE) # convert the input frame from BGR to RGB rgb = cv2.cvtColor(frame, cv2.COLOR_BGR2RGB) # the facial embeddings for face in input encodings = face_recognition.face_encodings(rgb) names = [] # loop over the facial embeddings incase # we have multiple embeddings for multiple fcaes for encoding in encodings: #Compare encodings with encodings in data["encodings"] #Matches contain array with boolean values and True for the embeddings it matches closely #and False for rest matches = face_recognition.compare_faces(data["encodings"], encoding) #set name =inknown if no encoding matches name = "Unknown" # check to see if we have found a match if True in matches: #Find positions at which we get True and store them matchedIdxs = [i for (i, b) in enumerate(matches) if b] counts = {} # loop over the matched indexes and maintain a count for # each recognized face face for i in matchedIdxs: #Check the names at respective indexes we stored in matchedIdxs name = data["names"][i] #increase count for the name we got counts[name] = counts.get(name, 0) + 1 #set name which has highest count name = max(counts, key=counts.get) # update the list of names names.append(name) # loop over the recognized faces for ((x, y, w, h), name) in zip(faces, names): # rescale the face coordinates # draw the predicted face name on the image cv2.rectangle(frame, (x, y), (x + w, y + h), (0, 255, 0), 2) cv2.putText(frame, name, (x, y), cv2.FONT_HERSHEY_SIMPLEX, 0.75, (0, 255, 0), 2) cv2.imshow("Frame", frame) if cv2.waitKey(1) & 0xFF == ord('q'): breakvideo_capture.release()cv2.destroyAllWindows() |
Although in the example above we have used haar cascade to detect faces, you can also use face_recognition.face_locations to detect a face as we did in the previous script
Haar cascade is a machine learning-based approach used for object detection in images. In face detection, Haar cascade classifiers are trained to detect features like eyes, nose, and mouth, allowing the algorithm to identify faces based on patterns of pixel intensities.
Face Recognition in Images
The script for detecting and recognising faces in images is almost similar to what you saw above. Try it yourself and if you can’t take a look at the code below:
1 2 3 4 5 6 7 8 9 10 11 12 13 14 15 16 17 18 19 20 21 22 23 24 25 26 27 28 29 30 31 32 33 34 35 36 37 38 39 40 41 42 43 44 45 46 47 48 49 50 51 52 53 54 55 56 57 58 59 60 61 62 63 64 65 | import face_recognitionimport imutilsimport pickleimport timeimport cv2import os#find path of xml file containing haarcascade filecascPathface = os.path.dirname( cv2.__file__) + "/data/haarcascade_frontalface_alt2.xml"# load the harcaascade in the cascade classifierfaceCascade = cv2.CascadeClassifier(cascPathface)# load the known faces and embeddings saved in last filedata = pickle.loads(open('face_enc', "rb").read())#Find path to the image you want to detect face and pass it hereimage = cv2.imread(Path-to-img)rgb = cv2.cvtColor(image, cv2.COLOR_BGR2RGB)#convert image to Greyscale for haarcascadegray = cv2.cvtColor(image, cv2.COLOR_BGR2GRAY)faces = faceCascade.detectMultiScale(gray, scaleFactor=1.1, minNeighbors=5, minSize=(60, 60), flags=cv2.CASCADE_SCALE_IMAGE)# the facial embeddings for face in inputencodings = face_recognition.face_encodings(rgb)names = []# loop over the facial embeddings incase# we have multiple embeddings for multiple fcaesfor encoding in encodings: #Compare encodings with encodings in data["encodings"] #Matches contain array with boolean values and True for the embeddings it matches closely #and False for rest matches = face_recognition.compare_faces(data["encodings"], encoding) #set name =inknown if no encoding matches name = "Unknown" # check to see if we have found a match if True in matches: #Find positions at which we get True and store them matchedIdxs = [i for (i, b) in enumerate(matches) if b] counts = {} # loop over the matched indexes and maintain a count for # each recognized face face for i in matchedIdxs: #Check the names at respective indexes we stored in matchedIdxs name = data["names"][i] #increase count for the name we got counts[name] = counts.get(name, 0) + 1 #set name which has highest count name = max(counts, key=counts.get) # update the list of names names.append(name) # loop over the recognized faces for ((x, y, w, h), name) in zip(faces, names): # rescale the face coordinates # draw the predicted face name on the image cv2.rectangle(image, (x, y), (x + w, y + h), (0, 255, 0), 2) cv2.putText(image, name, (x, y), cv2.FONT_HERSHEY_SIMPLEX, 0.75, (0, 255, 0), 2) cv2.imshow("Frame", image) cv2.waitKey(0) |
Output:


This brings us to the end of this article where we learned about face recognition.
Conclusion
We explored the implementation of python face recognition and OpenCV, providing a step-by-step guide to set up your project, extract face embeddings, and recognize faces in images and real-time webcam feeds.
For those looking to deepen their understanding and skills in artificial intelligence and machine learning, consider enrolling in Great Learning’s PGP Artificial Intelligence and Machine Learning Course.
This course is designed to equip you with the hottest job skills and knowledge in one of the most in-demand fields, often leading to some of the highest-paying careers.
You can learn anytime, anywhere, with weekly online mentorship by experts, exclusive access to the Great Learning job board, and live career mentorship with industry professionals.
Further Reading
- Face Detection using Viola-Jones Algorithm
- Real-time Face detection | Face Mask Detection using OpenCV
- Real-Time Object Detection Using TensorFlow
- YOLO object detection using OpenCV
- Object Detection in Pytorch | What is Object Detection?
FAQs
Face recognition systems must adapt to changes in facial appearance caused by aging, cosmetic alterations, or facial hair. Techniques such as
Facial Landmark Detection
Deep Feature Learning
Dynamic Updating of Facial Templates
Enable robust recognition performance despite variations in facial appearance.
Face recognition algorithms must contend with occlusions, which can obscure facial features and hinder accurate identification. Advanced algorithms leverage context-aware feature extraction, fusion of multiple modalities (e.g., thermal imaging), and adaptive learning techniques to mitigate the impact of occlusions on recognition accuracy.
Face recognition technologies implement robust authentication mechanisms such as liveness detection, spoofing detection, and multimodal biometric fusion to mitigate the risks of unauthorized access and identity theft, ensuring secure authentication in various applications.
Distinguishing between identical twins or individuals with similar facial features poses a challenge for face recognition systems.
Advanced algorithms leverage fine-grained feature analysis, temporal context modeling, and multimodal biometrics to improve discrimination accuracy in such scenarios.


