

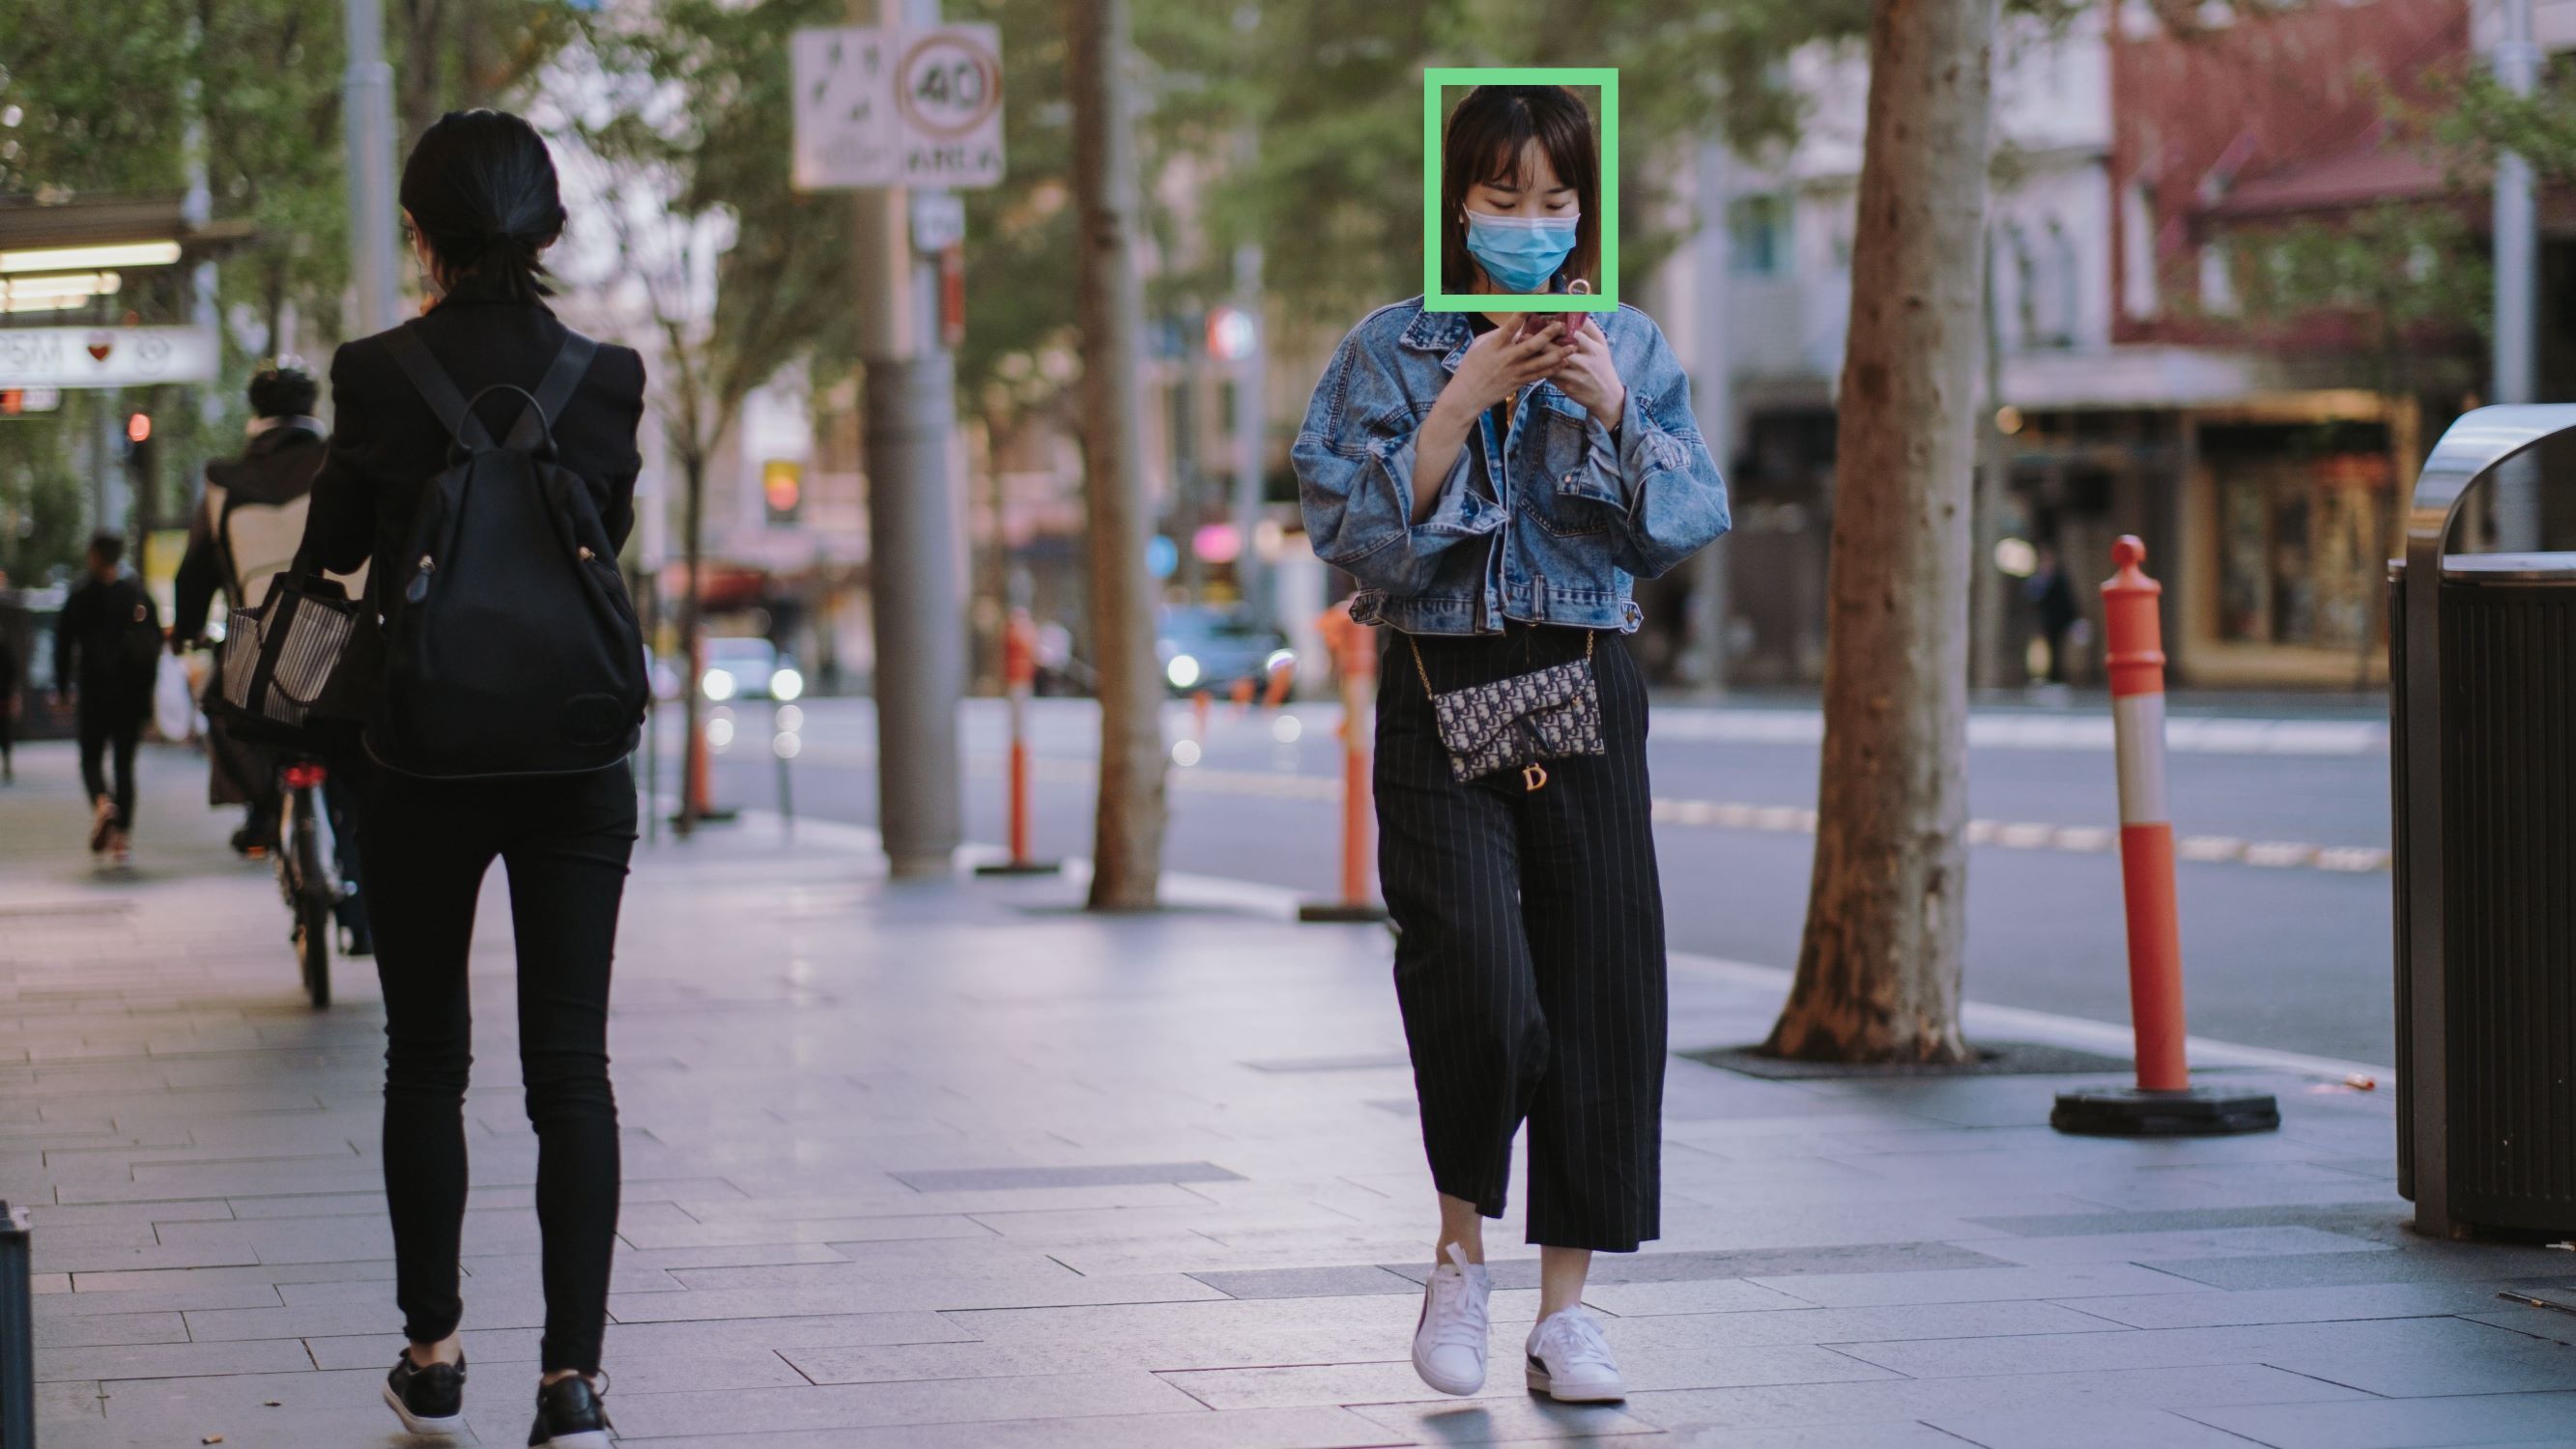
In this article, we are going to find out how to detect faces in real-time using OpenCV. After detecting the face from the webcam stream, we are going to save the frames containing the face. Later we will pass these frames (images) to our mask detector classifier to find out if the person is wearing a mask or not.
We are also going to see how to make a custom mask detector using Tensorflow and Keras but you can skip that as I will be attaching the trained model file below which you can download and use. Here is the list of subtopics we are going to cover:
- What is Face Detection?
- Face Detection Methods
- Face detection algorithm
- Face recognition
- Face Detection using Python
- Face Detection using OpenCV
- Create a model to recognise faces wearing a mask (Optional)
- How to do Real-time Mask detection
What is Face Detection?
The goal of face detection is to determine if there are any faces in the image or video. If multiple faces are present, each face is enclosed by a bounding box and thus we know the location of the faces
The primary objective of face detection algorithms is to accurately and efficiently determine the presence and position of faces in an image or video. The algorithms analyze the visual content of the data, searching for patterns and features that correspond to facial characteristics. By employing various techniques, such as machine learning, image processing, and pattern recognition, face detection algorithms aim to distinguish faces from other objects or background elements within the visual data, helping companies to enhance the cybersecurity of their business
Human faces are difficult to model as there are many variables that can change for example facial expression, orientation, lighting conditions, and partial occlusions such as sunglasses, scarfs, masks, etc. The result of the detection gives the face location parameters and it could be required in various forms, for instance, a rectangle covering the central part of the face, eye centers or landmarks including eyes, nose and mouth corners, eyebrows, nostrils, etc.
Face Detection Methods
There are two main approaches for Face Detection:
- Feature Base Approach
- Image Base Approach
Feature Base Approach
Objects are usually recognized by their unique features. There are many features in a human face, which can be recognized between a face and many other objects. It locates faces by extracting structural features like eyes, nose, mouth etc. and then uses them to detect a face. Typically, some sort of statistical classifier qualified then helpful to separate between facial and non-facial regions. In addition, human faces have particular textures which can be used to differentiate between a face and other objects. Moreover, the edge of features can help to detect the objects from the face. In the coming section, we will implement a feature-based approach by using the OpenCV tutorial.
Image Base Approach
In general, Image-based methods rely on techniques from statistical analysis and machine learning to find the relevant characteristics of face and non-face images. The learned characteristics are in the form of distribution models or discriminant functions that is consequently used for face detection. In this method, we use different algorithms such as Neural-networks, HMM, SVM, AdaBoost learning. In the coming section, we will see how we can detect faces with MTCNN or Multi-Task Cascaded Convolutional Neural Network, which is an Image-based approach of face detection
Face detection algorithm
One of the popular algorithms that use a feature-based approach is the Viola-Jones algorithm and here I am briefly going to discuss it. If you want to know about it in detail, I would suggest going through this article, Face Detection using Viola Jones Algorithm.
Viola-Jones algorithm is named after two computer vision researchers who proposed the method in 2001, Paul Viola and Michael Jones in their paper, “Rapid Object Detection using a Boosted Cascade of Simple Features”. Despite being an outdated framework, Viola-Jones is quite powerful, and its application has proven to be exceptionally notable in real-time face detection. This algorithm is painfully slow to train but can detect faces in real-time with impressive speed.
Given an image(this algorithm works on grayscale images), the algorithm looks at many smaller subregions and tries to find a face by looking for specific features in each subregion. It needs to check many different positions and scales because an image can contain many faces of various sizes. Viola and Jones used Haar-like features to detect faces in this algorithm.
Face Recognition
Face detection and Face Recognition are often used interchangeably but these are quite different. In fact, Face detection is just part of Face Recognition.
Face recognition is a method of identifying or verifying the identity of an individual using their face. There are various algorithms that can do face recognition but their accuracy might vary. Here I am going to describe how we do face recognition using deep learning.
In fact here is an article, Face Recognition Python which shows how to implement Face Recognition.
Face Detection using Python
As mentioned before, here we are going to see how we can detect faces by using an Image-based approach. MTCNN or Multi-Task Cascaded Convolutional Neural Network is unquestionably one of the most popular and most accurate face detection tools that work this principle. As such, it is based on a deep learning architecture, it specifically consists of 3 neural networks (P-Net, R-Net, and O-Net) connected in a cascade.
So, let’s see how we can use this algorithm in Python to detect faces in real-time. First, you need to install MTCNN library which contains a trained model that can detect faces.
pip install mtcnnNow let us see how to use MTCNN:
1 2 3 4 5 6 7 8 9 10 11 12 13 14 15 16 17 18 19 20 21 22 23 24 25 | from mtcnn import MTCNNimport cv2detector = MTCNN()#Load a videopip TensorFlowvideo_capture = cv2.VideoCapture(0)while (True): ret, frame = video_capture.read() frame = cv2.resize(frame, (600, 400)) boxes = detector.detect_faces(frame) if boxes: box = boxes[0]['box'] conf = boxes[0]['confidence'] x, y, w, h = box[0], box[1], box[2], box[3] if conf > 0.5: cv2.rectangle(frame, (x, y), (x + w, y + h), (255, 255, 255), 1) cv2.imshow("Frame", frame) if cv2.waitKey(25) & 0xFF == ord('q'): breakvideo_capture.release()cv2.destroyAllWindows() |
Face Detection using OpenCV
In this section, we are going to perform real-time face detection using OpenCV from a live stream via our webcam.
As you know videos are basically made up of frames, which are still images. We perform face detection for each frame in a video. So when it comes to detecting a face in a still image and detecting a face in a real-time video stream, there is not much difference between them.
We will be using Haar Cascade algorithm, also known as Voila-Jones algorithm to detect faces. It is basically a machine learning object detection algorithm that is used to identify objects in an image or video. In OpenCV, we have several trained Haar Cascade models which are saved as XML files. Instead of creating and training the model from scratch, we use this file. We are going to use “haarcascade_frontalface_alt2.xml” file in this project. Now let us start coding this up
The first step is to find the path to the “haarcascade_frontalface_alt2.xml” file. We do this by using the os module of Python language.
import os
cascPath = os.path.dirname(
    cv2.__file__) + "/data/haarcascade_frontalface_alt2.xml"
The next step is to load our classifier. The path to the above XML file goes as an argument to CascadeClassifier() method of OpenCV.
faceCascade = cv2.CascadeClassifier(cascPath)After loading the classifier, let us open the webcam using this simple OpenCV one-liner code
video_capture = cv2.VideoCapture(0)Next, we need to get the frames from the webcam stream, we do this using the read() function. We use it in infinite loop to get all the frames until the time we want to close the stream.
while True:
    # Capture frame-by-frame
    ret, frame = video_capture.read()
The read() function returns:
- The actual video frame read (one frame on each loop)
- A return code
The return code tells us if we have run out of frames, which will happen if we are reading from a file. This doesn’t matter when reading from the webcam since we can record forever, so we will ignore it.
For this specific classifier to work, we need to convert the frame into greyscale.
gray = cv2.cvtColor(frame, cv2.COLOR_BGR2GRAY)The faceCascade object has a method detectMultiScale(), which receives a frame(image) as an argument and runs the classifier cascade over the image. The term MultiScale indicates that the algorithm looks at subregions of the image in multiple scales, to detect faces of varying sizes.
  faces = faceCascade.detectMultiScale(gray,
                                         scaleFactor=1.1,
                                         minNeighbors=5,
                                         minSize=(60, 60),
                                         flags=cv2.CASCADE_SCALE_IMAGE)
Let us go through these arguments of this function:
- scaleFactor – Parameter specifying how much the image size is reduced at each image scale. By rescaling the input image, you can resize a larger face to a smaller one, making it detectable by the algorithm. 1.05 is a good possible value for this, which means you use a small step for resizing, i.e. reduce the size by 5%, you increase the chance of a matching size with the model for detection is found.
- minNeighbors – Parameter specifying how many neighbors each candidate rectangle should have to retain it. This parameter will affect the quality of the detected faces. Higher value results in fewer detections but with higher quality. 3~6 is a good value for it.
- flags –Mode of operation
- minSize – Minimum possible object size. Objects smaller than that are ignored.
The variable faces now contain all the detections for the target image. Detections are saved as pixel coordinates. Each detection is defined by its top-left corner coordinates and the width and height of the rectangle that encompasses the detected face.
To show the detected face, we will draw a rectangle over it.OpenCV’s rectangle() draws rectangles over images, and it needs to know the pixel coordinates of the top-left and bottom-right corners. The coordinates indicate the row and column of pixels in the image. We can easily get these coordinates from the variable face.
for (x,y,w,h) in faces:
        cv2.rectangle(frame, (x, y), (x + w, y + h),(0,255,0), 2)
rectangle() accepts the following arguments:
- The original image
- The coordinates of the top-left point of the detection
- The coordinates of the bottom-right point of the detection
- The colour of the rectangle (a tuple that defines the amount of red, green, and blue (0-255)).In our case, we set as green just keeping the green component as 255 and rest as zero.
- The thickness of the rectangle lines
Next, we just display the resulting frame and also set a way to exit this infinite loop and close the video feed. By pressing the ‘q’ key, we can exit the script here
 cv2.imshow('Video', frame)
    if cv2.waitKey(1) & 0xFF == ord('q'):
        break
The next two lines are just to clean up and release the picture.
video_capture.release()
cv2.destroyAllWindows()
Here are the full code and output.
1 2 3 4 5 6 7 8 9 10 11 12 13 14 15 16 17 18 19 20 21 22 23 | import cv2import oscascPath = os.path.dirname( cv2.__file__) + "/data/haarcascade_frontalface_alt2.xml"faceCascade = cv2.CascadeClassifier(cascPath)video_capture = cv2.VideoCapture(0)while True: # Capture frame-by-frame ret, frame = video_capture.read() gray = cv2.cvtColor(frame, cv2.COLOR_BGR2GRAY) faces = faceCascade.detectMultiScale(gray, scaleFactor=1.1, minNeighbors=5, minSize=(60, 60), flags=cv2.CASCADE_SCALE_IMAGE) for (x,y,w,h) in faces: cv2.rectangle(frame, (x, y), (x + w, y + h),(0,255,0), 2) # Display the resulting frame cv2.imshow('Video', frame) if cv2.waitKey(1) & 0xFF == ord('q'): breakvideo_capture.release()cv2.destroyAllWindows() |
Output:
Create a model to recognize faces wearing a mask
In this section, we are going to make a classifier that can differentiate between faces with masks and without masks. In case you want to skip this part, here is a link to download the pre-trained model. Save it and move on to the next section to know how to use it to detect masks using OpenCV. Check out our collection of OpenCV courses to help you develop your skills and understand better.
So for creating this classifier, we need data in the form of Images. Luckily we have a dataset containing images faces with mask and without a mask. Since these images are very less in number, we cannot train a neural network from scratch. Instead, we finetune a pre-trained network called MobileNetV2 which is trained on the Imagenet dataset.
Let us first import all the necessary libraries we are going to need.
from tensorflow.keras.preprocessing.image import ImageDataGenerator
from tensorflow.keras.applications import MobileNetV2
from tensorflow.keras.layers import AveragePooling2D
from tensorflow.keras.layers import Dropout
from tensorflow.keras.layers import Flatten
from tensorflow.keras.layers import Dense
from tensorflow.keras.layers import Input
from tensorflow.keras.models import Model
from tensorflow.keras.optimizers import Adam
from tensorflow.keras.applications.mobilenet_v2 import preprocess_input
from tensorflow.keras.preprocessing.image import img_to_array
from tensorflow.keras.preprocessing.image import load_img
from tensorflow.keras.utils import to_categorical
from sklearn.preprocessing import LabelBinarizer
from sklearn.model_selection import train_test_split
from imutils import paths
import matplotlib.pyplot as plt
import numpy as np
import os
The next step is to read all the images and assign them to some list. Here we get all the paths associated with these images and then label them accordingly. Remember our dataset is contained in two folders viz- with_masks and without_masks. So we can easily get the labels by extracting the folder name from the path. Also, we preprocess the image and resize it to 224x 224 dimensions.
imagePaths = list(paths.list_images('/content/drive/My Drive/dataset'))
data = []
labels = []
# loop over the image paths
for imagePath in imagePaths:
	# extract the class label from the filename
	label = imagePath.split(os.path.sep)[-2]
	# load the input image (224x224) and preprocess it
	image = load_img(imagePath, target_size=(224, 224))
	image = img_to_array(image)
	image = preprocess_input(image)
	# update the data and labels lists, respectively
	data.append(image)
	labels.append(label)
# convert the data and labels to NumPy arrays
data = np.array(data, dtype="float32")
labels = np.array(labels)
The next step is to load the pre-trained model and customize it according to our problem. So we just remove the top layers of this pre-trained model and add few layers of our own. As you can see the last layer has two nodes as we have only two outputs. This is called transfer learning.
baseModel = MobileNetV2(weights="imagenet", include_top=False,
	input_shape=(224, 224, 3))
# construct the head of the model that will be placed on top of the
# the base model
headModel = baseModel.output
headModel = AveragePooling2D(pool_size=(7, 7))(headModel)
headModel = Flatten(name="flatten")(headModel)
headModel = Dense(128, activation="relu")(headModel)
headModel = Dropout(0.5)(headModel)
headModel = Dense(2, activation="softmax")(headModel)

# place the head FC model on top of the base model (this will become
# the actual model we will train)
model = Model(inputs=baseModel.input, outputs=headModel)
# loop over all layers in the base model and freeze them so they will
# *not* be updated during the first training process
for layer in baseModel.layers:
	layer.trainable = False
Now we need to convert the labels into one-hot encoding. After that, we split the data into training and testing sets to evaluate them. Also, the next step is data augmentation which significantly increases the diversity of data available for training models, without actually collecting new data. Data augmentation techniques such as cropping, rotation, shearing and horizontal flipping are commonly used to train large neural networks.
lb = LabelBinarizer()
labels = lb.fit_transform(labels)
labels = to_categorical(labels)
# partition the data into training and testing splits using 80% of
# the data for training and the remaining 20% for testing
(trainX, testX, trainY, testY) = train_test_split(data, labels,
	test_size=0.20, stratify=labels, random_state=42)
# construct the training image generator for data augmentation
aug = ImageDataGenerator(
	rotation_range=20,
	zoom_range=0.15,
	width_shift_range=0.2,
	height_shift_range=0.2,
	shear_range=0.15,
	horizontal_flip=True,
	fill_mode="nearest")
The next step is to compile the model and train it on the augmented data.
INIT_LR = 1e-4
EPOCHS = 20
BS = 32
print("[INFO] compiling model...")
opt = Adam(lr=INIT_LR, decay=INIT_LR / EPOCHS)
model.compile(loss="binary_crossentropy", optimizer=opt,
metrics=["accuracy"])
# train the head of the network
print("[INFO] training head...")
H = model.fit(
aug.flow(trainX, trainY, batch_size=BS),
steps_per_epoch=len(trainX) // BS,
validation_data=(testX, testY),
validation_steps=len(testX) // BS,
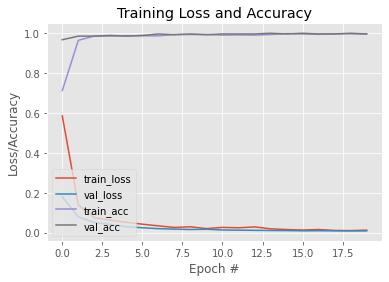
epochs=EPOCHS)Now that our model is trained, let us plot a graph to see its learning curve. Also, we save the model for later use. Here is a link to this trained model.
N = EPOCHS
plt.style.use("ggplot")
plt.figure()
plt.plot(np.arange(0, N), H.history["loss"], label="train_loss")
plt.plot(np.arange(0, N), H.history["val_loss"], label="val_loss")
plt.plot(np.arange(0, N), H.history["accuracy"], label="train_acc")
plt.plot(np.arange(0, N), H.history["val_accuracy"], label="val_acc")
plt.title("Training Loss and Accuracy")
plt.xlabel("Epoch #")
plt.ylabel("Loss/Accuracy")
plt.legend(loc="lower left")
Output:
#To save the trained model
model.save('mask_recog_ver2.h5')
How to do Real-time Mask detection
Before moving to the next part, make sure to download the above model from this link and place it in the same folder as the python script you are going to write the below code in.
Now that our model is trained, we can modify the code in the first section so that it can detect faces and also tell us if the person is wearing a mask or not.
In order for our mask detector model to work, it needs images of faces. For this, we will detect the frames with faces using the methods as shown in the first section and then pass them to our model after preprocessing them. So let us first import all the libraries we need.
import cv2
import os
from tensorflow.keras.preprocessing.image import img_to_array
from tensorflow.keras.models import load_model
from tensorflow.keras.applications.mobilenet_v2 import preprocess_input
import numpy as np
The first few lines are exactly the same as the first section. The only thing that is different is that we have assigned our pre-trained mask detector model to the variable model.
ascPath = os.path.dirname(
    cv2.__file__) + "/data/haarcascade_frontalface_alt2.xml"
faceCascade = cv2.CascadeClassifier(cascPath)
model = load_model("mask_recog1.h5")

video_capture = cv2.VideoCapture(0)
while True:
    # Capture frame-by-frame
    ret, frame = video_capture.read()
    gray = cv2.cvtColor(frame, cv2.COLOR_BGR2GRAY)
    faces = faceCascade.detectMultiScale(gray,
                                         scaleFactor=1.1,
                                         minNeighbors=5,
                                         minSize=(60, 60),
                                         flags=cv2.CASCADE_SCALE_IMAGE)
Next, we define some lists. The faces_list contains all the faces that are detected by the faceCascade model and the preds list is used to store the predictions made by the mask detector model.
faces_list=[]
preds=[]
Also since the faces variable contains the top-left corner coordinates, height and width of the rectangle encompassing the faces, we can use that to get a frame of the face and then preprocess that frame so that it can be fed into the model for prediction. The preprocessing steps are same that are followed when training the model in the second section. For example, the model is trained on RGB images so we convert the image into RGB here
    for (x, y, w, h) in faces:
        face_frame = frame[y:y+h,x:x+w]
        face_frame = cv2.cvtColor(face_frame, cv2.COLOR_BGR2RGB)
        face_frame = cv2.resize(face_frame, (224, 224))
        face_frame = img_to_array(face_frame)
        face_frame = np.expand_dims(face_frame, axis=0)
        face_frame =  preprocess_input(face_frame)
        faces_list.append(face_frame)
        if len(faces_list)>0:
            preds = model.predict(faces_list)
        for pred in preds:
        #mask contain probabily of wearing a mask and vice versa
            (mask, withoutMask) = pred
After getting the predictions, we draw a rectangle over the face and put a label according to the predictions.
label = "Mask" if mask > withoutMask else "No Mask"
        color = (0, 255, 0) if label == "Mask" else (0, 0, 255)
        label = "{}: {:.2f}%".format(label, max(mask, withoutMask) * 100)
        cv2.putText(frame, label, (x, y- 10),
                    cv2.FONT_HERSHEY_SIMPLEX, 0.45, color, 2)

        cv2.rectangle(frame, (x, y), (x + w, y + h),color, 2)
The rest of the steps are the same as the first section.
cv2.imshow('Video', frame)
    if cv2.waitKey(1) & 0xFF == ord('q'):
        break
video_capture.release()
cv2.destroyAllWindows()
Here is the complete code and output:
1 2 3 4 5 6 7 8 9 10 11 12 13 14 15 16 17 18 19 20 21 22 23 24 25 26 27 28 29 30 31 32 33 34 35 36 37 38 39 40 41 42 43 44 45 46 47 48 49 | import cv2import osfrom tensorflow.keras.preprocessing.image import img_to_arrayfrom tensorflow.keras.models import load_modelfrom tensorflow.keras.applications.mobilenet_v2 import preprocess_inputimport numpy as npcascPath = os.path.dirname( cv2.__file__) + "/data/haarcascade_frontalface_alt2.xml"faceCascade = cv2.CascadeClassifier(cascPath)model = load_model("mask_recog1.h5")video_capture = cv2.VideoCapture(0)while True: # Capture frame-by-frame ret, frame = video_capture.read() gray = cv2.cvtColor(frame, cv2.COLOR_BGR2GRAY) faces = faceCascade.detectMultiScale(gray, scaleFactor=1.1, minNeighbors=5, minSize=(60, 60), flags=cv2.CASCADE_SCALE_IMAGE) faces_list=[] preds=[] for (x, y, w, h) in faces: face_frame = frame[y:y+h,x:x+w] face_frame = cv2.cvtColor(face_frame, cv2.COLOR_BGR2RGB) face_frame = cv2.resize(face_frame, (224, 224)) face_frame = img_to_array(face_frame) face_frame = np.expand_dims(face_frame, axis=0) face_frame = preprocess_input(face_frame) faces_list.append(face_frame) if len(faces_list)>0: preds = model.predict(faces_list) for pred in preds: (mask, withoutMask) = pred label = "Mask" if mask > withoutMask else "No Mask" color = (0, 255, 0) if label == "Mask" else (0, 0, 255) label = "{}: {:.2f}%".format(label, max(mask, withoutMask) * 100) cv2.putText(frame, label, (x, y- 10), cv2.FONT_HERSHEY_SIMPLEX, 0.45, color, 2) cv2.rectangle(frame, (x, y), (x + w, y + h),color, 2) # Display the resulting frame cv2.imshow('Video', frame) if cv2.waitKey(1) & 0xFF == ord('q'): breakvideo_capture.release()cv2.destroyAllWindows() |
Output:
This brings us to the end of this article where we learned how to detect faces in real-time and also designed a model that can detect faces with masks. Using this model we were able to modify the face detector to mask detector.
Update: I trained another model which can classify images into wearing a mask, not wearing a mask and not properly wearing a mask. Here is a link of the Kaggle notebook of this model. You can modify it and also download the model from there and use it in instead of the model we trained in this article. Although this model is not as efficient as the model we trained here, it has an extra feature of detecting not properly worn masks.
If you are using this model you need to make some minor changes to the code. Replace the previous lines with these lines.
#Here are some minor changes in opencv code
for (box, pred) in zip(locs, preds):
        # unpack the bounding box and predictions
        (startX, startY, endX, endY) = box
        (mask, withoutMask,notproper) = pred

        # determine the class label and color we'll use to draw
        # the bounding box and text
        if (mask > withoutMask and mask>notproper):
            label = "Without Mask"
        elif ( withoutMask > notproper and withoutMask > mask):
            label = "Mask"
        else:
            label = "Wear Mask Properly"

        if label == "Mask":
            color = (0, 255, 0)
        elif label=="Without Mask":
            color = (0, 0, 255)
        else:
            color = (255, 140, 0)

        # include the probability in the label
        label = "{}: {:.2f}%".format(label,
                                     max(mask, withoutMask, notproper) * 100)

        # display the label and bounding box rectangle on the output
        # frame
        cv2.putText(frame, label, (startX, startY - 10),
                    cv2.FONT_HERSHEY_SIMPLEX, 0.45, color, 2)
        cv2.rectangle(frame, (startX, startY), (endX, endY), color, 2)
How to Get Started with Learning Real-time Face Detection & Face Mask Detection Using OpenCV?
If you’re interested in diving into real-time face detection and face mask detection using OpenCV, Great Learning offers specialized courses designed to help you gain hands-on experience with these critical AI technologies. OpenCV, a popular open-source computer vision library, is widely used for real-time image processing and AI applications, including face detection and facial recognition tasks.
Here’s how you can get started with learning these exciting AI technologies through Great Learning:
1. Explore Specialized AI Courses in Computer Vision:
Great Learning’s AI and Machine Learning courses include detailed modules on Computer Vision using OpenCV, where you’ll learn how to implement real-time face detection and face mask detection systems. These technologies are especially important in sectors like security, healthcare, and retail, and are gaining significant attention in today’s AI landscape.
2. Hands-On Projects with OpenCV:
Gain practical experience by working on projects that focus on real-time face detection and face mask detection. You’ll use OpenCV to build applications that can detect faces in images and videos, as well as identify whether individuals are wearing face masks. These projects will enhance your understanding of AI’s role in image processing and computer vision.
3. Get Personalized Mentorship:
With Great Learning’s AI courses, you’ll receive personalized guidance from dedicated Program Managers. They’ll support you throughout your learning process, ensuring that you gain the expertise needed to implement real-time face and mask detection systems successfully.
4. Earn Accredited Certifications:
Upon completion, you’ll receive an accredited certification that validates your skills in computer vision and AI, making you more attractive to potential employers. The certification will also demonstrate your proficiency in using OpenCV and developing real-time detection applications.
5. Learn from Experts:
Great Learning’s expert instructors, who bring the latest AI and computer vision trends to their teaching, will help you grasp complex concepts. Learn how to work with deep learning techniques, facial recognition models, and object detection frameworks within OpenCV.
By enrolling in Great Learning’s AI courses, you can quickly master the art of real-time face detection and face mask detection using OpenCV and gain valuable skills in computer vision that are in high demand across various industries. Start your AI learning journey today and open doors to exciting career opportunities in the world of artificial intelligence.
Conclusion
You can also upskill with Great Learning’s PGP Artificial Intelligence and Machine Learning Course. The course offers mentorship from industry leaders, and you will also have the opportunity to work on real-time industry-relevant projects.
Looking to upskill or explore a new field without breaking the bank? Our free online courses are the perfect solution. Dive into the exciting realms of Cybersecurity, Management, Cloud Computing, IT, and Software, Artificial intelligence and acquire the knowledge that can set you apart. Whether you’re a tech enthusiast, an aspiring entrepreneur, or simply curious about the digital landscape, our courses offer a flexible and accessible way to learn.